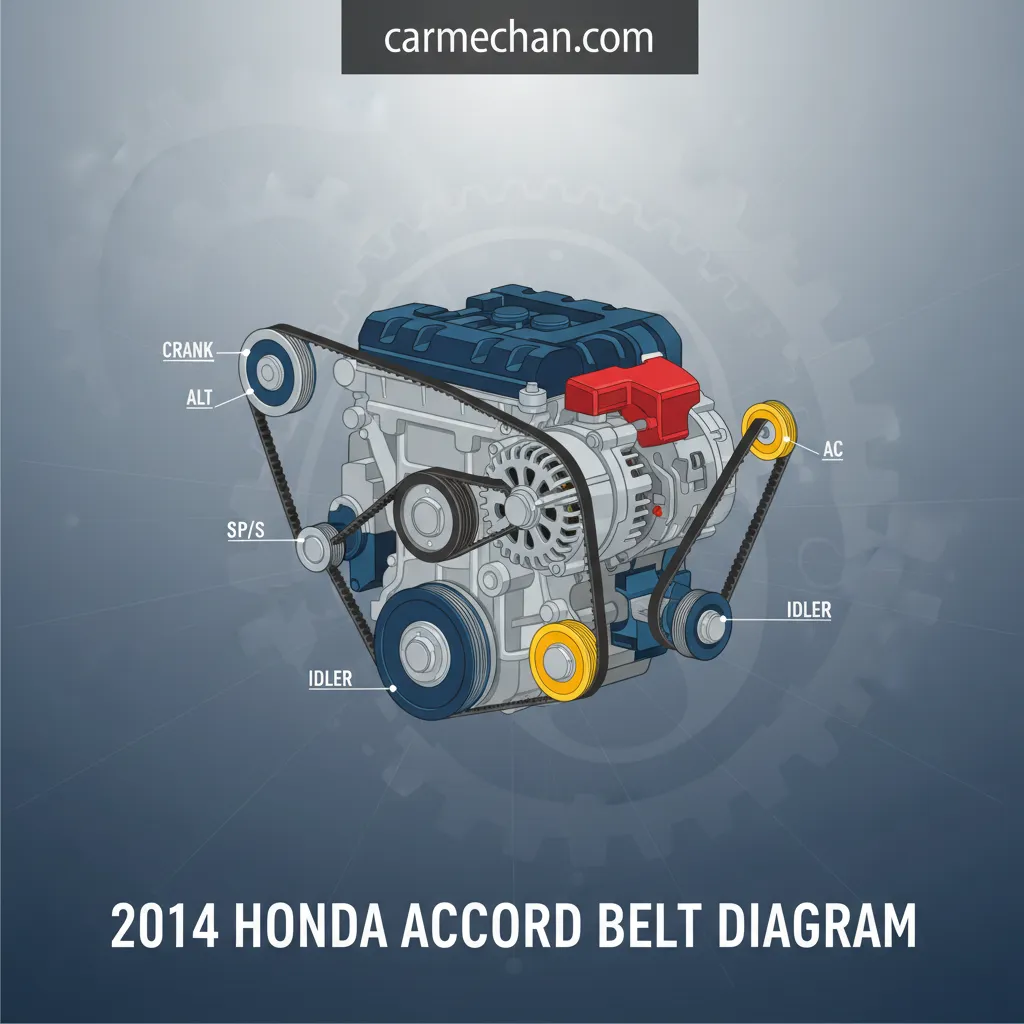
2014 Honda Accord Belt Diagram: Serpentine Belt Routing And Replacement Guide
For any 2014 Honda Accord owner, understanding the vehicle’s serpentine belt system is paramount for maintaining optimal performance and preventing unexpected breakdowns. Without a clear grasp of the components and their interplay, locating the precise belt diagram and executing a replacement can be a daunting task, potentially leading to incorrect routing, accelerated wear, or even component damage. This authoritative guide provides a detailed, professional content blueprint for comprehending, locating, interpreting, and correctly replacing the 2014 Honda Accord’s serpentine belt, ensuring your vehicle remains reliable and operates at its peak.

Understanding the 2014 Honda Accord Drive Belt System Configuration
Recommended Best Deal Products


📤 Share Image
The drive belt system, at the heart of your 2014 Honda Accord’s ancillary operations, is a meticulously engineered network designed for optimal power transmission. The serpentine belt is its primary component, a single, continuous loop responsible for transmitting rotational power from the engine’s crankshaft to various essential accessories. This elegant design simplifies maintenance compared to older multi-belt systems, but also means a single belt failure can disable multiple critical systems.
Core Function and Accessory Components
The serpentine belt’s primary function is to efficiently power the critical components that ensure your Accord’s comfortable and safe operation. These typically include:
- Alternator: Generates electrical power for the vehicle’s systems and recharges the battery.
- Air Conditioning (AC) Compressor: Pressurizes refrigerant for the climate control system.
- Power Steering Pump: (Applicable to hydraulic power steering systems, though many 2014 Accords utilize electric power steering, rendering this component absent on those specific trims/engines.)
- Water Pump: Circulates coolant throughout the engine to regulate temperature (on some configurations, it might be driven by the timing belt, but often the serpentine belt).
- Idler Pulleys: Guide the belt along its correct path and maintain proper contact with accessory pulleys.
- Automatic Belt Tensioner: A spring-loaded or hydraulically damped mechanism that maintains consistent tension on the belt, preventing slippage or excessive wear under varying engine loads and temperatures. This component is crucial for extending the lifespan of the belt and ensuring reliable accessory function.
The serpentine belt on a 2014 Honda Accord typically rotates at several thousand RPMs, demonstrating its high-stress operational environment. This continuous, high-speed operation underscores the need for a quality belt and a properly functioning tensioner.
Engine Configuration Differences: 2.4L i-VTEC vs. 3.5L i-VTEC V6
While the fundamental purpose remains the same, the accessory layouts and thus the belt routing can differ between the two primary engine configurations available in the 2014 Honda Accord:
- 2.4L i-VTEC 4-Cylinder: This engine typically features a more compact accessory drive. Most 4-cylinder Accords of this vintage employ Electric Power Steering (EPS), eliminating the need for a hydraulic power steering pump and simplifying the belt path.
- 3.5L i-VTEC V6: The V6 engine often has a different arrangement of accessories due to its larger size and differing component placements. While many V6 models also adopted EPS, some earlier configurations might still have a hydraulic power steering pump, adding another pulley to the belt path.
Understanding these distinctions is paramount when consulting a belt diagram, as using the incorrect diagram can lead to significant routing errors. The automatic belt tensioner plays a crucial role in both configurations, constantly adjusting to maintain optimal belt tension despite thermal expansion, contraction, and slight belt stretch over time.
Locating and Interpreting the Official 2014 Honda Accord Belt Diagram
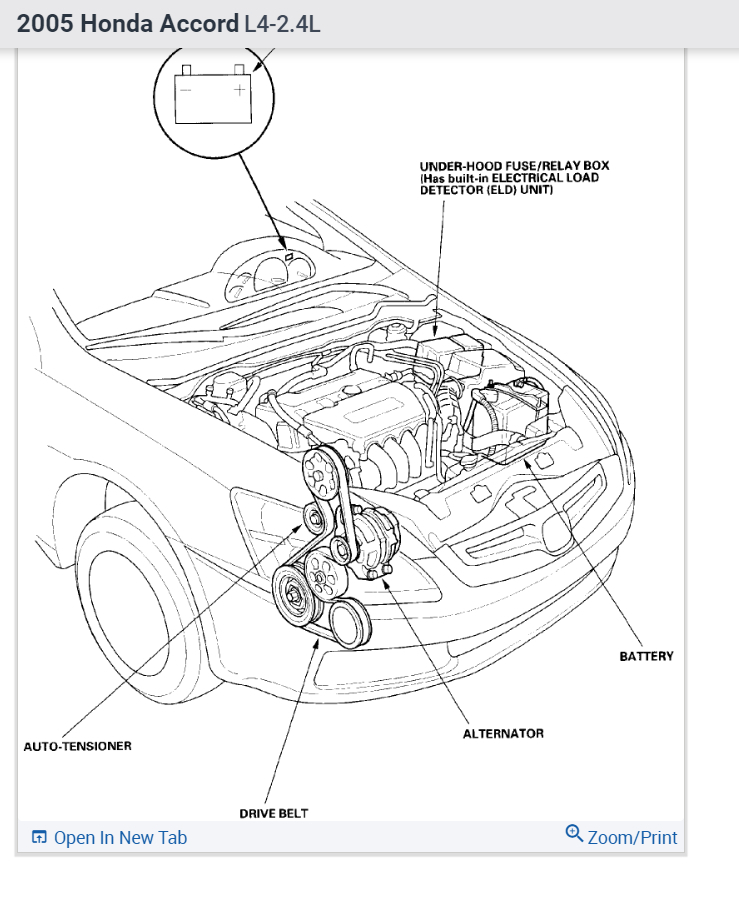
Before attempting any work on your vehicle’s serpentine belt, the absolute first step is to obtain and thoroughly understand the official belt diagram. Relying on memory or generic diagrams found online is a recipe for error. A professional approach demands consulting the most accurate information available for your specific 2014 Honda Accord.
Primary Sources for the Official Diagram
For a 2014 Honda Accord, there are several trusted and readily accessible locations where you can find the official belt routing diagram:
- Under the Hood Decal: The most common and convenient location. Honda engineers typically place a diagram decal on the underside of the hood, or sometimes on the radiator support or a fender. This decal is designed to be easily visible and often includes a simplified, clear representation of the belt path, along with a warning about specific engine types if applicable.
- Vehicle Owner’s Manual: Your vehicle’s owner’s manual contains a wealth of information, including maintenance procedures and diagrams. Consult the index for “drive belt,” “serpentine belt,” or “engine accessories.”
- Honda Factory Service Manual: This is the ultimate authoritative source. A genuine Honda factory service manual for the 2014 Accord will contain comprehensive diagrams for both 2.4L and 3.5L engines, often with multiple views and detailed instructions. Many automotive professionals rely exclusively on these manuals for their unparalleled accuracy.
- Trusted Automotive Repair Databases: Services like ALLDATA, Mitchell 1, or equivalent subscription-based platforms provide OEM-level repair information, including belt diagrams, and are used by virtually every expert repair shop.
Always verify the diagram’s applicability to your exact vehicle. Check the year, make, model, and crucially, the engine size (2.4L or 3.5L). A diagram for the wrong engine will lead to incorrect routing and potential damage.

Audible — Listen Free for 30 Days
One free credit a month and thousands of titles included.
Listen Free for 30 DaysInterpreting the Belt Diagram
Once you have the correct diagram, interpreting it is straightforward but requires attention to detail:
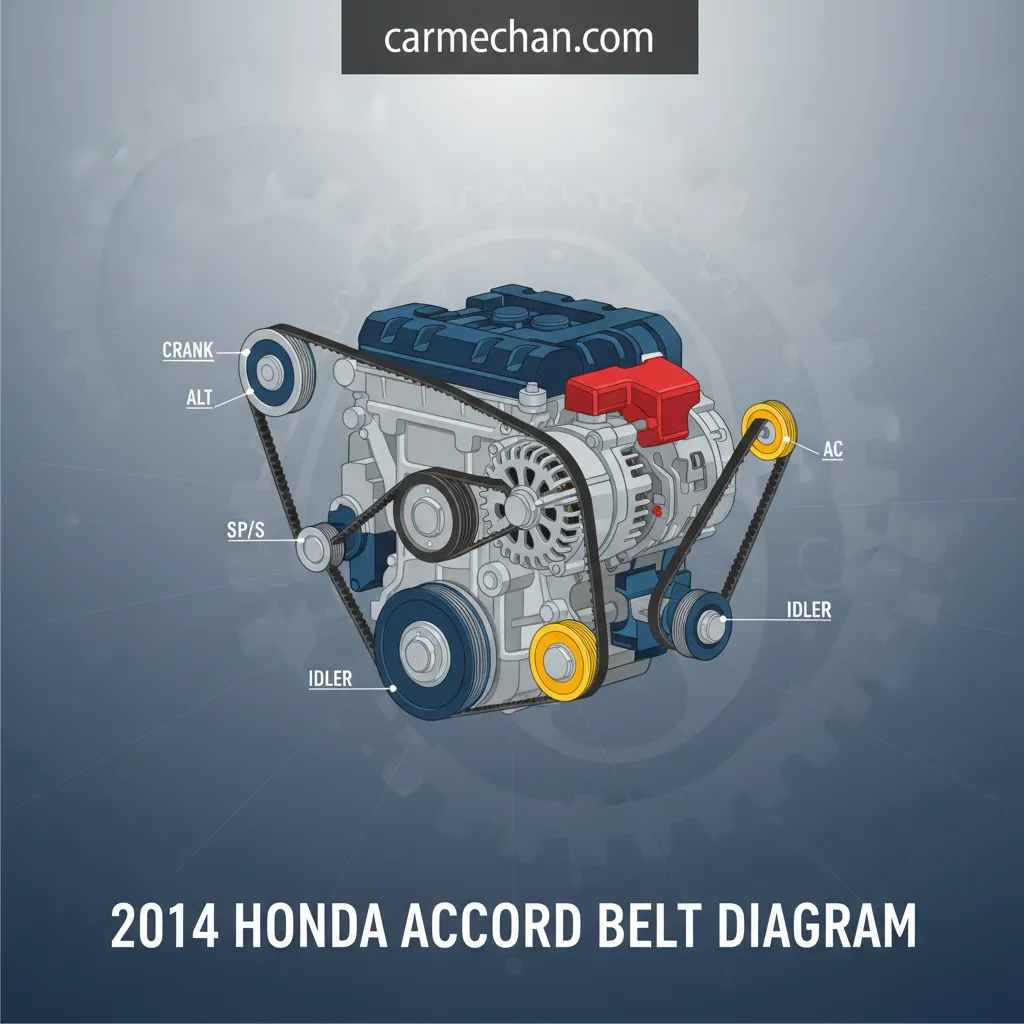
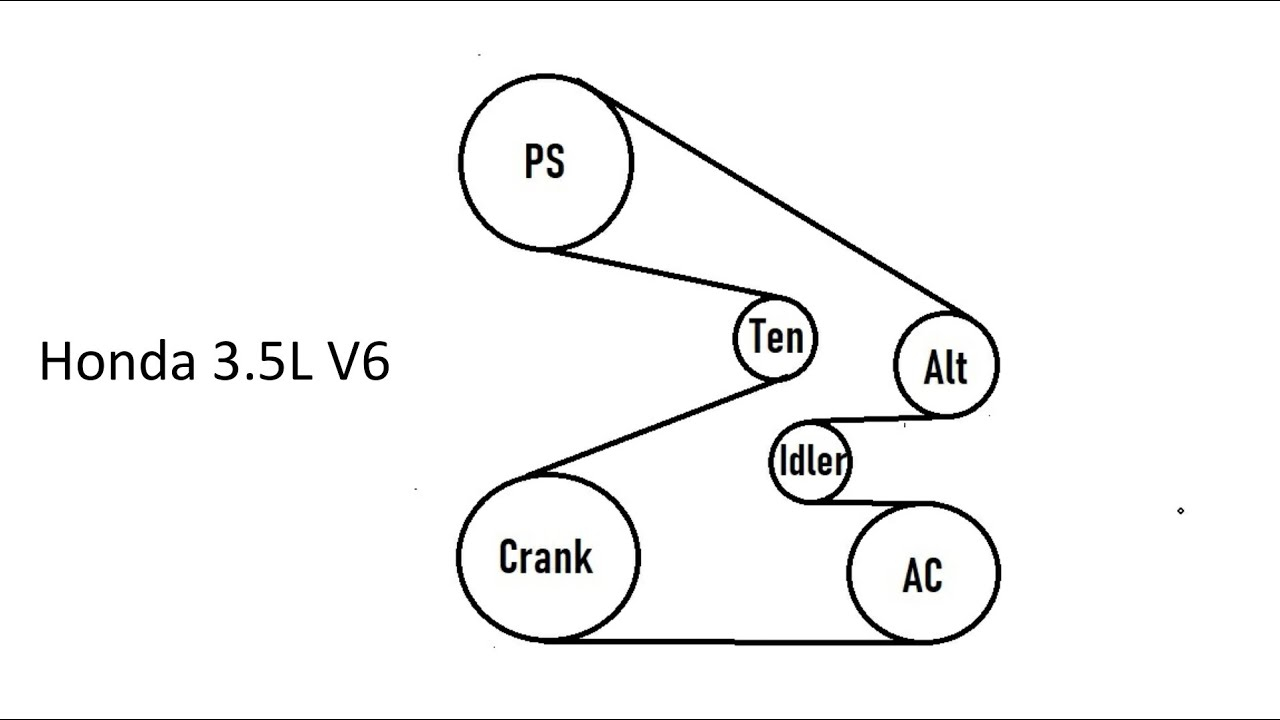
- Pulley Symbols: The diagram will typically use simple circles or shaded areas to represent pulleys. These will usually be labeled with abbreviations or icons for the component they drive:
- “CRK” or “CKP”: Crankshaft Pulley (the main drive pulley, usually the largest).
- “ALT” or “GEN”: Alternator.
- “AC” or “A/C”: Air Conditioning Compressor.
- “PS”: Power Steering Pump (if present).
- “WP”: Water Pump.
- “TENS” or “T”: Automatic Belt Tensioner.
- “IDLR” or “I”: Idler Pulley (a guide pulley, often smooth).
- Directional Arrows: Look for arrows indicating the direction of belt travel. This helps visualize the serpentine path.
- Numbered Routing Points: Some diagrams might number the pulleys or segments of the belt path, providing a sequential guide for installation.
According to automotive service professionals, misrouting a serpentine belt by even a single groove can lead to immediate belt damage or complete failure, underscoring the need for precision. Take a photograph of your existing belt routing before removal, even if you have the diagram, as a secondary reference.
Detailed Procedure for 2014 Honda Accord Serpentine Belt Removal
Recommended Best Deal Products
Removing the serpentine belt on your 2014 Honda Accord is a straightforward process when approached systematically and with proper safety precautions. This complete guide ensures you conduct the task safely and efficiently.
📋
Step-by-Step Guide: Serpentine Belt Removal
Before touching anything, ensure the engine is completely cool to prevent burns. Disconnect the negative terminal of your vehicle’s battery using a 10mm wrench to prevent accidental starting or electrical shorts. Always wear appropriate personal protective equipment (PPE), including safety glasses and mechanic’s gloves, throughout the process.
You’ll need a appropriately sized ratchet or breaker bar, typically 1/2-inch drive, with a 19mm socket or corresponding wrench for the tensioner bolt. For difficult-to-reach tensioners or those with limited clearance, a specialized serpentine belt tool (a long, thin wrench with various adapters) can be invaluable. Ensure your tools are in good condition to prevent slippage.
Identify the automatic belt tensioner. It will have a square drive hole or a bolt head that accepts your ratchet/breaker bar. Before proceeding, take a clear photo of the existing belt routing. This photographic record, combined with your official diagram, will be your reliable reference during installation. The average force required to release the tensioner on a 2014 Accord is approximately 60-80 ft-lbs, requiring a robust tool and steady hand.
Audible Premium Plus — Annual Membership
12 audiobook credits up front, plus the full Audible catalogue.
See Annual PlansAttach your ratchet or breaker bar to the tensioner’s pivot bolt or square drive. For most 2014 Honda Accord models, you will need to rotate the tensioner arm clockwise to relieve tension on the belt. Apply steady, controlled force. As the tension decreases, the belt will loosen. Maintain tension on the tool while you carefully slip the belt off one of the easier-to-access pulleys, such as an idler pulley or the alternator.
Once the belt is loose from one pulley, slowly release the tensioner. You can then fully remove the old belt from all other pulleys. Take this opportunity to inspect the old belt for signs of wear, such as cracking, fraying, glazing (shiny, smooth spots), or missing ribs. This inspection provides valuable insight into the overall health of your drive system and can indicate other potential issues. A quality replacement is key.
Never force the tensioner or allow the tool to slip, as this can cause injury or damage to the tensioner itself. If the tensioner is difficult to move, it may be seizing, indicating a need for replacement.
Precise Installation of the Serpentine Belt on a 2014 Honda Accord
Installing a new serpentine belt correctly is as critical as removing the old one. A meticulous approach ensures proper routing, optimal tension, and ultimately, reliable long-term performance. This professional guide walks you through each step.
📋
Step-by-Step Guide: Serpentine Belt Installation
Ensure your new belt matches the OEM specifications for your 2014 Honda Accord’s specific engine (2.4L or 3.5L V6). This includes correct length, width, and rib count. Opt for a professional-grade EPDM rubber belt, as these are engineered for superior durability, heat resistance, and quiet operation compared to older Neoprene belts. Using a trusted, quality replacement belt significantly reduces premature wear.
Refer meticulously to your official belt diagram and your reference photo. Start routing the new belt around the fixed pulleys first, typically beginning with the crankshaft pulley (the largest one at the bottom). Work your way around the accessories – alternator, AC compressor, water pump, idler pulleys – ensuring the belt sits snugly in each pulley’s grooves. Leave the tensioner pulley for last, as this is where you will leverage the tensioner to get the belt on.
Ensure the belt is correctly routed around all pulleys, especially any hidden ones like the water pump. A common error is missing a pulley, which will prevent the belt from fitting properly or lead to immediate failure.
With the belt routed around all fixed pulleys, re-attach your ratchet/breaker bar to the automatic belt tensioner. Apply steady, controlled pressure, rotating the tensioner arm clockwise (as per removal) to retract it. While holding the tensioner open, slip the new belt onto the final pulley. Slowly and smoothly release the tensioner, allowing it to apply the correct amount of tension to the belt. Ensure your fingers are clear of moving parts.
Once the belt is on, perform several critical checks:
- Visual Verification: Double-check every single pulley to ensure the belt is perfectly seated in all grooves. A misaligned belt will fail rapidly.
- Crankshaft Rotation: If possible, slowly rotate the crankshaft by hand (using a socket on the crankshaft bolt) for one or two full revolutions. This confirms the belt travels smoothly and seats correctly without binding.
- Battery Reconnection: Reconnect the negative battery terminal.
- Engine Start & Listen: Start the engine and let it idle for a minute. Listen carefully for any unusual noises – squealing, chirping, or grinding. These indicate a problem, such as incorrect routing, a slipping belt, or a failing pulley/tensioner. A properly installed serpentine belt on a 2014 Honda Accord should not exhibit more than 1/2 inch of deflection midway between pulleys when pressed, and should operate silently.
Turn off the engine and perform one last visual inspection. Confirm the belt is still perfectly aligned and the tensioner’s indicator (if present) is within its normal operating range. This final check ensures a complete and successful installation.
Common Serpentine Belt Issues and Proactive Maintenance for 2014 Accords
The serpentine belt and its associated components are wear items, and understanding their failure modes is key to preventing unexpected breakdowns. Proactive maintenance is paramount for ensuring your 2014 Honda Accord’s long-term reliability.
Recognizing Symptoms of Belt Wear or Failure
Pay close attention to these common indicators that your serpentine belt, or a related component, requires attention:
- Persistent Squealing: A high-pitched squeal, especially on cold startup, acceleration, or when turning the steering wheel (if hydraulic power steering is present), is the most common symptom of a slipping or worn belt. It can also indicate misaligned pulleys or a failing tensioner.
- Visible Damage: Conduct a visual inspection of the belt surface. Look for:
- Cracks: Small, superficial cracks are normal with age, but deep or widespread cracks are a sign of significant wear.
- Fraying: Loose fibers or material along the edges of the belt.
- Glazing: A shiny, hardened appearance on the belt’s ribbed surface, indicating loss of grip and potential slippage.
- Missing Ribs: Sections of the belt’s ribs that have torn off.
- Contamination: Oil, coolant, or power steering fluid on the belt surface will degrade the rubber and cause slippage.
- Accessory Malfunctions: If the belt is slipping or broken, you’ll notice corresponding issues with the driven components. The battery light might illuminate (alternator not charging), the AC might not blow cold (compressor not turning), or the engine might overheat (water pump not circulating coolant).
- Chirping Noises: A distinct chirping sound, often rhythmic, can indicate a misaligned pulley or a failing idler/tensioner pulley bearing. This is different from the continuous squeal of a slipping belt.
Diagnosis of Related Component Failures
Often, a failing belt is a symptom of a deeper issue. An expert diagnosis considers the entire drive system:
- Failing Belt Tensioner: Symptoms include excessive vibration of the tensioner arm, inconsistent belt tension (visible wobble), or grinding/rumbling noises from the tensioner pulley bearing. A failing tensioner cannot maintain proper belt tension, leading to slippage and premature belt wear.
- Worn Idler Pulleys: Listen for grinding, squealing, or rumbling noises from idler pulleys. You can often check for excessive play by wiggling the pulley by hand (with the engine off and belt removed).
- Failing Accessory Bearings: A loud whine or grind coming from the alternator, AC compressor, or water pump can indicate a failing bearing within that component, which can also contribute to belt wear or even cause the belt to shred.
By The Numbers
Miles for Serpentine Belt Lifespan
Miles for Visual Inspection
Proactive Maintenance Tips
Implementing a proactive maintenance regimen can significantly extend the life of your serpentine belt system:
- Regular Visual Inspections: Integrate a quick visual inspection of your serpentine belt into your routine. Check its condition every 10,000-15,000 miles or at every oil change. Use the ‘rib check’ method: carefully twist the belt to expose the ribbed underside and look for signs of cracking or missing material.
- Professional Evaluation: Schedule a more thorough professional evaluation of the entire drive belt system, including tensioner and idler pulleys, every 30,000 miles. A trusted mechanic can identify potential belt or pulley issues before they lead to a complete breakdown, often preventing costlier repairs.
- Fluid Leak Prevention: Address any fluid leaks (oil, coolant, power steering fluid) promptly. These fluids are highly damaging to rubber belts and can cause rapid degradation.
- High-Quality Replacement Parts: When replacing the belt, always opt for high-quality, OEM-equivalent components. A cheap belt might save money initially but will likely fail prematurely.
- System Component Replacement: Consider replacing the entire drive belt system components – belt, tensioner, and idler pulleys – at recommended intervals (typically around 90,000-100,000 miles). While the belt might look fine, the bearings in the tensioner and idlers can wear out, causing noise and eventual failure. This comprehensive approach ensures complete system integrity.
✅ Pros of Proactive Maintenance
- Prevents unexpected breakdowns.
- Extends the lifespan of the entire drive system.
- Ensures optimal performance of accessories (AC, alternator).
- Saves money by avoiding secondary damage and towing costs.
- Maintains vehicle resale value.
❌ Cons of Neglecting Maintenance
- Increased risk of roadside breakdowns.
- Potential for critical system failures (overheating, dead battery).
- Costlier emergency repairs.
- Accelerated wear on other components.
- Compromised vehicle safety and comfort.
Maintaining your 2014 Honda Accord’s serpentine belt system is a straightforward yet critical aspect of vehicle ownership. With the insights and procedures outlined in this expert guide, you are well-equipped to perform inspections and replacements with confidence.
In summary, accurate identification of your 2014 Honda Accord’s engine type is crucial for accessing the correct belt diagram. Adhering to a detailed, step-by-step process for both removal and installation, utilizing the official diagram, prevents common errors. Regular inspection and proactive maintenance of your serpentine belt and related components are vital for vehicle longevity and safety. Ensure your 2014 Honda Accord’s drive belt system operates flawlessly by conducting regular inspections and consulting this professional guide for any replacement needs. For complex issues or when in doubt, always seek a trusted, expert automotive technician.
Frequently Asked Questions
How often should the serpentine belt on a 2014 Honda Accord be replaced?
Generally, a serpentine belt should be inspected every 10,000-15,000 miles and replaced every 50,000 to 100,000 miles, or at the first signs of wear like cracking, fraying, or glazing. Consult your Honda owner’s manual for specific manufacturer recommendations, as driving conditions can influence wear and tear. A professional assessment can determine its true condition.
What are the key signs that my 2014 Accord’s serpentine belt needs replacement?
Primary indicators include a persistent squealing or chirping noise, especially during cold starts or acceleration, which often suggests slippage. Visual inspection may reveal cracks, fraying edges, glazing (a shiny, hardened appearance), or chunks of rubber missing from the belt. Any of these signs warrant prompt attention from a professional.
Can I replace the serpentine belt on my 2014 Honda Accord myself?
Yes, with the proper tools, the official belt diagram, and a good understanding of the procedure, a competent DIY enthusiast can replace the serpentine belt. However, ensuring correct routing and tension is critical. If you lack confidence or experience, engaging a professional mechanic is always the most reliable and safest approach to maintain quality.
Are there different belt diagrams for the 2.4L and 3.5L engines in the 2014 Honda Accord?
Yes, the 2014 Honda Accord with the 2.4L 4-cylinder engine and the 3.5L V6 engine have distinct serpentine belt diagrams due to differences in engine layout and accessory configurations. It is absolutely crucial to consult the correct diagram specific to your vehicle’s engine type to ensure proper routing and function. This is a common point of error.
What happens if the serpentine belt breaks while driving?
If the serpentine belt breaks, your 2014 Honda Accord will quickly lose power to critical accessories. This includes the alternator (leading to battery drain and eventual engine shutdown), power steering (making steering extremely difficult), and potentially the air conditioning and water pump (causing engine overheating). It’s a critical component for reliable operation.