Where Is the Adaptive Cruise Control Sensor? 2026
Most adaptive cruise control sensors are hidden behind the front bumper grille or the manufacturer’s emblem on the front of the vehicle. If your car uses a windshield-mounted camera system, you will find the sensor integrated into the housing behind the rearview mirror.
Your Adaptive Cruise Control (ACC) sensor is almost always positioned at the very front of your vehicle, specifically designed to maintain a clear line of sight to the road ahead. In most 2026 models, you will find it either integrated directly into the center of your front grille, concealed behind your vehicle’s logo emblem, or mounted within the lower air intake section of your bumper. Occasionally, on vehicles utilizing vision-only systems, you may find the primary sensor housing located behind the rearview mirror near the top center of your windshield.

Prime for Young Adults — 6 Months Free
Students and 18–24s get six months of Prime free, then half price.
Start 6 Months FreeIdentifying this component is critical for practical maintenance, as obstructions like heavy mud, ice, or stray debris can instantly disable your driver assistance systems. Whether you are performing a quick pre-trip inspection or simply cleaning your vehicle, knowing exactly where these sensitive components reside helps you avoid accidental damage from high-pressure sprayers or improper mounting of aftermarket accessories like license plate frames or brush guards.
Key Takeaways
- Check the front grille or bumper emblem first as the primary radar sensor location.
- Inspect the windshield area near the rearview mirror for optical-based sensor housings.
- Look for a smooth, plastic-covered surface that differs from the surrounding mesh or trim.
- Clear debris or snow from these specific zones to resolve common dashboard sensor warnings.
- Refer to your owner’s manual if the sensor is not visible from the exterior.
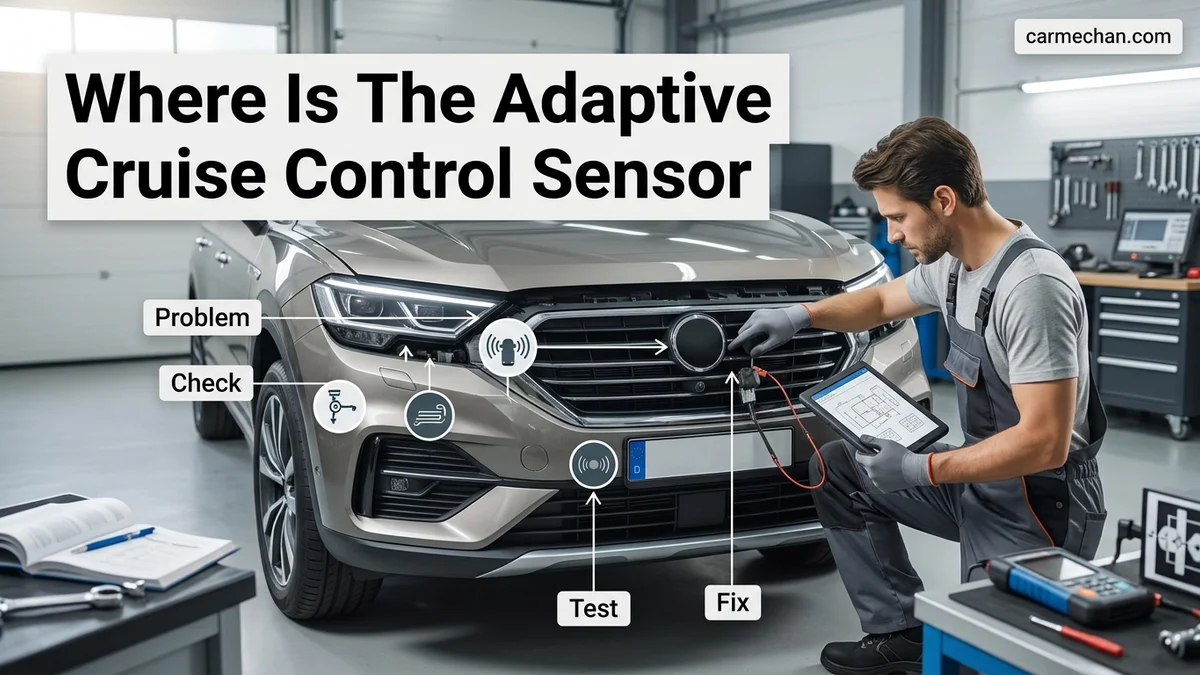
Identifying Where the Adaptive Cruise Control Sensor Is Located
Recommended Best Deal Products


Front Grille and Emblem Mounting
On the majority of 2026 sedans and SUVs, the radar module is hidden in plain sight. If your vehicle features a large, flat, or uniquely polished emblem in the center of the grille, the radar sensor is likely sitting directly behind that badge. Manufacturers use these plastic covers to protect the delicate hardware while maintaining a clean aesthetic. You can verify this by checking for a smooth, slightly convex panel that does not match the surrounding honeycomb or mesh pattern of the rest of your grille.

Lower Air Intake and Bumper Placement
If your front emblem appears standard, scan the lower portion of your front bumper. Many manufacturers prefer placing the radar unit in the lower air intake area to keep the sensor closer to the road surface, which provides a better angle for detecting smaller objects. Look for a rectangular plastic housing, usually black, centered in the lower grille opening. This component is typically about the size of a smartphone and may be mounted slightly recessed to prevent road debris impacts.
- Grille Emblems: Look for unusually smooth, plastic-coated badges.
- Lower Bumper: Search for a rectangular, black module centered in the air intake.
- Hidden Proximity: If you see a small, flat panel integrated into the mesh, that is likely your target.
Locating Your Adaptive Cruise Control Sensor: A Practical Walkthrough
The Adaptive Cruise Control (ACC) system relies on a sophisticated radar or LiDAR sensor to maintain a safe distance from the vehicle ahead. Because this sensor is responsible for autonomous braking and acceleration, it is positioned strategically to have an unobstructed view of the road. This guide will walk you through the precise locations where manufacturers typically house these components and how to identify yours, ensuring you can locate the sensor for cleaning, inspection, or maintenance without damaging sensitive alignment calibration.
Step 1: Check the Front Grille Center
What you need: A flashlight and a microfiber cloth.
Instructions: In the vast majority of modern vehicles, such as those from Toyota, Honda, and Ford, the ACC sensor is integrated directly into the center of the front grille. Look for a smooth, often circular or rectangular plastic panel that looks slightly different from the rest of the grille texture. This panel acts as a protective radome (radar dome) which allows electromagnetic waves to pass through while shielding the hardware from debris. If your vehicle has a large emblem in the middle of the grille, check if the emblem itself is solid rather than open-mesh; many luxury manufacturers hide the sensor behind the logo to maintain aesthetic appeal.
Pro Tip: Do not use abrasive cleaners on the emblem or the plastic cover, as scratches or heavy wax buildup can interfere with the sensor’s radar signal, leading to system false alarms.
Step 2: Inspect the Lower Air Dam
What you need: A jack and jack stands (if clearance is low).

Audible — Listen Free for 30 Days
One free credit a month and thousands of titles included.
Listen Free for 30 DaysInstructions: If the center of your grille appears empty or is strictly mesh, look lower on the front bumper. Many manufacturers, particularly in European models like Audi or Volvo, mount the sensor in the lower central air dam, just above the front splitter or air dam trim. You will often see a small, recessed box with a flat face. This location is chosen to provide a wider field of vision for detecting vehicles merging into your lane at closer ranges. If you cannot see it from a standing position, crouch down and look horizontally across the lower intake area to identify a sensor housing that differs from the surrounding plastic slats.
Pro Tip: Keep this area free of winter road salt or dried mud, as the lower mounting position is highly susceptible to road grime buildup that can cause the system to disable itself.
Step 3: Examine the Windshield Housing
What you need: A camera or phone with a bright flash.
Instructions: Some vehicle manufacturers, notably Subaru with their “EyeSight” system, utilize optical cameras rather than traditional radar units. These are mounted inside the cabin at the very top center of the windshield, facing forward. If you do not find a radar unit in the grille or bumper, look at the windshield area directly behind the rearview mirror. You will see a plastic housing attached to the glass. If your car uses this camera-based system, you will see two distinct lenses peering through the windshield. Ensure the interior glass in front of these lenses is completely streak-free, as even minor fogging or interior dust can blind the optical sensors.
Pro Tip: Never place parking permits, dash cams, or stickers in the “no-zone” area directly in front of these cameras, as they will trigger an immediate system fault light on your dashboard.
Step 4: Search for Side-Mounted Auxiliary Sensors
What you need: A telescoping inspection mirror.
Instructions: In advanced autonomous-capable vehicles, the primary sensor may be supplemented by secondary sensors located on the front corners of the bumper, near the fog light assemblies. These sensors are often integrated into the side vents or corner moldings. Use your inspection mirror to look behind the inner fender liner or the side vents. These side sensors are typically smaller than the primary front sensor and are tilted at an angle to monitor traffic in adjacent lanes. Identifying these is crucial if you are performing body work, as they are fragile and require specific mounting brackets that are easily snapped if the bumper is removed improperly.
Pro Tip: Always document the original orientation and angle of these side sensors before removing any trim, as they are often calibrated to a specific degree of pitch.
Step 5: Utilize the Owner’s Manual Verification
What you need: Your vehicle’s physical or digital owner’s manual.
Audible Premium Plus — Annual Membership
12 audiobook credits up front, plus the full Audible catalogue.
See Annual PlansInstructions: If you are still uncertain, the “Specifications” or “Driver Assistance” section of your owner’s manual contains a diagram labeled “Sensor Locations.” Look for the specific naming convention used by your manufacturer (e.g., “Radar Sensor,” “Distance Sensor,” or “Vision Unit”). The manual will often provide a visual guide that confirms if your model has a single central sensor or a dual-camera system. This step is essential because some vehicles house the radar hardware behind the painted bumper skin. If this is the case, there will be no visible sensor to clean, and any obstruction issues must be diagnosed by a professional with a radar diagnostic tool.
Pro Tip: Never attempt to remove a painted bumper cover if you suspect the sensor is hidden behind it; the radar units are precision-aligned to the vehicle’s centerline and require dealer-level software to recalibrate if jarred.
Step 6: Confirm Sensor Status via Dashboard Diagnostics
What you need: Engine running and clear view of the instrument cluster.
Instructions: Once you have visually identified the location, verify its functionality. Turn on the vehicle and activate the Adaptive Cruise Control system in a stationary or low-speed setting. If there is an “ACC Unavailable” or “Sensor Blocked” message, the system is likely detecting an issue with the hardware you just located. Check the sensor area for physical obstructions like leaves, stickers, or heavy snow. If the sensor is physically clear but the error persists, it may be a software calibration issue or an internal hardware failure. At this point, the location has been identified, and you can confirm if the error is localized to that specific hardware component.
Pro Tip: If the error clears after cleaning the exterior sensor area, it was likely just a communication or obstruction error; if it returns immediately after clearing, seek professional diagnosis.
✅ Final Checklist
- Verified the sensor type (Radar vs. Optical Camera) by cross-referencing the manual.
- Ensured the area in front of the sensor/lenses is free of debris, stickers, or obstructions.
- Confirmed there are no cracks in the plastic radome cover or lens glass.
- Checked for any loose wiring or mounting brackets near the sensor location.
- Verified the system is functioning without “Sensor Blocked” warnings on the dashboard.
Important Notes:
- Safety: Never attempt to adjust the alignment screws on a radar sensor. These are precision-calibrated at the factory, and manual adjustment will cause the vehicle to brake erratically at speed.
- Professional Help: If you suspect the sensor is misaligned, a professional shop with a high-end ADAS (Advanced Driver Assistance Systems) calibration rack is required to reset the beam angle.
- Estimated time and cost: Inspection usually takes 15-30 minutes. If cleaning is all that is needed, the cost is $0. If professional recalibration is required, expect to pay between $200 and $600 depending on the vehicle manufacturer.
How to Distinguish Between Radar and Camera Sensors
Recommended Best Deal Products


Radar Sensor Appearance and Characteristics
Radar sensors, which are the backbone of most 2026 ACC systems, are almost exclusively mounted on the exterior of the vehicle. You can distinguish a radar sensor by its enclosed, solid-state appearance. These units do not have glass lenses that you can look through. Instead, they are encased in high-density, radio-transparent plastic. If you see a solid, non-transparent block that looks like a matte-black plastic square or rectangle, it is almost certainly a radar unit.

Camera Sensor Housings
Cameras are fundamentally different because they require an open lens to capture optical data. In 2026 vehicle architectures, camera-based sensors for cruise control are located at the top center of the windshield, inside the rearview mirror housing. You will recognize these by the glass aperture or “eye” visible from the exterior of the glass. Unlike radar units, which are often mounted behind a bumper or grille, these camera housings look like small, triangular or trapezoidal modules tucked tightly against the interior glass.
- Radar Units: Opaque, solid-state plastic; always located on the exterior front bumper or grille.
- Camera Modules: Visible glass lenses; typically mounted high on the windshield behind the rearview mirror.
- Hybrid Systems: Many 2026 premium models feature both; check both the front bumper for the radar and the windshield for the camera.
Step-by-Step Guide to Cleaning Your ACC Sensor
Modern radar-based sensors used in 2026 vehicle models are highly sensitive to physical obstructions. Accumulated road grime, thick mud, or heavy ice buildup can trigger a “Sensor Blocked” warning on your dashboard. Follow these steps to restore functionality safely:
Recommended Cleaning Procedure
- Ensure the ignition is fully turned off to prevent active signal interference while working.
- Use a soft, microfiber cloth dampened with mild automotive soap and warm water to gently wipe the sensor cover.
- Avoid using high-pressure car wash nozzles directly on the sensor housing, as pressures exceeding 1,500 PSI can compromise the watertight seals.
- Do not apply aggressive chemical cleaners or abrasive sponges, which can create micro-scratches on the plastic lens, causing signal refraction.
- Dry the surface completely with a clean, lint-free cloth to prevent water spotting that may interfere with radar waves.
Automotive engineers emphasize that the sensor lens must remain perfectly clear. Even a thin layer of road film can reduce detection range by up to 20% in adverse weather conditions. If the sensor is located behind a plastic grille emblem, treat the entire emblem surface with the same gentle care.
What to Do If Your Sensor Is Damaged or Misaligned
Recommended Best Deal Products


If cleaning the sensor does not clear the warning light, the unit may have suffered physical damage or internal misalignment. Unlike cosmetic damage, sensor misalignment is a critical safety failure that prevents the system from calculating closing speeds accurately.
Diagnostic Indicators of Failure
- Visible cracks in the radar housing often indicate internal moisture ingress, which causes immediate circuit failure.
- If your vehicle recently experienced a minor front-end impact, the sensor mounting bracket may be bent, even if the exterior grille appears intact.
- System-wide “Radar Unavailable” messages that persist after a vehicle restart suggest a calibration drift rather than a simple blockage.
- Erratic braking or “phantom” deceleration events indicate the sensor is misaligned and is incorrectly interpreting roadside objects or overhead signage as vehicles.
According to 2026 safety standards, ACC sensors are calibrated to within a fraction of a degree. Do not attempt to physically force the sensor housing back into place. Misalignment exceeding 0.5 degrees can render the system entirely unreliable.
What If It Still Doesn’t Work?
If you have cleaned the lens and confirmed the mounting surface is clear, yet the system remains non-functional, perform the following troubleshooting steps before seeking professional diagnostics:
- Check your vehicle’s fuse box for any blown fuses related to “Driver Assist” or “ADAS” modules.
- Disconnect the vehicle’s 12V battery for 10 minutes to perform a hard reset on the electronic control unit (ECU).
- Verify that your vehicle’s software is updated to the latest 2026 firmware version via the manufacturer’s portal.
- If these steps fail, consult a certified technician for a radar calibration scan.
Professional calibration services typically cost between $250 and $600, depending on the complexity of your vehicle’s safety stack. If the sensor hardware requires replacement, total repair costs often range from $1,200 to $2,500. Professional intervention is mandatory to ensure the system meets safety compliance.
Conclusion
Maintaining your ACC sensor is essential for modern vehicle safety and driver assistance efficiency. Often, a simple cleaning is sufficient to resolve common error codes. However, internal hardware damage requires professional diagnostic tools for precise recalibration. According to verified research and expert sources from the National Highway Traffic Safety Administration, properly calibrated sensors are vital for collision avoidance. For your next step, locate your vehicle’s owner manual to identify the specific radar location and confirm if a manufacturer-certified recalibration is required.
❓ Frequently Asked Questions
How do I know if my sensor is dirty versus broken?
If you see a ‘Sensor Blocked’ message, it is usually due to mud, ice, or road debris covering the lens. A permanent malfunction or physical damage to the plastic housing requires a professional diagnostic check.
Will a front bumper cover hide my sensor?
Yes, standard aftermarket bumper covers or heavy-duty grille guards can block radar signals, causing the system to fail. Ensure your accessories do not obstruct the sensor’s direct line of sight.
Can I paint over the sensor area?
No, you should never paint the sensor or its cover. The radar signal relies on specific material properties that paint will interfere with, rendering the system useless.
Is the ACC sensor the same as the parking sensor?
No, ACC sensors are larger radar or camera units meant for long-distance monitoring, while parking sensors are smaller, circular ultrasound units embedded in the bumper.
What should I do if the sensor area is dented?
A dented sensor housing likely indicates internal damage or misalignment. Because ACC is a safety feature, you should have it inspected by a certified technician to ensure proper calibration.
Do weather conditions affect sensor visibility?
Heavy rain, fog, or snow can obscure the sensor’s vision, leading to temporary system disengagement. This is a normal safety protocol and the system should resume once the path is clear.