Ford Adaptive Cruise Control Sensor Location 2026
The adaptive cruise control sensor is typically mounted within the lower front bumper grille on most Ford vehicles. This radar module acts as the ‘eye’ for your cruise control system and requires a clear line of sight to function properly.


On almost all 2026 Ford models, the Adaptive Cruise Control (ACC) radar sensor is physically mounted behind the front bumper, usually positioned low in the center of the lower grille or tucked directly behind the large Ford emblem on the grille. If you are struggling with a sensor blockage message or a system fault, the physical location is the first place you need to inspect for mud, ice, or debris buildup that prevents the radar signal from transmitting correctly.
Knowing exactly where this module sits is vital for routine maintenance and diagnostic troubleshooting. Because the 2026 lineup relies on high-frequency radar to gauge distance from the vehicle ahead, this sensor serves as the “eyes” of your Ford Co-Pilot360 suite. A small piece of road debris or a thick layer of wet snow covering this specific area will immediately trigger a system warning on your digital instrument cluster, disabling the cruise functionality until the obstruction is cleared.
Key Takeaways
- Check the front lower grille area for a flat, plastic, rectangular or circular module.
- Ensure the sensor cover is free from mud, snow, or ice for reliable performance.
- Avoid mounting license plates or aftermarket accessories directly in front of the sensor.
- Consult your owner’s manual if the radar sensor is integrated behind the Ford emblem.
- Never attempt to adjust the alignment screws yourself as this requires specialized calibration equipment.
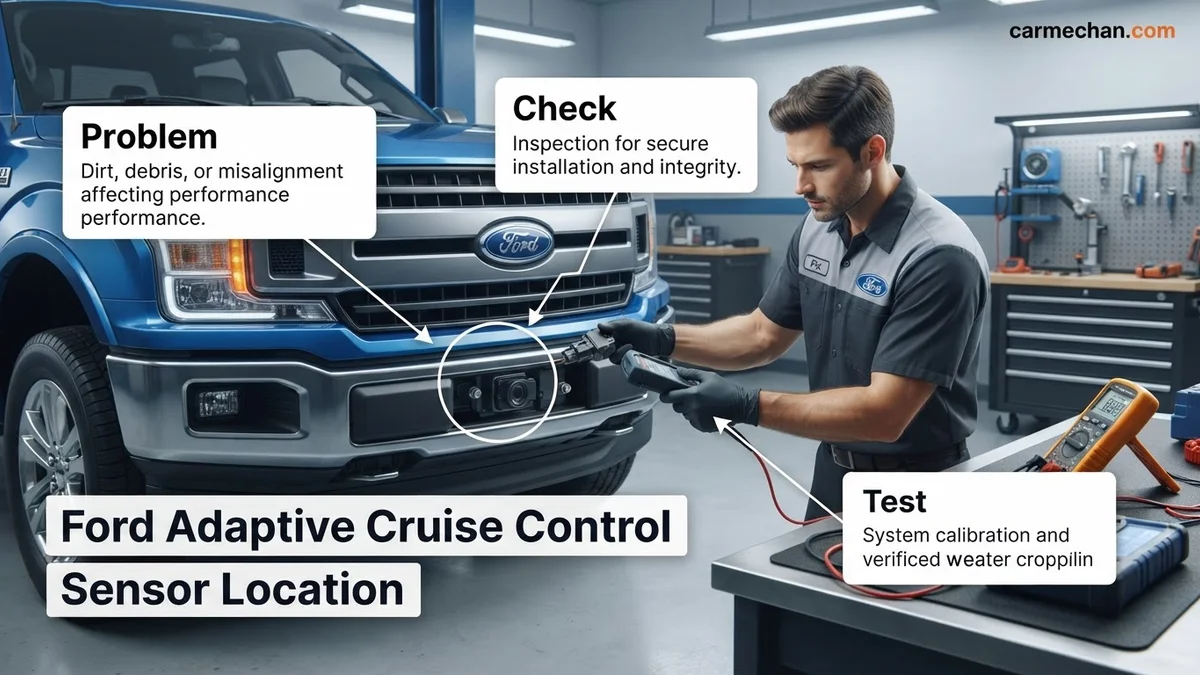
Identifying Your Ford Adaptive Cruise Control Sensor Location
Primary Placement in Modern Ford Trucks and SUVs
For the 2026 F-Series, Expedition, and Explorer platforms, the radar module is almost exclusively housed in the lower intake section of the front bumper. You will typically see a rectangular, smooth plastic panel—often black or body-colored—integrated into the plastic mesh of the lower grille. Unlike the main radiator grille, this sensor housing is designed to be relatively flat to minimize signal refraction.
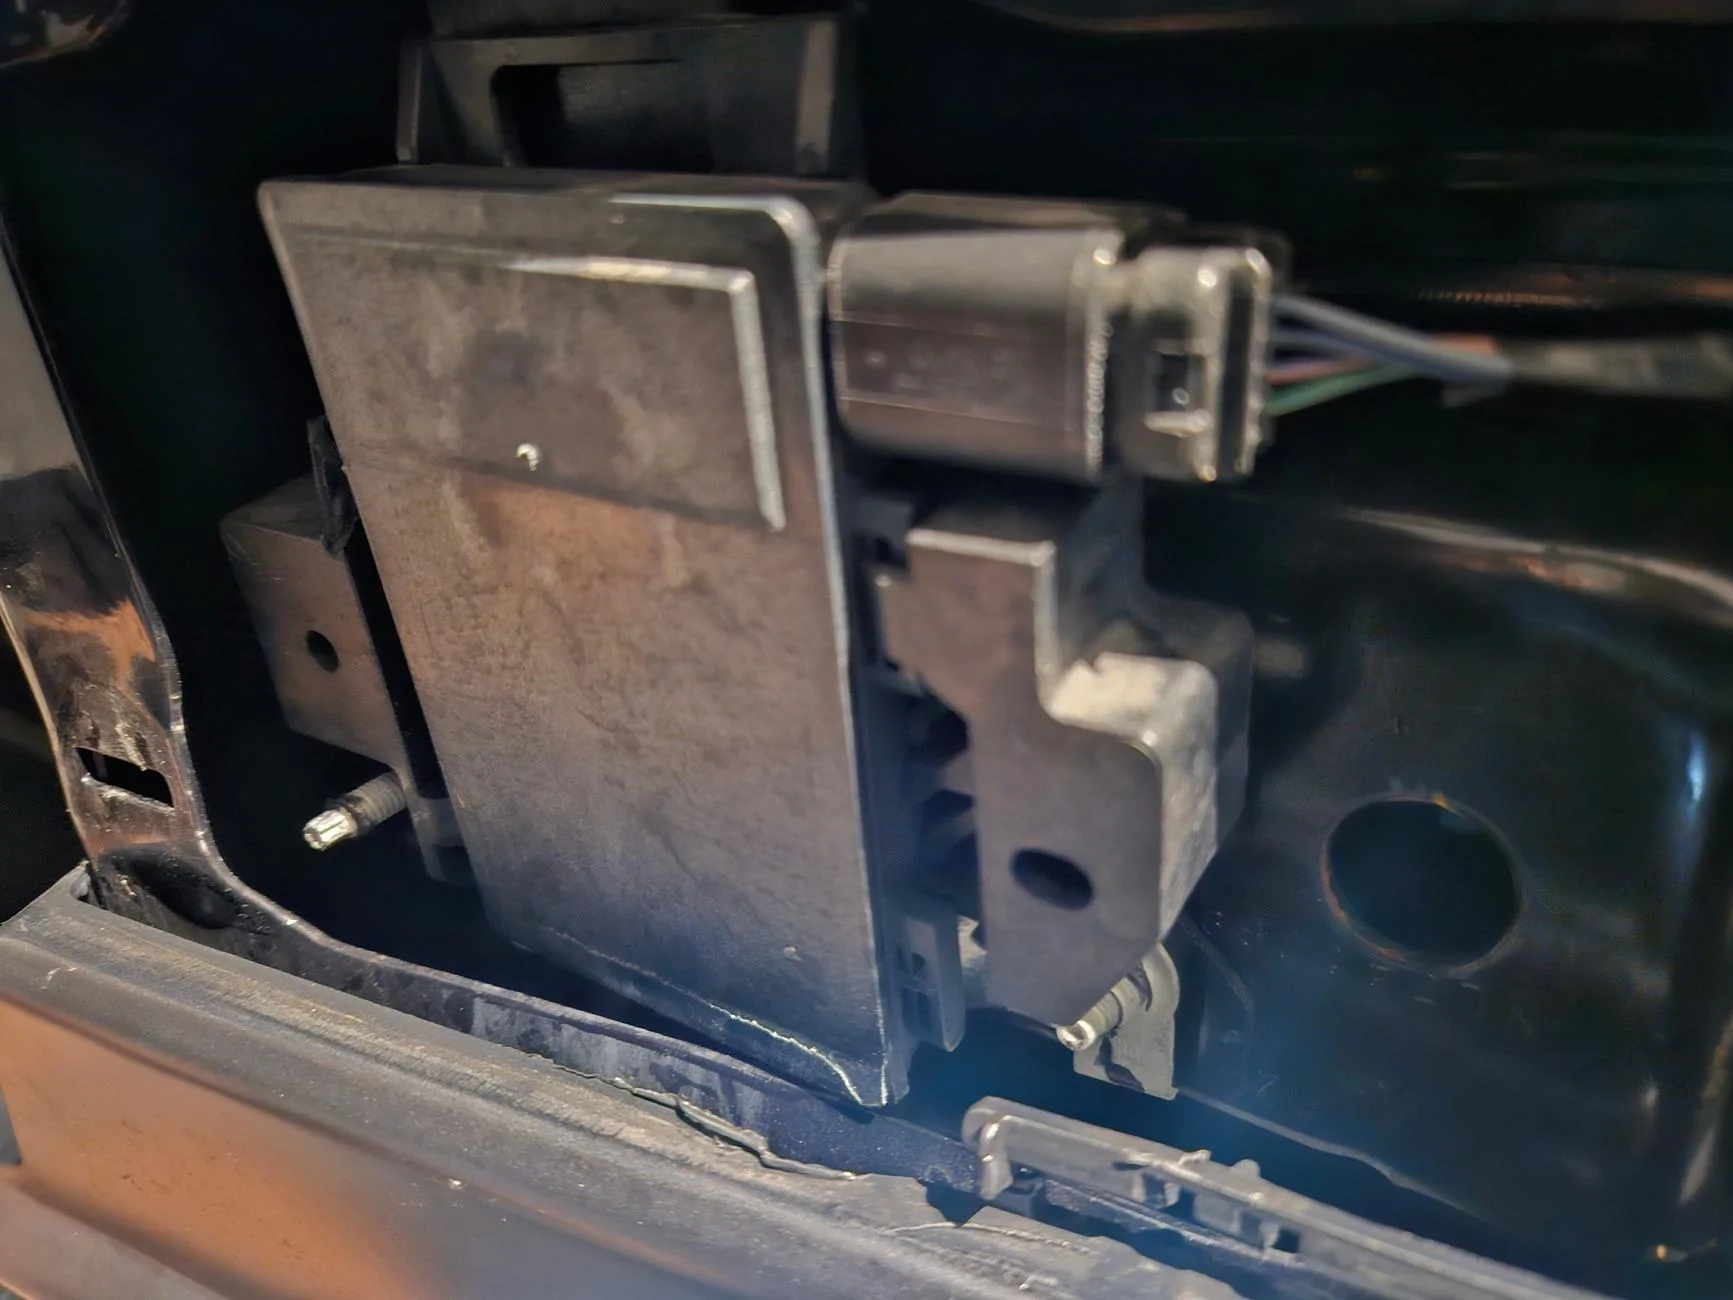
- F-150 and Super Duty: Look for the module centered between the two front tow hooks in the lower valance.
- Expedition and Explorer: The sensor is usually nestled in the center of the lower air dam, below the license plate bracket.
- Edge and Escape: Often positioned in a dedicated rectangular housing in the center of the lower bumper fascia.
Variations for Sedans and Performance Models
Ford’s 2026 passenger car platforms and performance models often utilize a more discreet placement to maintain aerodynamic styling. On these vehicles, look for a large, solid-faced Ford emblem on the front grille. The sensor is frequently mounted directly behind this emblem. The emblem itself is made of a specific radar-transparent material that allows the signal to pass through without interference. If your vehicle features this design, check the face of the emblem for road grime or thick ice, as even minor buildup here can degrade system performance.
Ford Adaptive Cruise Control Sensor Location: From Start to Finish Explained
Locating the radar sensor for your Ford’s Adaptive Cruise Control (ACC) system is a fundamental task for any owner looking to perform maintenance, resolve sensor obstructions, or prepare for a professional alignment. Often hidden behind front-end trim or nestled within the lower grille, this sensitive piece of hardware is the “eye” of your vehicle’s safety features. Following this guide ensures you can safely identify, access, and inspect your sensor without damaging the delicate mounting clips or the radar housing itself.
Step 1: Identifying the Sensor Zone
What you need: A flashlight and a microfiber cloth.
Instructions: Start by performing a visual inspection of the front bumper area while the vehicle is on a flat surface. In the vast majority of modern Ford models, such as the F-150, Explorer, or Escape, the radar sensor is situated in the front center of the vehicle. Look for a rectangular plastic panel, typically located just below the front grille or integrated into the lower air dam. It often has a smooth, slightly different texture than the surrounding plastic. Use your flashlight to peer through the grille slats if the sensor is not immediately visible, as it may be mounted behind a cosmetic cover designed to keep the unit hidden from plain sight.
Pro Tip: If your vehicle has a “Ford” emblem that appears unusually solid or flat, check behind it; some models integrate the radar sensor directly behind the front grille badge.
Step 2: Preparing for Safe Access
What you need: A flat surface and your vehicle’s ignition key.
Instructions: Before you attempt to interact with the bumper or grille area, ensure the vehicle is turned completely off. Engage the electronic parking brake to prevent any accidental rolling. While it is rarely necessary to disconnect the battery just to locate the sensor, it is critical to ensure that your Adaptive Cruise Control system is not actively attempting to self-calibrate or scan. Walk around to the front of the vehicle and clear away any debris, snow, or mud that might be obscuring the sensor’s housing. This allows you a clear line of sight to confirm the exact mounting point before attempting to remove any trim panels.
Pro Tip: Never press hard on the plastic cover over the sensor; these sensors are precision-calibrated and can be misaligned by even minor physical force.
Step 3: Removing Obstructions and Trim
What you need: Plastic pry tools and a T20 Torx screwdriver.
Instructions: Once the location is pinpointed, you may need to remove a trim piece to get a better look at the wiring harness or mounting brackets. Locate the plastic fasteners holding the lower grille or the specific sensor bezel in place. Use a dedicated plastic pry tool—avoid metal screwdrivers to prevent scratching the paint—and gently lever the fasteners out. If the sensor is mounted to a secondary support bracket, you might see small Torx screws. Carefully loosen these if visibility is poor, but do not remove them entirely. You are simply creating a window to view the sensor’s status and its connection to the vehicle’s electrical system.
Pro Tip: Always work in a warm environment if possible, as plastic clips become brittle in cold weather and are prone to snapping during removal.
Step 4: Inspecting the Radar Housing
What you need: A clean cloth and a flashlight.
Instructions: Now that you have visual access, examine the physical radar unit. You are looking for a box-like device, usually black or dark gray, with a large wiring harness plugged into the rear or side. Check the face of the sensor for any signs of physical impact, such as spider-web cracks in the plastic or deep gouges from road debris. Even small impacts can shatter the internal circuitry of the radar unit. Ensure that the sensor is mounted level; if it appears tilted at an angle, it may have suffered a collision or impact that shifted the mounting bracket, which will cause persistent ACC error codes.


Pro Tip: Check the wiring harness connection to ensure the lock tab is fully engaged; vibration can sometimes cause the plug to loosen slightly.
Step 5: Clearing the “Eye” of the System
What you need: Mild soap, water, and a microfiber towel.
Instructions: Many times, the sensor is perfectly functional but is failing due to surface interference. If you find your sensor, use a damp cloth to gently clean the lens surface. Do not use abrasive cleaners or harsh chemicals, as these can strip the radar-transparent coating off the housing. If you see a heavy buildup of wax or road tar, use a dedicated automotive bug and tar remover on a soft cloth, then rinse thoroughly with water. Ensure the area around the sensor is also clean, as excessive grime can sometimes disrupt the radar’s ability to maintain a clear beam width for the Adaptive Cruise Control system.
Pro Tip: Do not use high-pressure power washers directly on the sensor, as water can force its way past the seals and cause internal corrosion.
Step 6: Confirming Calibration Readiness
What you need: An OBD-II diagnostic scanner (optional).
Instructions: After inspecting the location and ensuring the area is clean, perform a final check. Ensure that no aftermarket accessories, such as a brush guard, license plate bracket, or light bar, are directly in the sensor’s path. These items are the most common culprits for ACC malfunctions because they block the radar field. If you have an OBD-II scanner capable of Ford-specific modules, plug it into the port under the dash and check the “Adaptive Cruise Control” module for any stored diagnostic trouble codes (DTCs). If the sensor was physically disturbed, it may require a dynamic or static alignment process, which typically necessitates professional service equipment.
Pro Tip: If you’ve added any accessories to the front of your Ford, double-check that they do not cross the invisible 20-degree cone originating from the sensor.
✅ Final Checklist
- Sensor is clear of dirt, mud, and road debris.
- No aftermarket accessories are obstructing the sensor’s line of sight.
- Wiring harness connection is tight and free of corrosion.
- The radar unit is mounted firmly and is not visibly loose or crooked.
- System is free of physical damage or cracks on the sensor face.
Important Notes:
- Safety: Always disconnect the ignition before working near sensors to prevent electrical shorts.
- Professional Help: If the system displays a “Service Required” message even after the sensor is clean and unobstructed, take the vehicle to a certified Ford technician for a professional radar alignment.
- Estimated Time: 30–60 minutes for inspection and cleaning.
- Estimated Cost: $0 if performing a basic inspection; however, professional calibration can cost between $250 and $500 depending on the dealership labor rates.
Step-by-Step Guide to Safely Cleaning the Radar Sensor
Tools and Techniques for Damage-Free Cleaning
Because the sensor face is made of specialized plastic, you must avoid abrasive cloths or harsh chemicals that could create micro-scratches. These scratches can scatter radar beams and lead to phantom braking or persistent fault codes. Use only high-quality microfiber towels and mild automotive soap mixed with water.

- Spray the sensor area lightly with clean water or a dedicated automotive detailer spray to soften dried mud or salt.
- Gently wipe the surface using a clean microfiber cloth in a horizontal motion.
- Ensure the area surrounding the sensor is also clean, as dirt buildup on the edges of the housing can still interfere with the sensor’s field of view.
- Dry the sensor gently with a fresh section of the microfiber cloth to prevent water spotting.
What to Avoid During Maintenance
Never use high-pressure washers directly against the sensor lens from a distance of less than 12 inches. The extreme force of commercial car wash nozzles can force water behind the seal or physically damage the alignment of the module. Additionally, avoid applying any wax, ceramic coatings, or protective films over the sensor area. These substances change the density of the surface layer, which can cause the radar signal to reflect back internally, leading to a permanent “sensor blocked” error that requires professional recalibration at a dealership.
How to Fix Obstruction Errors and Sensor Misalignment
Modern Ford radar sensors utilize high-frequency millimeter-wave technology to track lead vehicles. By 2026, Ford’s advanced Driver Assistance Systems (ADAS) have become highly sensitive to environmental obstructions and minor physical shifts in the sensor mounting bracket.
Clearing Physical Obstructions
The most common cause of a “Sensor Blocked” message is an accumulation of road debris, ice, or excessive mud directly in front of the radar aperture. Follow these steps to clear the obstruction safely:
- Locate the sensor, typically positioned in the lower front grille or behind the Ford badge.
- Use a soft, non-abrasive microfiber cloth dampened with mild automotive soap and warm water.
- Wipe the surface gently in a horizontal motion; avoid using high-pressure sprayers directly on the sensor face, as this can force water into the housing.
- Ensure the plastic bumper cover surface is completely clear of vinyl wraps or aftermarket decals, which interfere with radar signal transmission.
Addressing Sensor Misalignment
If the sensor is physically loose or damaged from a minor front-end impact, software resets will not suffice. Misalignment beyond 2 degrees can lead to “false positive” braking events. If the diagnostic readout indicates a calibration fault, the sensor must be physically re-indexed by a technician using a radar alignment target board at a precise distance of 3.5 meters from the vehicle center line. Do not attempt to adjust the bracket screws manually, as this risks permanent damage to the internal leveling gimbal.
What If It Still Doesn’t Work?
If clear sensor housing and software power-cycling do not resolve the system fault, the issue likely resides in the vehicle’s Controller Area Network (CAN) bus or the sensor internal firmware. If the “Adaptive Cruise Control Not Available” warning remains persistent, follow these diagnostic escalation steps:
- Check the vehicle’s 12V battery health; low voltage states often trigger false sensor communication faults across Ford’s 2026 electrical architecture.
- Inspect the front wiring harness for signs of rodent damage or thermal fatigue, which are common points of failure in the front bumper area.
- Verify that no recent software updates or over-the-air (OTA) patches have stalled during installation.
- Consult a certified Ford technician to perform a specialized radar calibration reset using the Ford Integrated Diagnostic System (IDS).
Professional diagnostic fees for a system calibration generally range between $150 and $300. If the radar unit itself requires replacement, OEM sensor units currently range from $650 to $1,200 depending on the specific model trim. If the vehicle is under the standard 3-year/36,000-mile bumper-to-bumper warranty, repairs may be covered at no cost.
Conclusion
Maintaining the integrity of your Ford adaptive cruise control system requires both physical cleanliness and correct hardware orientation. According to verified research and expert automotive diagnostics, persistent sensor failures often stem from internal electrical shorts or alignment drift rather than simple surface debris. For reliable performance, ensure your radar unit is calibrated by an authorized technician after any front-end impact. For your next step, perform a system status check via the FordPass app to identify specific diagnostic trouble codes (DTCs) before visiting a service center.
❓ Frequently Asked Questions
Are there different sensor locations for Ford trucks versus SUVs?


While most use a bumper-mounted radar, some larger trucks and SUVs integrate the sensor behind the front grille emblem. Always check your specific owner’s manual for model-specific placement.
Will a front-mounted license plate interfere with the radar?
Yes, mounting a license plate bracket directly over the sensor location will block the radar beams. This often triggers a ‘Sensor Blocked’ warning on your dashboard.
Can I replace the radar sensor myself if it is damaged?
While you can physically mount a new sensor, the system requires professional digital calibration using Ford-specific diagnostic software. You cannot simply plug and play a new unit.
How do I know if my sensor is misaligned?
If your cruise control system frequently disengages or reports an error despite the sensor being clean, it may be physically misaligned. This requires a professional shop check.
Does car wash wax damage the sensor?
Standard car wash soap and wax are generally safe, but avoid high-pressure sprayers aimed directly at the sensor. High-pressure water can sometimes force moisture into the housing seals.
Why does my cruise control stop working in heavy rain?
Radar signals can be scattered by heavy rain, snow, or dense fog. The system is designed to disable itself when environmental conditions prevent reliable object detection.