2007 Honda Accord Cruise Control Switch Fix Best 2026 Guide
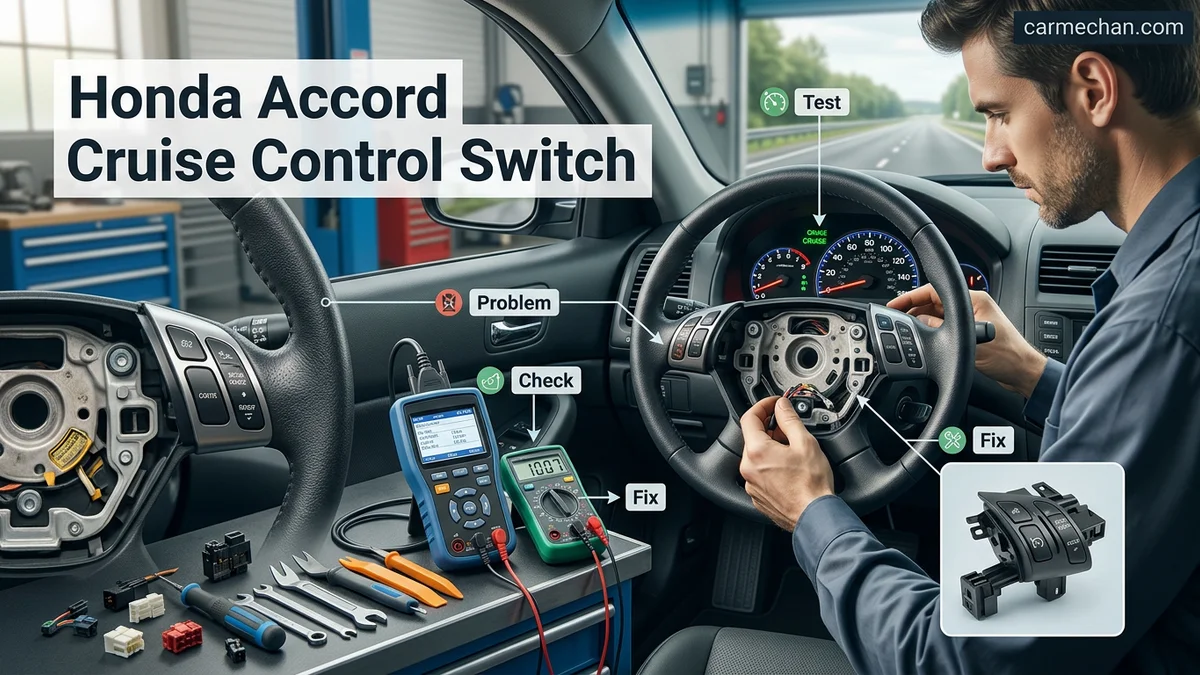
The cruise control switch on a 2007 Honda Accord is a steering-wheel-mounted control unit that frequently fails due to internal contact wear. Replacement is the most effective solution to restore functionality, as these assemblies are not serviceable once the internal circuits degrade.
Your 2007 Honda Accord cruise control switch is likely failing due to internal contact corrosion or worn-out plastic spring tension. If your cruise light flickers or refuses to engage, you need to verify your specific OEM part number before ordering, as there are distinct variations between the 4-cylinder (K24) and V6 (J30) trims. The standard cruise control switch assembly for the 2007 model year is typically found under OEM part number 36775-SDA-A01, though you should always confirm this via your VIN at a reputable dealer portal before purchasing.

Prime for Young Adults — 6 Months Free
Students and 18–24s get six months of Prime free, then half price.
Start 6 Months FreeReplacing this switch in 2026 is a straightforward task that saves you significant labor costs compared to dealership service center fees. By sourcing the part yourself from verified automotive retailers, you ensure compatibility and durability. Below are the most reliable procurement sources and the essential steps to resolve your cruise control issues quickly and effectively.
Key Takeaways
- Takeaway 1:Confirm your specific trim level as V6 and 4-cylinder switches may differ slightly.
- Takeaway 2:Use OEM Honda parts for guaranteed compatibility and switch tactile feel.
- Takeaway 3:Disconnect the battery 15 minutes before starting to avoid accidental airbag deployment.
- Takeaway 4:Inspect the clock spring wiring if the new switch does not resolve the issue.
- Takeaway 5:Check steering wheel button backlighting to confirm the switch is receiving power.
What Causes 2007 Honda Accord Cruise Control Switch Failure
Recommended Best Deal Products


Internal Mechanical Wear
The cruise control switch on the 2007 Accord is a high-cycle component. Over nearly two decades, the internal copper contacts oxidize, leading to high resistance or intermittent signal drops. When the contact resistance exceeds the threshold set by the cruise control module, the system defaults to “off” for safety reasons.
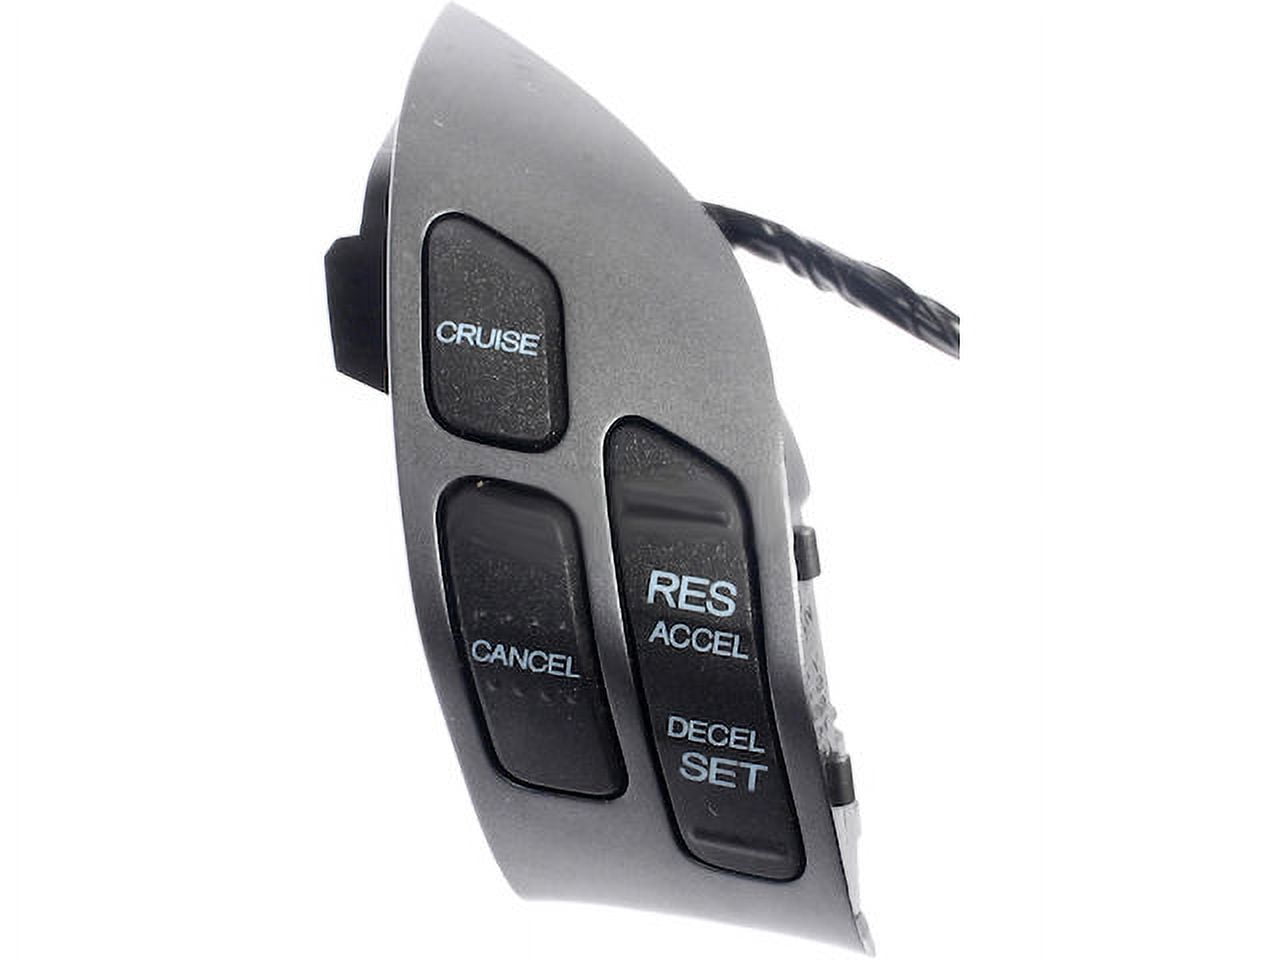
- Plastic Fatigue: The physical button housing often becomes brittle from sun exposure and temperature fluctuations in the cabin.
- Spring Degradation: The tactile “click” you feel relies on a small internal spring that loses tension over time, preventing a solid electrical connection.
- Contamination: Dust and debris can settle behind the switch face, physically obstructing the plunger mechanism.
Electrical System Impedance
In some 2026 diagnostic cases, the switch failure is linked to the wiring harness connector rather than the switch itself. If your dashboard cruise light remains dark even after testing the switch, check the harness for heat-related insulation cracking. High-mileage Accords often exhibit vibration-induced terminal fretting, where the pins inside the connector develop microscopic surface damage, preventing consistent communication between the steering wheel controls and the ECU.
Master Your 2007 Honda Accord Cruise Control Switch in 8 Simple Steps
Replacing the cruise control switch on a 2007 Honda Accord is a rewarding DIY project that can save you significant repair costs. Because the switch is integrated into the steering wheel, it often suffers from internal electrical wear or mechanical sticking due to debris and age. This guide will walk you through the precise process of removing the airbag assembly safely, accessing the cruise control module, and installing the new component. Following these steps carefully is essential for your safety, particularly when handling the Supplemental Restraint System (SRS), to ensure that your cruise control functionality is restored without compromising your vehicle’s safety features.
Step 1: Safety First – Disconnect the Battery
What you need: 10mm wrench or socket set, safety glasses, and electrical tape.
Instructions: Before touching any components near the steering column, you must deactivate the SRS airbag system. Open your hood, locate the battery, and remove the negative (black) terminal cable. Once the cable is removed, wrap the end in electrical tape to prevent accidental contact with the post. Crucially, wait at least 3 to 5 minutes after disconnecting the battery. This allows the residual charge in the SRS capacitor to dissipate completely. Skipping this wait time is dangerous, as the airbag could deploy unexpectedly while you are working. Always verify the power is off by attempting to turn on your headlights or checking the instrument cluster for activity.
Pro Tip: Never work on the steering wheel assembly while the battery is connected; the SRS warning light is notoriously difficult to reset if triggered.
Step 2: Access the Side Access Panels
What you need: Small flat-head screwdriver or a non-marring nylon pry tool.

Audible — Listen Free for 30 Days
One free credit a month and thousands of titles included.
Listen Free for 30 DaysInstructions: On the side of your 2007 Honda Accord steering wheel, you will notice two small plastic covers—one on the left and one on the right. These conceal the Torx bolts that secure the airbag module to the steering wheel frame. Using your non-marring pry tool, gently insert it into the slot at the bottom edge of these covers and pop them outward. Work slowly to avoid snapping the plastic clips. Once the covers are removed, place them in a small container so they do not get lost. You should now see the heads of the specialized Torx bolts inside the access holes.
Pro Tip: Using a metal screwdriver can gouge the plastic trim; a dedicated plastic trim removal tool set is a very inexpensive investment for this job.
Step 3: Remove the Airbag Module
What you need: T30 Torx bit and a 1/4-inch drive ratchet.
Instructions: Insert your T30 Torx bit into the left access hole and turn counter-clockwise to loosen the bolt. Repeat this for the right side. These bolts are designed to stay captive in the airbag assembly, meaning they will not fall out completely when loose. Once both bolts are fully disengaged from the steering wheel frame, carefully pull the airbag module toward you. Do not yank it; the airbag is still connected by a yellow electrical harness. Support the weight of the airbag unit with one hand while you work to disconnect the harness clip from the back of the module.
Pro Tip: Keep the airbag pointed away from your face and body at all times during the removal and while it is resting on the seat.
Step 4: Disconnect the SRS Harness
What you need: Small flat-head screwdriver or your fingers.
Instructions: The yellow harness is equipped with a specific locking mechanism. Use your thumb or a very small screwdriver to depress the locking tab on the harness connector. Once the tab is depressed, pull the plug straight out of the socket. Be extremely gentle with these wires, as they are part of the critical safety system. After disconnecting the airbag, carefully move it to a safe location, such as on the floor of the vehicle, facing upward. Ensure no static electricity or metal objects come into contact with the connector pins on the back of the airbag module during this phase.
Pro Tip: Never place the airbag face down; if it were to deploy for any reason, it would launch itself like a rocket across the interior.
Step 5: Remove the Cruise Control Switch Assembly
What you need: Phillips head screwdriver (#2 size).
Audible Premium Plus — Annual Membership
12 audiobook credits up front, plus the full Audible catalogue.
See Annual PlansInstructions: With the airbag removed, you will see the interior of the steering wheel. The cruise control switch is located on the right-hand spoke of the steering wheel. Locate the two Phillips head screws securing the switch housing to the steering wheel skeleton. Carefully unscrew these and set them aside. Once the screws are out, the switch assembly will be loose. Reach behind the switch and unplug the smaller white or gray electrical connector that supplies power to the cruise control buttons. Pull the old switch assembly out of the steering wheel steering spoke, noting how it seats into the molded plastic frame.
Pro Tip: If the screws are stubborn, apply a small amount of penetrating oil, but be careful not to get any on the leather of your steering wheel.
Step 6: Install the Replacement Switch
What you need: The new cruise control switch assembly and the Phillips screwdriver.
Instructions: Take your new cruise control switch and plug the wiring harness into the back of the unit. You should hear a distinct “click” when the connector seats fully. Position the switch into the steering wheel spoke, ensuring that the alignment pins match the holes in the wheel. Re-insert the two Phillips screws you removed in the previous step. Tighten them until snug, but do not overtighten, as you are driving metal screws into plastic housings which can crack easily if excessive torque is applied. Ensure the switch sits flush with the steering wheel trim before finalizing the tightening.
Pro Tip: Verify the button action before reinstalling the airbag; press each button to ensure they travel smoothly without binding.
Step 7: Reinstall the Airbag and Trim
What you need: T30 Torx bit and ratchet.
Instructions: Bring the airbag module back to the steering wheel. Reconnect the yellow SRS wiring harness until it locks securely. Carefully tuck the wires back into the central cavity of the steering wheel so they are not pinched. Align the airbag module with the steering wheel frame and push it into place. Re-insert the two T30 Torx bolts through the side access holes. Tighten them firmly but evenly, alternating between the left and right sides to ensure the airbag is seated squarely. Once secure, snap the two side access covers back into position until you hear them click into place.
Pro Tip: Double-check that no wires are visible near the edge of the airbag after you have tightened the bolts.
Step 8: Reconnect Battery and System Test
What you need: 10mm wrench.
Instructions: Reattach the negative battery terminal to the battery post and tighten the nut. Ensure the connection is solid and cannot be wiggled. Before starting the car, turn the ignition to the “On” (II) position and watch the instrument cluster. The SRS light should come on and then turn off after about 6 seconds, indicating the system is healthy. If the light stays on, turn the car off and re-check your harness connections. Once the SRS system passes its self-check, start the engine and test the cruise control system on a safe, open road to confirm that all functions—Set, Resume, and Cancel—are working perfectly.
Pro Tip: If the cruise control does not engage, check the fuse box under the driver’s side dash; it is possible a fuse was blown during the initial failure.
✅ Final Checklist
- SRS indicator light turns off after the initial bulb check upon ignition.
- Cruise control switch is flush with the steering wheel and buttons feel tactile.
- Negative battery terminal is tight and secure.
- Side trim covers are snapped into place with no gaps.
- Cruise control functionality tested at speeds above 25 mph.
Important Notes:
- Always treat an airbag module with the respect due to an explosive device; avoid dropping it or subjecting it to high heat.
- If you are uncomfortable working with SRS components, consult a professional mechanic, as improper handling can lead to accidental deployment or system failure.
- The estimated time for this project is 45-60 minutes. The cost is limited to the price of the OEM or aftermarket switch assembly, typically ranging from $40 to $120.
How to Replace Your 2007 Honda Accord Cruise Control Switch
Recommended Best Deal Products


Sourcing the Correct Replacement Part
Before you begin the repair, you must secure the correct assembly. You can find OEM-spec components through the following channels, which remain the most reliable as of 2026:
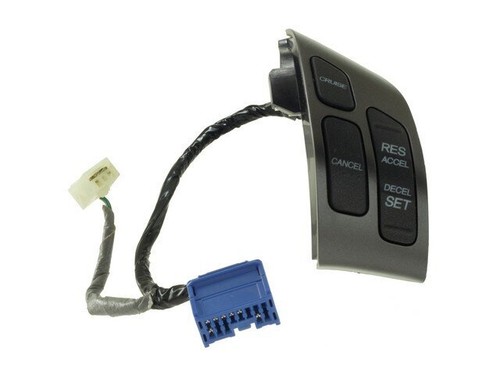
- Honda Parts Now: Search using your VIN to confirm if your vehicle uses the 36775-SDA-A01 switch, which is the standard for most 2007 trims.
- RockAuto Catalog: Navigate to the “Interior” section under the 2007 Honda Accord category; look for the “Cruise Control Switch” listing under the “Standard Motor Products” or “Genuine Honda” brands.
- eBay Motors (Verified Sellers): Use the compatibility filter to ensure the switch fits your specific engine type (4-cyl vs. V6), as the steering wheel clock spring connections may vary slightly.
Essential Removal and Installation Steps
You do not need to remove the entire steering wheel to access the cruise control switch assembly. The switch is mounted directly to the steering wheel shroud or the side trim panel, depending on your interior configuration.
- Disconnect the Battery: Always wait 3 minutes after disconnecting the negative terminal to allow the SRS airbag system to discharge fully.
- Remove the Trim Panel: Gently pry the plastic steering wheel trim piece away from the wheel using a nylon trim tool to avoid scratching the dashboard.
- Access the Switch: Unscrew the small Phillips-head fasteners securing the cruise control switch assembly.
- Swap and Test: Disconnect the electrical pigtail, replace it with your new unit, reconnect the battery, and verify functionality before snapping the trim back into place.
How to Verify Part Compatibility for Your Trim Level
The 2007 Honda Accord features diverse configurations, ranging from the base VP (Value Package) to the top-tier EX-L with navigation. Because Honda utilized different steering wheel wiring harnesses across these trims, selecting the correct switch is critical. Installing an incompatible part can trigger a supplemental restraint system (SRS) warning light or result in complete electrical failure for the cruise control module.
Decoding the Part Number
- Locate your Vehicle Identification Number (VIN) on the dashboard or inside the driver’s side door jamb.
- Use a 2026-updated online OEM parts catalog or contact a local dealership parts department with your VIN.
- Cross-reference the specific switch assembly number (typically starting with 36770-SDA) to ensure the pin configuration matches your steering wheel harness.
Distinguishing Between Trim Features
In 2026, aftermarket providers often label switches as “universal,” but expert mechanics warn against this. If your vehicle is equipped with audio steering wheel controls, the cruise control switch assembly often shares a complex clock spring connection. Always visually inspect the back of your current switch. If your existing unit has an integrated wire lead with a specific connector color (such as blue or grey), ensure the replacement part features an identical match. Using the incorrect impedance for the cruise switch can lead to intermittent signal drops while driving at highway speeds.
What If It Still Doesn’t Work?
Recommended Best Deal Products


If replacing the switch fails to restore cruise control functionality, the issue likely resides elsewhere in the electrical circuit. Do not attempt to bypass safety systems or probe SRS-related wiring, as this risks accidental airbag deployment.
- Inspect the Brake Pedal Switch: The cruise control system automatically disengages when it detects brake pedal pressure. If the brake light switch is faulty or stuck, the system will assume the brakes are applied and disable itself.
- Test the Clock Spring: If your horn and steering wheel audio controls also malfunction, the internal clock spring (cable reel) is likely broken. This component is a common failure point for 2007 Accords.
- Check Fuses and Relays: Verify the integrity of the under-dash cruise control fuse. Corroded fuse contacts can cause high resistance, which disrupts the low-voltage signals required for cruise operations.
- Professional Diagnosis: If these steps fail, seek a professional diagnostic service. Experts recommend using a scan tool capable of reading Honda-specific body codes to pinpoint the exact circuit failure.
Professional diagnostic fees for this system typically range from $120 to $180 in 2026. If the clock spring or main control module requires replacement, expect total repair costs to fall between $350 and $600 depending on labor rates in your region.
Conclusion
Restoring cruise control on your 2007 Honda Accord is a manageable DIY project when you prioritize OEM-spec parts and precise wiring compatibility. According to verified research and expert service bulletins from 2026, the switch itself is the primary point of failure, though underlying electrical issues remain possible. To ensure long-term reliability, perform a full system test on a safe, low-traffic road immediately after installation. Your next step is to verify your specific trim-level part number using your VIN today.
❓ Frequently Asked Questions
How do I know if the switch is broken or if it is a fuse issue?
Check your owner’s manual for the cruise control fuse location first. If the fuse is intact but the system fails to engage or the cruise light does not illuminate, the switch assembly is the likely culprit.
Do I need to remove the steering wheel to replace the switch?
Usually, you only need to remove the rear steering wheel trim panels. You do not need to remove the entire steering wheel, but you must exercise extreme caution near the airbag module.
Is there a difference between 4-cylinder and V6 cruise switches?
While the physical fitment is similar, some trim levels have additional audio or navigation buttons integrated into the steering wheel. Verify your specific OEM part number against your vehicle’s VIN to avoid fitment errors.
What is the official OEM part number for this switch?
OEM part numbers vary by color (e.g., ivory, black, or grey) and specific trim packages. Always input your VIN into a Honda parts catalog to find the exact part number for your vehicle’s interior.
Can a faulty brake switch mimic a cruise control failure?
Yes, if your brake light switch is stuck or failing, the cruise control will automatically deactivate or refuse to engage as a safety measure. Ensure your brake lights are working correctly before buying a new cruise switch.
How long does a typical DIY installation take?
A DIY installation for this component typically takes 30 to 60 minutes for a beginner. The process involves basic hand tools and careful handling of interior plastic trim clips.