Essential Guide: How to Safely Disconnect a Car Battery
Last Updated on September 1, 2026 by Ryan
Always prioritize safety when disconnecting your car battery by wearing protective gear and following the correct terminal removal order (negative first). This crucial process prevents electrical hazards, vehicle damage, and personal injury, ensuring a secure and efficient disconnection.
🎯 Key Takeaways
Recommended Best Deal Products


- Wear safety glasses and gloves always.
- Disconnect the negative terminal first.
- Ensure car ignition is fully off.
- Securely insulate disconnected cables.
- Gather all necessary tools beforehand.
Disconnecting your car battery safely and correctly is a fundamental task for various maintenance procedures. The core rule you must remember is this: always disconnect the negative terminal first, and always reconnect it last. This isn’t just a recommendation; it’s a critical safety protocol that prevents dangerous electrical shorts and protects both you and your vehicle’s sensitive electronics.

Prime for Young Adults — 6 Months Free
Students and 18–24s get six months of Prime free, then half price.
Start 6 Months Free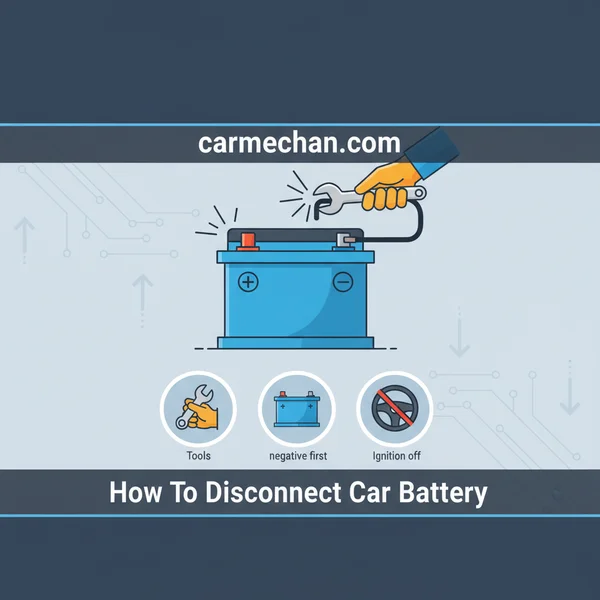
Understanding this precise order matters immensely for practical reasons. Incorrectly disconnecting your battery can lead to damaging sparks, potential battery acid exposure, and even harm to your car’s complex computer systems. By following the right steps, you ensure a safe working environment and avoid costly repairs, making tasks like replacing an alternator or performing electrical diagnostics much more secure.
Understanding the Importance of Correct Disconnection
The Critical “Negative First” Rule
The “negative first” rule is paramount for your safety. Your car’s chassis acts as the ground for the entire electrical system, connected directly to the negative terminal of the battery. When you disconnect the negative terminal first, you effectively break this ground path. This means that if your wrench accidentally touches a grounded metal part of the car while you are working on the positive terminal, no short circuit will occur. Without the negative terminal connected, there’s no complete circuit to spark against the chassis.

Conversely, if you were to disconnect the positive terminal first, the negative terminal would still be connected to the car’s ground. A slip of your wrench from the positive terminal to any metal part of the car would immediately create a direct short circuit. This can result in significant sparks, an arc flash, severe battery damage, and even potential harm to your vehicle’s delicate electrical components due to uncontrolled current flow. Always prioritize breaking the ground connection.
Protecting Yourself and Your Vehicle
Beyond preventing immediate short circuits, correct disconnection safeguards you from potential hazards like battery acid and explosive gases. Car batteries contain sulfuric acid, which is highly corrosive. Sparks can ignite hydrogen gas, which batteries emit, especially during charging or when damaged. Following the negative-first procedure drastically reduces the risk of such dangerous incidents. It ensures a stable, controlled environment for your work.
Furthermore, modern vehicles are packed with sophisticated electronic control units (ECUs) and sensors. Sudden, uncontrolled power fluctuations or short circuits can damage these sensitive components, leading to expensive diagnostic issues or module replacements. A proper disconnection sequence minimizes electrical shocks to these systems. It’s about protecting both your personal well-being and your vehicle’s intricate technological brain.
How to Disconnect Your Car Battery Like a Pro: A Practical Walkthrough
This comprehensive guide will walk you through the essential steps to safely and effectively disconnect your car battery. Whether you’re performing maintenance, replacing a battery, or storing your vehicle, understanding this process is crucial. Following these detailed instructions carefully will help prevent electrical shorts, personal injury, and potential damage to your vehicle’s electrical system, ensuring a smooth and successful operation every time.
Step 1: Prioritize Safety & Gather Your Tools
What you need: Safety glasses, heavy-duty work gloves (preferably acid-resistant), a wrench or socket set (typically 10mm or 13mm for terminal nuts), a wire brush or battery terminal cleaning tool, baking soda and water mixture (for cleaning corrosion), and possibly a battery terminal puller for stubborn clamps.
Instructions: Before touching anything, ensure you have all necessary safety gear on. Don your safety glasses and gloves to protect against acid splashes and sparks. Gather your tools and place them within easy reach. Having the correct wrench size ready is critical to avoid stripping nuts. A clean workspace and preparedness are key to a safe and efficient battery disconnection. Never use damaged or frayed tools.

Audible — Listen Free for 30 Days
One free credit a month and thousands of titles included.
Listen Free for 30 DaysPro Tip: Always double-check your wrench or socket size. Using the wrong size can round off the terminal nuts, making them incredibly difficult to remove and potentially requiring professional assistance or replacement battery cables later on.
Step 2: Prepare Your Vehicle for the Task
What you need: Level ground, parking brake, vehicle manual (optional but recommended for specific instructions).
Instructions: Begin by parking your vehicle on a flat, stable surface away from traffic or other hazards. Engage the parking brake firmly to prevent the car from rolling. Turn off the engine and remove the keys from the ignition to ensure all electrical systems are deactivated and to prevent accidental starting or airbag deployment, which can occur in some modern vehicles if power is disrupted incorrectly. Allow the engine to cool down completely before proceeding, typically 15-30 minutes after driving.
Pro Tip: If your vehicle has sensitive electronics or a complex infotainment system, consult your car’s owner’s manual for specific battery disconnection protocols or potential issues like needing a radio security code after reconnection.
Step 3: Locate the Battery and Identify Terminals
What you need: Your eyes, a flashlight (optional).
Instructions: Open the hood of your vehicle. The battery is typically located under the hood, usually on one side, but in some modern vehicles, it might be in the trunk, under the rear seat, or even in the fender well. Once located, identify the positive (+) and negative (-) terminals. The positive terminal usually has a red cap or cable and a plus sign, while the negative terminal often has a black cap or cable and a minus sign. Take note of any covers that might need to be removed to access the terminals.
Pro Tip: Never guess which terminal is which. Misidentifying terminals can lead to severe electrical shorts and damage. Always look for the clear markings or color coding. If in doubt, refer to your car’s manual or look for online diagrams specific to your vehicle model.
Step 4: Disconnect the Negative Terminal First
What you need: Correct size wrench or socket.
Instructions: This is a critical safety step. Locate the negative terminal (-) and its corresponding cable clamp. Using your wrench or socket, loosen the nut on the clamp by turning it counter-clockwise. You only need to loosen it enough for the clamp to slide off the terminal post – typically one to two full turns. Once loose, gently twist and pull the negative cable straight up and off the terminal. Immediately move this cable away from the battery so it cannot accidentally fall back onto the terminal or touch any metal part of the car’s frame. You can tuck it under another component or cover it with a rag.
Audible Premium Plus — Annual Membership
12 audiobook credits up front, plus the full Audible catalogue.
See Annual PlansPro Tip: Always disconnect the negative terminal first. This ensures that if your wrench accidentally touches the vehicle’s metal frame while you’re working on the negative side, you won’t create a direct short circuit across the battery, which can cause dangerous sparks, damage, or even an explosion.
Step 5: Disconnect the Positive Terminal
What you need: Correct size wrench or socket.
Instructions: With the negative cable safely disconnected and secured away, you can now proceed to the positive terminal (+). Locate the positive terminal and its cable clamp. Using your wrench, loosen the nut on this clamp by turning it counter-clockwise, just as you did with the negative terminal. Once the clamp is sufficiently loose, carefully lift the positive cable straight up and off the terminal post. Exercise caution to ensure the disconnected negative cable remains isolated and cannot make contact with any part of the battery during this step.
Pro Tip: Even though the negative cable is off, treat the positive terminal with respect. If you plan to clean the battery tray or remove the battery, ensure both cables are isolated from the battery posts to prevent any accidental contact or short circuits during handling.
Step 6: Secure Cables and Remove Battery Hold-Down
What you need: Cable ties or bungee cords (optional), wrench for hold-down (if applicable).
Instructions: After both cables are disconnected, ensure they are positioned well clear of the battery and cannot accidentally swing back and touch the terminal posts. You might want to use a cable tie or bungee cord to hold them to a nearby component, or simply wrap a thick rag around their ends for added insulation. If your task requires removing the battery, locate the battery hold-down mechanism. This could be a strap, a clamp, or bolts that secure the battery in its tray. Loosen or remove this mechanism completely to free the battery for removal.
Pro Tip: Securing the cables is not just for safety during this step; it also prevents them from dangling into the engine bay where they could get tangled or damaged while you work on other components or remove the battery itself.
Step 7: Battery Removal (If Necessary)
What you need: Battery carrier strap (highly recommended), gloves, baking soda and water mixture, wire brush (for cleaning tray).
Instructions: With the hold-down removed and cables safely out of the way, you can now carefully lift the battery out of its tray. Car batteries are notoriously heavy, typically ranging from 30 to 60 pounds, so lift with your legs, not your back, to prevent injury. A battery carrier strap makes this task significantly easier and safer. Be mindful of any potential acid spills during removal. Once the battery is out, inspect the battery tray and surrounding area for any corrosion. Clean any corrosion with a baking soda and water solution and a wire brush before installing a new battery or returning the old one.
Pro Tip: When cleaning corrosion, ensure the baking soda solution neutralizes the acid by waiting until the fizzing stops. Rinse with clean water and dry thoroughly. Proper cleaning extends the life of the battery tray and prevents future corrosion issues.
✅ Final Checklist
- Are both battery cables completely disconnected from their respective terminals (negative first, then positive)?
- Are the disconnected cables safely secured away from the battery posts and any metal components of the vehicle?
- Is the battery hold-down mechanism disengaged (if the battery was removed or relocated)?
- Are all tools safely put away, and is your workspace clear of potential hazards?
- Have you confirmed all vehicle accessories and lights are off before attempting reconnection (if applicable)?
Important Notes:
- Safety considerations: Always wear eye protection and gloves. Ensure adequate ventilation when working with batteries. Never smoke or have open flames near a battery, as they can produce explosive hydrogen gas. If battery acid comes into contact with skin or eyes, flush immediately with plenty of water and seek medical attention.
- When to seek professional help: If you encounter extreme corrosion you cannot manage, if the battery is leaking extensively, or if you are unsure about any step, do not hesitate to consult a certified mechanic. Some modern vehicles, particularly hybrids or those with complex electrical systems, may require specific diagnostic tools or procedures to avoid damaging electronic components.
- Estimated time and cost range: Disconnecting a car battery typically takes 15-30 minutes for an average DIYer. If cleaning corrosion or removing the battery is involved, it might take 45-60 minutes. The direct cost is generally $0 if you already own basic tools. If tools are needed, a basic wrench set might cost $15-$30.
Essential Tools and Preparations for Battery Work
Gathering Your Safety Gear (PPE)
Before you even think about touching your battery, prioritize personal protective equipment (PPE). This isn’t optional; it’s essential. Firstly, always wear safety glasses or goggles. Battery acid splashes are a significant risk, and even small sparks can cause eye injury. Secondly, don a pair of sturdy work gloves. These protect your hands from acid, grime, and offer a better grip on tools. Opt for gloves made from acid-resistant material if possible. Finally, wear old clothes. Battery acid can ruin fabric quickly, so choose attire you don’t mind getting stained or damaged. Never begin battery work without these fundamental safety items.

Required Mechanical Tools
The tools needed are relatively simple but crucial for safe operation. You will need a battery terminal wrench. These are often 10mm or 13mm open-end or box-end wrenches, specifically designed for the smaller nuts on battery terminals. Using the correct size wrench is vital to prevent stripping the terminal bolts, which can make reconnection difficult later. A wire brush can also be helpful for cleaning terminals, though the focus here is purely on disconnection. Ensure your wrench handles are insulated to minimize any accidental conductivity, adding an extra layer of protection during the process. Always confirm you have the right size before starting to avoid frustration and potential damage.
Initial Vehicle & Battery Assessment
Ensuring Your Vehicle is Fully Off
Before any battery work begins, completely power down your vehicle. This step is non-negotiable. First, turn off your engine and remove the key from the ignition. Do not leave it in the “ACC” or “ON” position. Next, ensure all accessories are off: radio, lights (interior and exterior), climate control system, and any connected chargers or devices. Modern cars have complex electrical systems that retain residual power or can be sensitive to sudden disconnections if modules are still active. It’s a good practice to wait 5-10 minutes after turning everything off to allow all electronic control units (ECUs) to power down fully and capacitors to discharge. This waiting period prevents potential data corruption or electrical spikes that could harm sensitive onboard computers. Patience here is a virtue that protects your vehicle’s electronics.
Locating and Identifying Terminals
Your car battery is typically located under the hood, but some vehicles place it in the trunk, under the rear seat, or even beneath the passenger floorboard. Once you’ve located the battery, clearly identify its positive (+) and negative (-) terminals. The positive terminal is usually marked with a plus sign (+) and often has a red cap or a red cable attached. The negative terminal is marked with a minus sign (-) and typically has a black cable connected. Confirm these markings visually. Incorrect identification is a common and dangerous mistake that can lead to severe damage and injury. Take a moment to double-check which cable leads to which terminal before proceeding. This simple visual confirmation is a critical step for a safe disconnection process.
Safety Protocols and Preventing Electrical Hazards
Working with a car battery isn’t just about knowing which wrench to use; it’s fundamentally about ensuring your safety and the longevity of your vehicle’s electrical system. Understanding potential hazards and how to prevent them is non-negotiable.
Personal Protective Equipment (PPE) is Non-Negotiable
Before you even think about touching a terminal, consider your personal protection. Battery acid is corrosive, and electrical sparks can cause burns or ignite flammable materials. Proper PPE creates a vital barrier between you and these dangers.
- Safety Glasses: Essential for protecting your eyes from acid splashes or flying debris. Look for those with side shields for maximum coverage.
- Insulated Gloves: These protect your hands from acid and provide a degree of insulation against accidental electrical contact. Standard work gloves won’t offer the same protection against electricity.
- Old Clothes: Wear clothes you don’t mind getting stained or damaged. Battery acid can eat through fabric surprisingly quickly.
- Avoid Metal Jewelry: Rings, watches, and bracelets can inadvertently complete a circuit, causing severe burns or damaging the jewelry itself if it touches a live terminal.
Avoiding Short Circuits and Sparks
The potential for sparks and short circuits is the primary electrical hazard when disconnecting a battery. A short circuit occurs when current takes an unintended, low-resistance path, often leading to excessive heat, sparks, or even an explosion.
- Correct Disconnection Order: Always prioritize removing the negative (black) terminal first. This isolates the battery from the vehicle’s ground, greatly reducing the risk of a short circuit if your wrench accidentally touches the vehicle’s metal frame while working on the positive terminal.
- Tool Handling: Use only wrenches or ratchets with non-conductive handles. Be careful not to let your wrench touch both battery terminals simultaneously, or a positive terminal and any part of the vehicle’s metal chassis.
- Secure Cables: Once a terminal is disconnected, ensure the cable is positioned so it cannot accidentally fall back onto the battery post. Wrapping the disconnected cable end in an insulating cloth or glove can add an extra layer of protection.
- Ventilation: Batteries can produce hydrogen gas, which is highly flammable. Always work in a well-ventilated area to prevent gas buildup, especially if the battery has been charging recently.
Common Pitfalls and Best Practices for Battery Handling
Even with the right intentions, common mistakes can turn a simple task into a headache. Knowing what to watch out for, and adopting sound practices, ensures a smoother experience and better battery longevity.
Recognizing and Avoiding Common Mistakes
Many issues arise not from complex problems, but from overlooking simple details. Being aware of these common pitfalls can save you time, money, and frustration.
- Incorrect Terminal Order: As mentioned, disconnecting the positive terminal first is a significant safety hazard. Always remember “Negative first, Positive last” for disconnection. This isn’t just a guideline; it’s a critical safety rule to prevent accidental shorts.
- Rushing the Process: Haste often leads to errors. Take your time, double-check your tools, and confirm terminal polarities before beginning. A few extra minutes of careful attention can prevent hours of troubleshooting or potential injury.
- Neglecting Terminal Cleanliness: Overlooking corrosion on terminals can compromise electrical contact and even prevent a successful disconnection. Always clean any visible corrosion before attempting to loosen nuts.
- Using the Wrong Tools: Employing worn-out wrenches or pliers that slip can strip terminal nuts or cause you to slip and accidentally short a circuit. Use properly sized, quality tools.
- Not Securing Cables: Leaving disconnected cables to dangle freely increases the risk of them accidentally touching terminals or other conductive surfaces, potentially causing a spark. Secure them away from the battery.
Proper Battery Care and Storage After Disconnection
Disconnecting a battery is often just one part of a larger plan, whether it’s for maintenance, storage, or replacement. How you handle the battery after disconnection significantly impacts its lifespan and performance.
- Cleaning the Battery: Once disconnected, clean the battery top and terminals thoroughly. A mixture of baking soda and water can neutralize acid residue and help prevent future corrosion. Ensure terminals are completely dry before reconnection or storage.
- Long-Term Storage: If you’re storing the battery for an extended period (weeks or months), keep it in a cool, dry place away from direct sunlight and extreme temperatures. Concrete floors are generally fine, despite old myths to the contrary.
- Maintain Charge During Storage: Batteries slowly discharge even when not in use. For optimal health, use a trickle charger or battery maintainer for batteries stored long-term. This prevents deep discharge, which can lead to sulfation and permanent damage.
- Inspect for Damage: Before reconnecting or storing, visually inspect the battery case for cracks, leaks, or swelling. Any signs of damage warrant careful handling and professional assessment.
- Proper Lifting Techniques: Car batteries are heavy. If you’re removing the battery from the vehicle, lift it with a proper battery carrier or use both hands, bending with your knees, to avoid back injury.
Conclusion
Safely disconnecting a car battery is a fundamental skill for any vehicle owner, offering peace of mind for DIY maintenance or storage. By understanding the critical importance of proper preparation, personal protective equipment, and the correct sequence of steps, you can confidently approach this task.
Remember, prioritizing safety by wearing appropriate gear and avoiding common pitfalls like incorrect terminal order are not just recommendations—they are essential practices that protect you and your vehicle. Take the time to understand each step, and always double-check your work.
Equipped with this knowledge, you’re ready to tackle battery disconnection with confidence and competence. Stay safe, stay informed, and keep your vehicle running smoothly!
❓ Frequently Asked Questions
What are the primary safety precautions I should take before attempting to disconnect my car battery?
Before starting, always wear safety glasses and acid-resistant gloves to protect against battery acid and sparks. Ensure the vehicle’s engine is off, the parking brake is engaged, and the car is in park (or neutral with wheels chocked) to prevent any accidental movement or electrical draw.
How do I correctly identify the positive and negative terminals on my car battery?
The positive terminal is usually marked with a “+” sign and often has a red cable or cover. The negative terminal is marked with a “-” sign and typically has a black cable connected to the car’s chassis, serving as the ground.
What should I do with the disconnected battery cables to ensure safety and prevent damage?
After disconnecting, ensure the cables (especially the positive) do not touch any metal parts of the car or each other. You can use electrical tape, a plastic bag, or a non-conductive cloth to insulate the ends of the cables and keep them securely away from the battery terminals.
Can disconnecting the battery affect my car’s computer or radio settings?
Yes, disconnecting the battery can sometimes reset your car’s onboard computer (ECU), erasing learned driving patterns or causing engine fault codes. It may also reset radio presets, clock settings, and power window memory, requiring them to be reprogrammed.
How do I properly clean the battery terminals during the disconnection process?
Once the cables are removed, use a wire brush or a specialized battery terminal cleaner to scrub away any corrosion (white or blue powdery substance) from both the battery posts and the inside of the cable clamps. This ensures good electrical contact upon re-connection.
What is the correct procedure for re-connecting a car battery after it has been disconnected?
When re-connecting, the order is reversed: always connect the positive (+) terminal first, then the negative (-) terminal. Securely tighten both connections, ensuring they are snug but not overtightened, and apply a thin layer of dielectric grease to prevent future corrosion.