How to Replace a Car Door Expert DIY Guide 2026
Last Updated on September 1, 2026 by Albert Duke
Replacing a car door involves careful preparation, sequential removal, and precise installation. This detailed guide walks you through every step, from gathering tools to final adjustments, empowering you to perform a successful DIY replacement.
Replacing a car door involves careful preparation, sequential removal, and precise installation. This detailed guide walks you through every step, from gathering tools to final adjustments, empowering you to perform a successful DIY replacement.
Replacing a car door can seem daunting, but with the right guidance, it is a manageable DIY project. We understand the financial strain of professional auto repairs, especially for a significant component like a car door. Undertaking this task yourself in 2026 not only saves money but also significantly enhances your mechanical skills and understanding of your vehicle.
The satisfaction of successfully completing such a complex repair is immense. This article provides the practical knowledge you need to achieve a professional-quality door swap.
Before grabbing any tools, understanding what you will need is the critical first step.
Key Takeaways


- Gather all specialized tools beforehand.
- Disconnect battery to ensure safety.
- Wiring harness removal needs precision.
- Align new door carefully for proper seal.
- Professional help might be necessary for complex issues.
What Key Tools Do You Need to Replace a Car Door?


Before you begin to replace a car door, acquiring the correct tools and materials is paramount for a smooth process. Having everything organized beforehand minimizes interruptions and ensures efficiency. We have grouped the essential items you will need for this project.
Essential Hand Tools
- A comprehensive socket and wrench set (metric and SAE).
- Various screwdrivers (Phillips and flathead).
- Torx bit set for specific fasteners.
- Trim removal tools (plastic pry tools are crucial to avoid damage).
- Wire cutters and strippers for electrical connections.
- Utility knife for cutting seals or tapes.
- Marking pen or paint for alignment references.
Specialized Equipment
- A sturdy floor jack and jack stands for supporting the vehicle if needed.
- An automotive hoist or heavy-duty jack for supporting the door itself.
- Impact wrench (optional, but speeds up bolt removal).
- Multimeter for testing electrical circuits.
- Heat gun for adhesive removal (e.g., weather stripping).
- Bungee cords or straps to temporarily secure components.
Crucial Safety Gear
- Heavy-duty work gloves to protect your hands.
- Safety glasses or goggles for eye protection.
- Knee pads for comfort during extended work.
- Mask or respirator if sanding or painting.
- Fire extinguisher nearby as a precaution.
Sourcing Replacement Doors
You have several options when looking for a replacement car door. New OEM (Original Equipment Manufacturer) doors offer a perfect fit but are the most expensive. Aftermarket doors are cheaper but quality can vary. Used doors from salvage yards are often the most cost-effective but might have minor damage or mismatched paint.
Consider checking local junkyards for a door in good condition. The cost of a new OEM car door can range from $500 to $1,500+, while used aftermarket doors might be $100-$400 .
Painting Preparations
If your replacement door does not match your car’s existing paint, you will need to plan for painting. This involves cleaning, sanding, priming, painting, and clear-coating. You can purchase aerosol cans with matched paint codes, often found on a sticker inside your driver’s side door jamb or under the hood.
For a seamless finish, professional painting might be required, but you can save significantly by doing the preparation work yourself. obtaining the correct paint code is vital for a good color match. Some manufacturers include the paint code on the vehicle identification number (VIN) sticker [LIST: Specific paint codes and where to find them for common manufacturers].
With your workshop prepared, the next phase involves safely detaching the old, damaged car door.
How to Safely Remove Your Damaged Car Door in 7 Steps


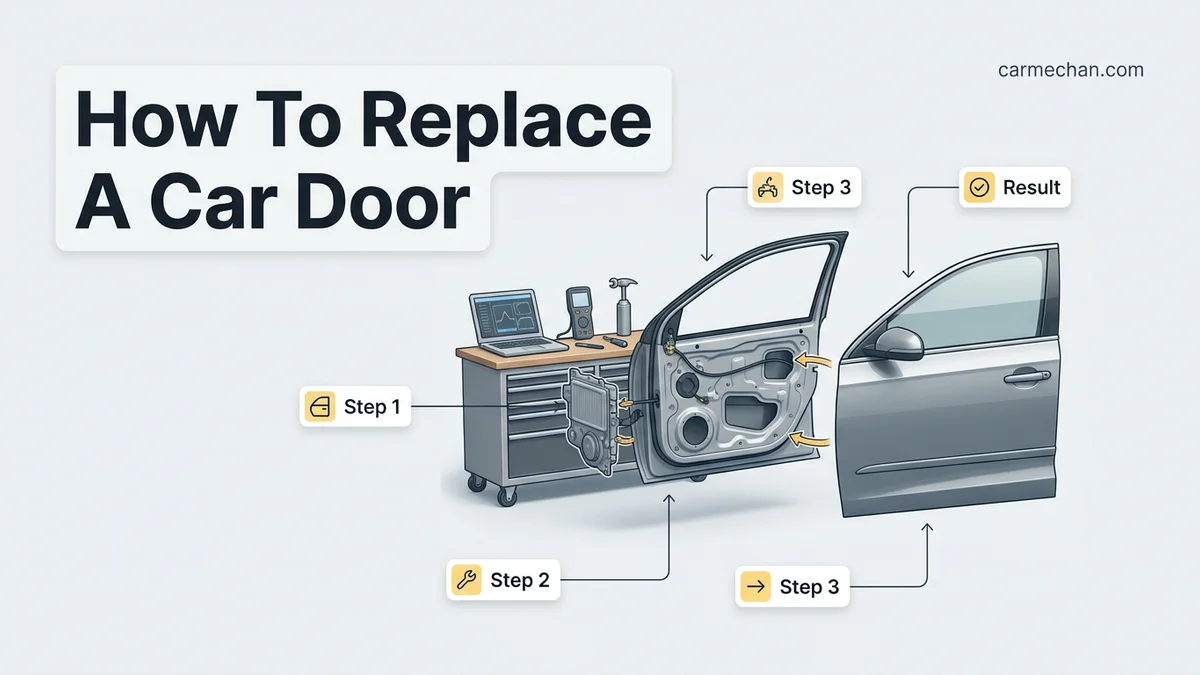
Safely removing the damaged car door requires methodical execution to prevent injury or further vehicle damage. This process often benefits from an extra pair of hands, especially when lifting the heavy door itself. Always prioritize safety throughout these steps.
Disconnect Vehicle Battery
Begin by completely disconnecting your car’s battery. Locate the battery, usually under the hood or in the trunk, and remove the negative terminal cable first, followed by the positive cable. This crucial step prevents electrical shorts and accidental airbag deployment during wiring detachment.
Remove Interior Panel
Carefully remove the interior door panel. This usually involves unscrewing a few fasteners, often hidden behind trim pieces or under door handles. Use your plastic trim removal tools to gently pry off clips and avoid scratching the paint or damaging the panel itself. Refer to a vehicle-specific repair manual for exact fastener locations.
IMAGE: Visual guide for trim panel removal.
Detach Wiring Harness
With the interior panel off, you will see the complex network of wires. Disconnect all electrical connectors leading to the power windows, locks, speakers, and any other components within the door. Take photos or label each connector to ensure correct reattachment later. Gently depress retaining clips on each connector to avoid breakage.
VIDEO: Short clip on disconnecting a wiring harness.
Disconnect Door Stop
The door stop, or door check strap, limits how far the door opens. Locate its attachment points, typically at the front of the door and on the car’s body. Unbolt or disconnect this component. This allows the door to swing freely for removal.
Support Door Weight
Before unbolting the hinges, ensure the door’s weight is adequately supported. A second person is ideal for this. Alternatively, you can use a floor jack with a padded block or specialized door support stands. This prevents the door from falling once the hinges are loose.
TIP: Advice on proper door support during unbolting.
Unbolt Hinge Fasteners
The hinges are typically secured to both the door and the car’s body with several bolts. Using your socket wrench, carefully loosen and remove these bolts. It is often best to remove the bolts from the door side first, then the body side, or vice-versa, depending on access and how you are supporting the door.
Lift Door Away
Once all fasteners are removed and the door is supported, carefully lift the damaged door away from the vehicle. Have your helper guide you. Move it to a safe location where it will not be damaged further or obstruct your workspace.
Once the old door is successfully removed, you are ready to prepare for the installation of its replacement.
Installing Your Replacement Car Door 5 Critical Steps
Installing your replacement car door demands patience and precision to ensure a proper fit and function. This stage is crucial for the long-term integrity and safety of your vehicle. A helper is invaluable for these steps.
Prepare Mounting Area
Inspect the car’s body where the old door was attached. Clean any debris, rust, or old sealant from the hinge mounting surfaces. Apply a thin layer of grease to the hinge pins if they are separate components. Ensure the area is smooth and ready for the new door.
Position New Door
With the help of your assistant, carefully lift the replacement door and align its hinges with the mounting points on the car’s body. This step requires delicate maneuvering. Avoid bumping or scratching your vehicle’s paintwork.
IMAGE: Two people maneuvering a car door onto hinges.
Attach Hinge Bolts Loosely
Insert the hinge bolts, but only tighten them finger-tight initially. This allows for crucial adjustments later to achieve perfect alignment. The loose fit provides enough play to move the door up, down, and side-to-side.
Connect Door Stop
Reattach the door stop or check strap. This component helps control the door’s opening range and provides stability during the initial alignment process. Ensure it is securely fastened but not overly tight, as it will also be subject to adjustment.
Perform Initial Alignment
With the bolts loose, gently close the door to check its initial fit against the car’s frame. Observe the gaps around the door. You can make gross adjustments by slightly moving the door and retightening the hinge bolts to hold it in place temporarily. The goal is to get it roughly aligned before full electrical reconnection.
General torque specifications for hinge bolts typically range from 25-40 ft-lbs, but consult your specific vehicle manual for accuracy.
DIAGRAM: Explaining hinge bolt positions for adjustment.
With the door physically attached, the next crucial step is reintegrating the vehicle’s electrical systems and interior components.
How to Connect Car Door Wiring Harnesses in 3 Phases
Connecting the car door’s electrical wiring system is a precise process crucial for the functionality of power windows, locks, and speakers. Rushing this stage can lead to frustrating electrical issues later. Double-check every connection.
Reconnect Main Harness
Locate the main wiring harness that passes from the car’s body into the door. Connect it securely, ensuring the clips engage properly. Refer to any photos you took during disassembly to ensure correct orientation and connection. The main harness typically powers most internal door functions.
IMAGE: Close-up of different wiring harness connectors.
Reintegrate Accessories
Systematically reconnect all individual electrical components within the door. This includes the power window motor, door lock actuator, speakers, side mirror controls, and any other sensors or lights. Ensure each connector clicks into place. Test the functionality of these components with the battery reconnected before reinstalling the interior panel.
CHECKLIST: Electrical function test items.
Reinstall Interior Panel
Once all electrical components are reconnected and tested, reattach the interior door panel. Align the clips and fasteners carefully, pressing firmly to secure it. Do not force anything; if it does not fit easily, re-check for obstructions or misalignments. Reinstall any trim pieces or screws that hold the panel in place.
Once all interior components and electrical systems are reconnected, the final and perhaps most important step involves fine-tuning your new door’s alignment.
When to Align Your Car Door After Installation
Properly aligning your new car door after installation is essential for a tight seal, smooth operation, and aesthetic consistency. This iterative process ensures the door functions perfectly, preventing issues like wind noise or water leaks. This step is critical for a professional finish.
Assess Door Gaps
Begin by visually inspecting the gaps around the newly installed door. Compare them to the gaps on other doors of your vehicle. The gaps should be consistent and uniform all the way around the door. Look for any areas where the door appears to sag or protrude. Ideal door gap measurements generally fall within 3-5 millimeters.
IMAGE: Visual examples of correct and incorrect door gaps.
Adjust Hinge Positions
The primary method for adjusting door alignment is through the hinges. Loosen the hinge bolts slightly, then gently push or pull the door to adjust its position. Tighten the bolts and re-check the gaps. This process might require several iterations of loosening, adjusting, and tightening until the gaps are even.
Modify Striker Plate
If the door does not close smoothly or requires excessive force, the striker plate on the car’s frame might need adjustment. Loosen its bolts and slightly move the plate until the door latches easily and sits flush with the body. Some striker plates have shims for finer adjustments. Ensure the door latches securely, without rattling.
DIAGRAM: How to adjust a striker plate.
Check Weather Stripping
Inspect the weather stripping around the door. It should make even contact with the car’s frame when the door is closed, creating a seal. If the door gaps are too wide or too narrow, the weather stripping might not seal correctly, leading to wind noise or water leaks. Minor adjustments to the door or weather stripping itself may be necessary.
Confirm Smooth Operation
Once you are satisfied with the gaps and seal, open and close the door several times. It should operate smoothly, without sticking or catching. Test the power windows, locks, and any other electrical components again to confirm full functionality. Drive the vehicle at varying speeds to listen for wind noise, which indicates a poor seal.
With your newly installed car door perfectly aligned and fully functional, let’s address some common questions you might have.
Your Top Questions About Replacing a Car Door Answered
We understand you might have more questions about this significant DIY project. Here are some common inquiries to help you further.
How Much Does It Cost to Replace a Car Door Yourself?
DIY replacement typically saves 50-70% over professional service by eliminating labor costs. You pay for the door itself, paint if needed, and specialized tools. Professional service includes labor, shop overhead, and markup on parts. For 2026, DIY costs generally range from $100-$1000, depending on the door source and painting needs.
Is Replacing a Car Door a Difficult DIY Project for a Beginner?
Replacing a car door is moderately difficult and not recommended for absolute beginners without prior mechanical experience. It requires precision, patience, specialized tools, and often a helper. Mistakes can lead to misalignment, electrical issues, or further body damage. It is a rewarding project for experienced DIYers.
How Long Does It Take to Replace a Car Door?
For an experienced individual, replacing a car door can take anywhere from 4 to 8 hours, including removal, installation, and initial adjustments. For a novice, this process could easily extend to 8-16 hours or even multiple days, accounting for research, learning, and troubleshooting.
What Are Common Issues After Replacing a Car Door?
Common issues include misalignment (leading to wind noise or water leaks), electrical problems (non-functional windows or locks), and difficulties with door latching. These often stem from improper hinge adjustment, incorrect wiring harness connections, or misaligned striker plates. Patience in troubleshooting is key.
Should I Paint My Replacement Door Before Installation?
Yes, we recommend painting your replacement door before installation if it does not match your vehicle’s existing color. Painting it off the vehicle allows for better coverage and easier access to all surfaces. You can then touch up any small areas or scratches that occur during installation.
Your Next Steps After Replacing a Car Door
Successfully replacing a car door yourself is a significant accomplishment and a testament to your mechanical aptitude. You have not only saved a substantial amount of money compared to professional body shop costs in 2026, but you have also gained invaluable experience.
Take pride in your work and continue to monitor the door’s function over the coming weeks. Listen for any unusual noises, check for water leaks during rain, and ensure all electrical components remain fully operational. Regular maintenance and proper care will extend the life of your newly installed car door.