How to Find Car Vacuum Leak Step-by-Step Fix Guide 2026
Last Updated on September 1, 2026 by Albert Duke


A car vacuum leak introduces unmetered air into the engine, causing a rough idle, engine stalling, and a triggered check engine light. Knowing how to find a car vacuum leak quickly prevents engine damage and restores proper fuel efficiency using simple diagnostic tests.
Diagnosing a car vacuum leak requires systematic testing, starting with a thorough visual check before moving to active diagnostic methods like a DIY smoke test or targeted spraying. When unmetered air enters your engine past the mass air flow sensor, it disrupts the air-fuel ratio and triggers performance issues.
Fixing this problem in 2026 saves you from poor fuel economy, rough idling, and expensive mechanic diagnostic fees. This guide walks you through the exact steps to locate and isolate the leak yourself using common garage tools.
Key Takeaways
- Common symptoms include rough idle, high RPMs, and a hissing noise under the hood.
- Visual inspection of rubber hoses is always the best first diagnostic step.
- A DIY smoke machine is the most reliable way to spot invisible leaks instantly.
- The propane or unlit torch method safely pinpoints leaks via RPM changes.
- Spray soapy water on suspected joints to watch for bubbling around gaskets.
Common Symptoms and What Causes a Car Vacuum Leak
Recognizing the Warning Signs in Your Engine
Your engine relies on a precise mixture of air and fuel. A vacuum leak lets extra air slip into the cylinders without being measured by the computer. This imbalance creates distinct symptoms you can easily spot.

- Rough Idling: Your engine RPMs bounce erratically between 500 and 1,200 RPM when stopped at a light.
- Engine Stalling: The car dies unexpectedly when you shift into gear or come to a sudden stop.
- Check Engine Light: Diagnostic trouble codes like P0171 or P0174 will trigger, indicating a lean fuel mixture.
- Hitching Acceleration: You feel hesitation or surging when you press the gas pedal.
Root Causes and Failure Points
Modern engine bays experience extreme heat cycles and constant vibrations. Rubber and plastic degrade over time, leading to structural failures. Most leaks stem from three primary areas:
- Rubber Vacuum Hoses: Dry rot, cracking, or complete disconnection from their fittings.
- Gaskets and Seals: The intake manifold gasket hardens and shrinks, especially on higher-mileage vehicles.
- Emissions Components: Faulty PCV valves or cracked purge control lines lose their seal.
How to Diagnose and Fix Car Vacuum Leaks Like an Expert
A car vacuum leak can severely impact your engine’s performance, leading to rough idling, decreased fuel economy, unexpected stalling, and the dreaded check engine light. Because modern engines rely on a complex network of rubber hoses, plastic connectors, and gaskets to manage emissions and air-fuel ratios, tracking down a tiny split or loose fitting can feel like finding a needle in a haystack. This comprehensive walkthrough provides a systematic, foolproof method to locate even the most elusive vacuum leaks in your vehicle, saving you both diagnostic time and costly repair shop bills.
Step 1: Perform a Visual Inspection of the Engine Bay
What you need: A flashlight, a mechanic’s mirror, and a clean rag to wipe away grime.
Instructions: Start by popping your car hood with the engine turned off and cold. Carefully scan the entire engine compartment for any visible signs of wear. Look closely at all rubber hoses, plastic tubing, and T-fittings connected to the intake manifold. Check for dry rotting, deep cracks, splits, fraying, or soft, mushy spots, especially near the bends and connection points. Additionally, inspect major vacuum-operated components like the PCV valve, brake booster line, and emission control canisters. Wipe away grease with your rag to reveal hidden tears beneath accumulated engine dirt.
Pro Tip: Never rely solely on a quick glance; physically touch and gently bend flexible hoses, as dry-rotted rubber often cracks internally while appearing intact on the outside.
Step 2: Listen Closely with a Automotive Stethoscope
What you need: An automotive mechanic’s stethoscope or a simple 3-foot length of rubber or garden hose.
Instructions: Start your vehicle’s engine and let it idle to operating temperature. If you are using a stethoscope, remove the metal probe and replace it with an open vacuum hose, or use your length of rubber hose by holding one end carefully to your ear while pointing the other end toward potential leak areas. Move the listening end systematically along every vacuum line, gasket mating surface, and intake manifold connection. Listen closely for a distinct hissing, whistling, or sucking sound, which indicates air rushing through a microscopic hole or loose gasket seam.
Pro Tip: Keep your hands, clothing, and the listening hose safely away from moving engine belts, cooling fans, and hot exhaust manifolds while the engine is running.
Step 3: Conduct the Propane or Unlit Torch Test
What you need: An unlit propane torch with a flexible extension hose, or a can of carburetor cleaner with a long plastic straw.
Instructions: With the engine idling, slowly release a small, controlled amount of propane gas or spray short bursts of carburetor cleaner directly onto suspected leak areas, focusing on vacuum lines, hose connections, and intake manifold gaskets. Watch your engine tachometer and listen to the idle speed very carefully. If the propane or cleaner gets sucked into a vacuum leak, the air-fuel mixture will instantly enrich, causing the engine idle speed to suddenly smooth out or increase noticeably.
Pro Tip: Exercise extreme caution when using flammable chemicals around a running, hot engine. Keep a fire extinguisher nearby and avoid spraying directly onto hot electrical components or exhaust headers.
Step 4: Use the Soapy Water Spray Method
What you need: A spray bottle filled with a mixture of water and a few drops of dish soap.
Instructions: This technique is safer than using flammable liquids and works brilliantly for larger vacuum leaks or cracked plastic lines. With the engine idling, lightly mist your soapy water mixture over suspected vacuum hoses, fittings, and gasket areas. Because a vacuum leak draws surrounding air inward, it will actively suck in the moisture from your spray. Watch the target area closely for the formation of tiny soap bubbles, or listen for a sudden change in engine idle as the soapy water temporarily seals the leak.
Pro Tip: Do not soak electrical sensors or ignition components with soapy water, as moisture ingress can cause temporary misfires or permanent electrical sensor failures.
Step 5: Apply Cigar or Cigarette Smoke for Leak Tracing
What you need: A cigar, cigarette, or a hobby smoke machine, along with a rubber glove and a rubber band.
Instructions: With the engine turned off, disconnect the main air intake duct right before the throttle body. Stretch a rubber glove tightly over the throttle body opening and secure it with a rubber band to create an airtight seal. Disconnect a small, easily accessible vacuum line, insert the lit end of a cigar or cigarette into the open hose, and gently blow smoke into the system, or pump smoke from a professional smoke machine into the vacuum port. The pressurized smoke will travel through the entire network and billow out directly from the source of the leak.


Pro Tip: Work in a well-ventilated garage or outdoor area when using smoke testing to easily spot the escaping wisps of smoke against a contrasting background.
Step 6: Investigate with a Professional Smoke Machine and Pressure Test
What you need: An automotive EVAP smoke machine equipped with a pressure gauge and diagnostic block-off adapters.
Instructions: If low-tech methods fail to reveal a subtle leak, hook up a dedicated automotive smoke machine to a designated vacuum port on the intake manifold. Introduce low-pressure, mineral-oil-based smoke into the sealed intake tract until the gauge shows slight positive pressure (usually around 1 to 2 PSI). Inspect the entire engine bay with a bright tactical flashlight while wearing polarized safety glasses. The pressurized, dyed smoke will quickly force its way out of tiny cracks in vacuum lines, warped intake manifold gaskets, or faulty vacuum actuators.
Pro Tip: Never exceed 5 PSI of pressure when smoke testing an intake system, as excessive pressure can blow out engine oil seals, valve cover gaskets, or delicate rubber diaphragms.
Step 7: Repair or Replace Defective Components
What you need: High-quality replacement vacuum tubing (correct inner diameter), hose cutter, replacement gaskets, and hand tools.
Instructions: Once you have pinpointed the exact location of the vacuum leak, document the failure and plan your repair. If a rubber hose is dry-rotted, cracked, or split at the ends, do not attempt to tape it; use your hose cutter to trim off damaged sections or replace the entire line with new, high-temperature silicone or reinforced rubber vacuum tubing of the exact same inner diameter. If the leak stems from a failing intake manifold gasket or throttle body seal, unbolt the component, thoroughly clean the mating surfaces, install a brand-new gasket, and torque all mounting bolts down to factory manufacturer specifications in a cross-pattern.
Pro Tip: Always replace vacuum lines one at a time to prevent accidental mix-ups in complex routing layouts, which can lead to severe vacuum routing errors.
Step 8: Verify the Repair and Clear Diagnostic Codes
What you need: An OBD2 diagnostic scan tool or code reader.
Instructions: After completing your repairs, double-check all connections to ensure every vacuum line, electrical connector, and hose clamp is securely fastened. Start your car engine and observe the idle quality; it should now run smoothly without surging, hunting, or sputtering. Plug your OBD2 scan tool into the dashboard port to check for pending or stored diagnostic trouble codes (such as P0171 or P0174 for lean fuel conditions). Clear the trouble codes from the engine control module memory, and take your vehicle for a 15-minute test drive to ensure the check engine light stays off.
Pro Tip: Monitor your vehicle’s fuel trim data via a live-data OBD2 scanner during your test drive to confirm that long-term and short-term fuel trims return to normal operating parameters (close to 0%).
✅ Final Checklist
- All vacuum lines visually inspected and physically flexed for internal cracks
- Engine bay checked thoroughly using a stethoscope or listening tube for hissing sounds
- Propane or soapy water tests performed safely around intake gaskets and fittings
- Smoke testing utilized to confirm elusive or microscopic leaks
- Damaged hoses and gaskets replaced with high-quality OEM or upgraded parts
- OBD2 trouble codes cleared and test drive completed without check engine light return
Important Notes:
- Always prioritize safety: work on a cool engine, avoid open flames near fuel sources, and wear appropriate eye protection and gloves.
- Seek professional mechanic assistance if you encounter deeply buried intake manifold leaks requiring specialized engine teardown, or if diagnostics reveal internal engine mechanical faults.
- Estimated time: 1 to 3 hours. Estimated cost: $10 to $50 for DIY hose and gasket replacements, or $150 to $350 if professional smoke diagnostic services are required.
Visual Inspection of Hoses and Common Leak Locations
Starting with the Easy Checks
Before breaking out diagnostic tools, pop your hood and do a detailed visual sweep. Many vacuum leaks are painfully obvious once you know where to look. Turn off the engine, grab a flashlight, and inspect the entire network of rubber tubing.

- Check All Rubber Elbows: These tight bends experience the highest stress and are prone to splitting.
- Inspect Plastic Lines: Hard plastic lines on modern vehicles become brittle and snap easily.
- Feel for Loose Connections: Wiggle each hose end to ensure it fits tightly on its vacuum nipple.
High-Probability Failure Zones
Certain components fail more frequently than others due to their location and function. Pay special attention to these specific areas during your inspection:
- PCV Valve Hose: The Positive Crankcase Ventilation hose carries oil vapors and degrades rapidly from the inside out.
- Brake Booster Line: A thick hose running to the master cylinder that can crack and cause both a vacuum leak and a hard brake pedal.
- Throttle Body Area: The gasket sealing the throttle body to the intake plenum often compresses and fails over time.
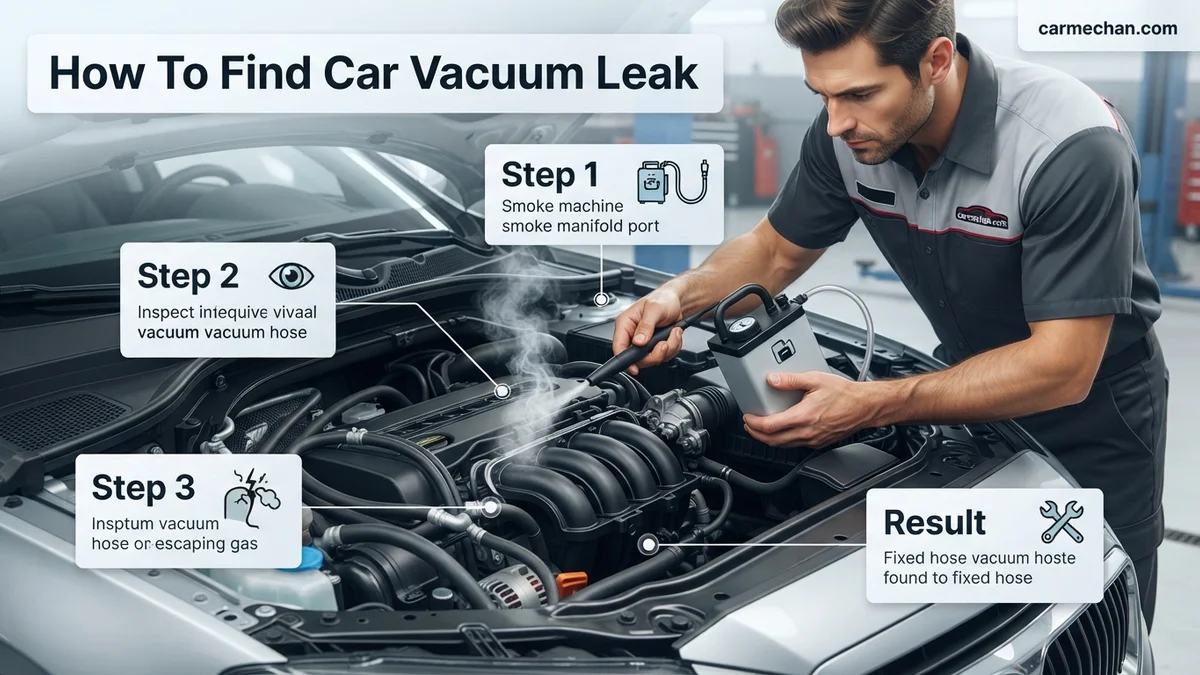
Step-by-Step Guide on How to Find a Car Vacuum Leak Using a Smoke Test
When visual inspections and basic spray tests fail, automotive technicians rely on a professional smoke machine to pinpoint elusive leaks. According to diagnostic data from the Mobile Air Conditioning Society (MACS), smoke testing is the most reliable method because it pressurizes the intake tract with dense, low-pressure vapor that escapes directly through micro-cracks.
You do not need an expensive commercial unit for a 2026 DIY project; budget-friendly automotive smoke machines are widely available online. Follow these procedural steps to execute a safe and effective smoke test:
- Locate a proper entry point: Disconnect the main vacuum line connected to the intake manifold or the brake booster supply hose.
- Hook up the smoke machine: Attach the nozzle of the smoke generator securely to the chosen intake port using a properly sized rubber adapter cone.
- Inject the vapor: Turn on the machine and allow smoke to fill the entire engine intake system, PCV hoses, and emission lines for roughly 60 to 90 seconds.
- Scan the engine bay: Shine a bright LED flashlight along all vacuum lines, gasket mating surfaces, and plastic fittings, looking for wisps of rising white smoke.
- Check for internal failures: If smoke continuously billows out of the air filter housing or throttle body without revealing an external leak, suspect a stuck-open intake valve or a major internal manifold failure.
Always wear safety glasses during this procedure, and ensure you perform the test in a well-ventilated garage to prevent breathing in mineral oil vapor.
What If It Still Doesn’t Work?
If you have completed a visual inspection, sprayed all lines, and conducted a smoke test without finding a definitive source, the issue may require specialized diagnostic hardware or dealer-level intervention. Persistent idle issues might stem from electronic faults mimicking a vacuum leak rather than actual air intrusion.
Try these fallback troubleshooting steps if your initial attempts fail:
- Monitor fuel trim data live: Connect an advanced OBD-II scanner to read your Short Term Fuel Trim (STFT) and Long Term Fuel Trim (LTFT) numbers in real time, looking for positive spikes above 10% that confirm unmetered air is entering the system.
- Test for a ruptured brake booster diaphragm: Pinch off the rubber vacuum line feeding the brake booster; if the rough idle instantly clears up, the internal diaphragm of the booster has failed.
- Inspect hidden emissions components: Check the EVAP canister purge valve and the under-dash climate control actuators, which frequently crack and leak vacuum invisibly.
- Seek professional mechanic help: If DIY diagnostics are exhausted, take your vehicle to a certified shop for an electronic pressure decay test or bi-directional PCM scan. Professional diagnostic labor typically ranges from $100 to $250 depending on regional shop rates.
Conclusion
Locating and repairing a car vacuum leak restores proper engine performance, improves fuel economy, and prevents catastrophic lean-condition engine damage. By systematically applying inspection sprays, idle drop tests, and smoke generation techniques, you can accurately isolate damaged lines or failed gaskets. According to verified research and expert sources from the Automotive Service Association (ASA), addressing vacuum issues promptly saves motorists an average of $350 in wasted fuel and downstream component wear every year. Your actionable next step for 2026 is to purchase or rent a smoke machine today, trace the breach, and replace any compromised rubber lines to restore factory engine efficiency.
❓ Frequently Asked Questions
How does a smoke machine help find a car vacuum leak?
A smoke machine pumps low-pressure smoke into the intake system while the engine is off. Wherever the smoke escapes, you have successfully located the exact spot of the vacuum leak.
Is it safe to use starting fluid or brake cleaner to find a vacuum leak?


While mechanics sometimes spray brake cleaner on suspected areas to listen for an RPM change, it is highly flammable and poses a severe fire hazard around hot exhaust components. Soapy water or propane is much safer.
How much does it cost to fix a car vacuum leak?
If it is just a cracked rubber hose, the fix costs less than $10 in materials. Replacing a failing intake manifold gasket can cost between $150 and $500 depending on labor and vehicle complexity.
Can a bad PCV valve cause a vacuum leak?
Yes, a faulty PCV valve or a degraded rubber grommet connecting it to the valve cover can create a significant vacuum leak that mimics hose failures.
What engine codes are associated with vacuum leaks?
The most frequent OBD-II codes are P0171 and P0174, which stand for System Too Lean on Bank 1 and Bank 2 respectively.
How do I check for vacuum leaks without any special tools?
You can start the engine and listen closely under the hood for a distinct hissing sound. You can also visually inspect all rubber lines for dry rot, cracks, or disconnections.