DIY Car Air Filter Change: Boost Performance & Save Fuel
Changing your car’s air filter is a simple and effective DIY maintenance task that significantly improves engine performance and fuel efficiency. This guide provides everything you need to know, from tools to troubleshooting, ensuring a smooth replacement process. Regular replacement is crucial for engine health.
🎯 Key Takeaways
- Gather basic tools before starting your air filter change.
- Boost engine performance and fuel economy with a new filter.
- Replace your air filter every 12,000-15,000 miles.
- Always ensure the engine is off and cool for safety.
- Select the correct air filter for your specific car model.
Changing your car’s engine air filter is one of the simplest, most rewarding DIY maintenance tasks you can perform. It requires minimal tools and only takes a few minutes, yet many drivers overlook it. By tackling this job yourself, you’ll save money on mechanic fees and immediately improve your car’s health.

A clean engine air filter is crucial for optimal vehicle performance, fuel efficiency, and engine longevity. Ignoring this small component can lead to noticeable drops in horsepower, increased fuel consumption, and even long-term damage to vital engine components. This guide will walk you through the entire process, making it easy for you to boost your car’s performance and save on fuel costs right from your driveway.
Understanding the Role and Benefits of a Clean Air Filter
Your car’s engine needs a constant supply of clean air for combustion. The engine air filter is the gatekeeper, preventing dirt, dust, pollen, insects, and other airborne contaminants from entering the engine’s intricate systems. Think of it as your engine’s lungs; if they’re clogged, your engine can’t breathe efficiently, which impacts everything from power output to overall lifespan.

Maintaining a clean engine air filter ensures optimal engine operation. When the filter is clear, air flows freely, allowing your engine to maintain the correct air-to-fuel ratio essential for efficient combustion. This efficiency directly translates into better performance and significant savings at the pump. Don’t underestimate the impact of this easily replaceable part.
Why Airflow Matters: Performance and Fuel Economy
- Restored Horsepower: A clogged filter restricts airflow, forcing your engine to work harder. Changing it can restore lost horsepower and improve acceleration, making your car feel more responsive.
- Improved Fuel Efficiency: An engine struggling for air will compensate by burning more fuel to achieve the desired power output. A clean filter ensures your engine gets the oxygen it needs, optimizing the air-fuel mixture and potentially improving your gas mileage by 5-10%.
- Reduced Emissions: When your engine burns fuel more efficiently, it also produces fewer harmful emissions. A clean air filter contributes to a greener, more environmentally friendly vehicle.
Protecting Your Engine’s Lifespan
Beyond performance and fuel economy, the air filter plays a critical role in safeguarding your engine’s internal components. The microscopic particles of dust and grit found in everyday air can act like sandpaper on pistons, cylinder walls, and other moving parts. Over time, this abrasion leads to premature wear and expensive repairs.
- Prevents Contaminant Entry: The dense filtration media captures even the smallest particles, protecting sensitive engine components from abrasive damage. This includes sand, road grit, leaves, and other debris that could otherwise cause significant wear.
- Extends Engine Life: By keeping contaminants out, a clean air filter helps maintain the integrity of vital engine parts, reducing wear and tear. This directly contributes to a longer, healthier life for your engine, saving you from costly rebuilds or replacements down the road.
- Supports Optimal Sensor Function: Modern engines rely on various sensors, like the Mass Airflow (MAF) sensor, to monitor air intake. A clean filter prevents dirt from fouling these sensors, ensuring accurate readings and proper engine management.
How to Change Your Car’s Air Filter Like a Pro: A Practical Walkthrough
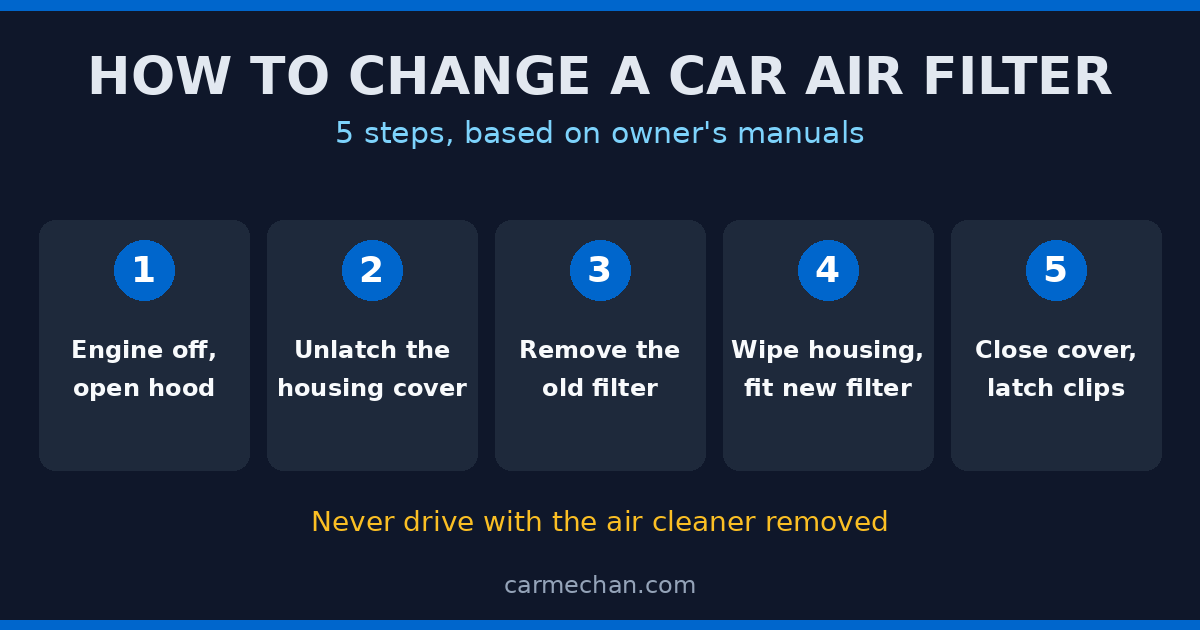
This comprehensive guide provides a step-by-step approach to changing your car’s engine air filter. A clean air filter is essential for optimal engine performance, fuel efficiency, and longevity, preventing harmful contaminants from reaching your engine. By following these instructions, you can confidently perform this critical maintenance task yourself, ensuring your vehicle runs efficiently and reliably.
Step 1: Gather Your Supplies and Consult Your Manual
What you need: Correct new engine air filter, screwdriver set (flathead, Phillips, Torx if applicable), work gloves (optional), shop rags, car’s owner’s manual.
Instructions: First, ensure you have the precise replacement air filter for your car’s make, model, and year. This information is typically found in your owner’s manual or by cross-referencing online with your vehicle’s specifications. Always compare the new filter to the old one to confirm it matches in size and shape. Consult your owner’s manual to locate the air filter housing and to check for any model-specific instructions or warnings. Having all necessary tools readily available will streamline the process.
Pro Tip: Most auto parts stores can verify the correct filter part number using your vehicle’s VIN. Investing in a quality filter can offer enhanced filtration and potentially extend its service life.
Step 2: Locate the Air Filter Housing
What you need: Your car’s owner’s manual (if unsure), flashlight (optional).
Instructions: Open your car’s hood and securely prop it up. The air filter housing is typically a large, black plastic box, often rectangular or somewhat rounded, situated in the engine bay. It’s usually connected to a substantial intake hose that leads directly to the engine manifold. Visually trace this main intake hose; it will lead you straight to the air filter housing. Take a moment to observe its overall shape and identify the clips or screws that hold its components together before attempting to open it.
Pro Tip: For certain vehicle models, especially those with compact engine layouts, the air filter housing might be less conspicuous. If you struggle to locate it, always refer to your owner’s manual to avoid damaging other engine components by forcing access.
Step 3: Disconnect Components and Open the Housing
What you need: Screwdriver (if fasteners are screws), your hands (for clips), camera (optional, for reference).
Instructions: The air filter housing is secured by either metal clips, screws, or a combination. Examine the housing carefully to identify all fasteners. If clips are present, unlatch them by pulling or prying them outwards. If screws are used, utilize the correct screwdriver to loosen and carefully remove them, placing them in a safe spot to prevent loss. In some vehicles, a sensor wire (often for the Mass Air Flow – MAF sensor) or a small hose may be connected to the housing or intake tube; gently disconnect these by pinching their release tabs. Once all fasteners are loose, you can carefully separate the housing’s top and bottom halves.
Pro Tip: To avoid losing small parts, place screws or clips in a magnetic tray or on a clean rag near the windshield wipers. Taking a quick photo with your phone before disconnecting wires or hoses provides an excellent reassembly reference.
Step 4: Remove the Old Air Filter
What you need: Work gloves (optional).
Instructions: Carefully lift the top section of the air filter housing, or if it’s hinged, gently swing it open. The old air filter will be seated within the lower half of the housing. Before removal, take careful note of its orientation—which side faces up or down, and how it fits into any specific grooves or tabs. Gently lift the old filter straight out. Inspect its condition: a clean filter is typically white or light grey, whereas a dirty one will appear dark, laden with leaves, insects, and road grime. This visual inspection confirms the necessity for replacement.
Pro Tip: A severely clogged air filter can diminish engine power by up to 10% and significantly decrease fuel economy. If your old filter is exceptionally dirty, consider reducing your replacement interval to approximately 10,000-12,000 miles, rather than the standard 15,000-30,000 miles.
Step 5: Clean the Air Filter Housing
What you need: Shop rags or paper towels, small shop vacuum (optional).
Instructions: With the old filter removed, meticulously inspect the interior of the air filter housing. You will likely find accumulated dust, small leaves, tiny pebbles, and dead insects. Use a clean shop rag or paper towels to thoroughly wipe down the inside of both halves of the housing. Pay particular attention to the grooves where the filter seats. If there’s a significant amount of loose debris, a small shop vacuum can effectively remove it. Ensure no debris inadvertently falls into the intake system while cleaning. A clean housing guarantees a better seal for the new filter.
Pro Tip: Never use compressed air to clean the housing while it remains attached to the intake system. This can blow debris further into the engine’s intake tract, potentially causing damage. Stick to manual wiping and vacuuming for safety.
Step 6: Install the New Air Filter
What you need: Your new engine air filter.
Instructions: Carefully unwrap your new air filter, ensuring it is clean and free from any damage. Following the orientation you observed when removing the old filter, meticulously place the new filter into the housing. The rubber gasket or foam seal around the filter’s edge must sit flush and snugly within the housing’s groove, forming an airtight barrier. Do not force the filter; it should slide in smoothly if correctly positioned. A perfect seal is crucial to prevent unfiltered air from bypassing the filter and entering the engine, which could lead to significant internal wear.
Pro Tip: Double-check that the filter is seated perfectly flat and securely. A common error is installing the filter slightly askew, which compromises the seal and allows unfiltered air to enter the engine, defeating the purpose of the new filter.
Step 7: Close and Secure the Air Filter Housing
What you need: Screwdriver (if needed), your hands (for clips).
Instructions: Carefully realign the top half of the air filter housing with its bottom half. If the housing has hinges, ensure they are properly engaged. Firmly push the two halves together until they meet flush. Reattach all clips by pushing or snapping them back into their locked positions. If your housing utilizes screws, reinsert and tighten them snugly, but be careful not to overtighten, as this can strip the plastic threads. Reconnect any sensor wires or hoses that were detached in Step 3, ensuring they click securely into place. Gently wiggle the housing to confirm it feels solid and correctly assembled.
Pro Tip: Meticulously verify that every clip is firmly latched or every screw is properly tightened. Even a single loose fastener can create a gap, allowing unfiltered air to bypass the filter. This step is as important as the filter installation itself.
Step 8: Final Checks and Test Drive
What you need: Nothing specific, just your observational skills.
Instructions: Before lowering your hood, conduct a thorough visual inspection of the entire air filter assembly. Confirm all connections are secure, wires are reconnected, and the housing is fully closed. Remove all tools and rags from the engine bay. Close the hood. Start your car and listen for any unusual noises, such as a prominent whistling or sucking sound, which could indicate an air leak from the housing. Take your car for a brief test drive. You might notice improved throttle response or a smoother running engine, particularly if the old filter was significantly dirty. If you experience excessive engine noise or rough idling, promptly re-open the hood and meticulously double-check your work.
Pro Tip: If your “check engine” light illuminates after the change, re-verify all sensor connections, especially the Mass Air Flow (MAF) sensor if it was disconnected. An improperly connected sensor is a common cause for fault codes.
✅ Final Checklist
- ✅ New air filter is securely seated and housing is fully closed.
- ✅ All clips and screws are properly fastened and snug.
- ✅ Any disconnected hoses or sensor wires are reconnected.
- ✅ No tools or debris have been left in the engine bay.
- ✅ Engine runs smoothly without unusual noises or illuminated “check engine” lights.
Important Notes:
- Safety considerations: Always ensure your car is parked on a level surface with the engine off and cool before commencing work. Wear gloves to protect your hands from grease and potential sharp edges. Avoid touching hot engine components.
- When to seek professional help: If you encounter significant difficulty locating the housing, removing stubborn components, or if your vehicle exhibits persistent issues (such as a recurring check engine light or unusual engine behavior) after the filter change, it is advisable to consult a certified mechanic.
- Estimated time and cost range: This DIY task typically takes 10-30 minutes for a beginner. The cost of a new air filter generally ranges from $15-$40, representing a substantial saving compared to a professional service which might charge $50-$100+ for the part and labor combined.
Identifying When Your Car’s Air Filter Needs Changing
Knowing when to change your engine air filter is key to proactive maintenance. While your car might not always display obvious warning signs until the filter is severely clogged, there are several indicators and recommended intervals to help you determine if it’s time for a replacement. Regular inspection is a simple way to stay ahead of potential issues.

Don’t wait for your car’s performance to noticeably degrade before checking the filter. By paying attention to visual cues, subtle performance changes, and adhering to manufacturer guidelines, you can ensure your engine always breathes easy and operates at its best. A simple visual check is often the most straightforward diagnostic tool.
Recognizing the Warning Signs
- Visible Dirt and Debris: The easiest way to tell is by simply looking at it. A new filter is typically white or off-white. If your filter appears dark gray or black, is caked with grime, leaves, insects, or other debris, it’s definitely time for a change.
- Reduced Fuel Economy: If you notice your car is getting fewer miles per gallon than usual, a dirty air filter could be a contributing factor. The engine needs more fuel to compensate for restricted airflow.
- Sluggish Acceleration or Reduced Horsepower: Your car might feel less responsive, accelerate slowly, or struggle to maintain speed on inclines. This is a direct result of the engine not getting enough air for efficient combustion.
- Unusual Engine Sounds: A dirty air filter can sometimes cause the engine to make a whistling or sucking sound due to restricted airflow, or even run rougher than usual.
- “Check Engine” Light: While less common for just an air filter, a severely clogged filter can sometimes trigger your car’s “Check Engine” light if it impacts the Mass Airflow (MAF) sensor’s readings too significantly.
Adhering to Maintenance Schedules
Most vehicle manufacturers recommend checking your engine air filter at every oil change or during routine service intervals. However, the actual replacement schedule can vary widely based on your driving conditions and vehicle type.
- Manufacturer Recommendations: As a general rule, most manufacturers suggest replacing the engine air filter every 12,000 to 15,000 miles, or once a year, whichever comes first. Always consult your car’s owner’s manual for the precise recommendation for your specific model.
- Driving Conditions: If you frequently drive in dusty environments, on unpaved roads, in heavy traffic with frequent stops, or in areas with high pollen counts, you may need to replace your air filter more often. Check it every 5,000 to 7,500 miles under these conditions.
- Climate and Environment: Extreme temperatures or high humidity can also affect the filter’s integrity and effectiveness over time. A quick visual inspection is always advisable, regardless of mileage, if you drive in challenging conditions.
Selecting the Right Replacement Air Filter for Your Vehicle
Choosing the correct air filter is just as crucial as the replacement process itself. An ill-fitting or inappropriate filter won’t offer the intended benefits and could even compromise your engine’s health. Think of it like choosing shoes – they might look similar, but the right size and type make all the difference in comfort and performance.
Understanding Filter Types and Materials
Air filters aren’t one-size-fits-all, nor are they all made from the same material. You’ll typically encounter a few main types:
- Paper (Cellulose) Filters: These are the most common, offering excellent filtration and cost-effectiveness. They’re designed for single use and need regular replacement. Great for everyday drivers who prioritize standard performance and economy.
- Synthetic Filters: Often made from non-woven synthetic fibers, these can offer slightly better airflow or longer service intervals than paper filters. They are a good balance between performance and protection.
- Cotton (Gauze) Filters: Known as “performance” filters (like K&N), these are usually made from layers of cotton gauze saturated with oil. They offer superior airflow for potential minor horsepower gains but require periodic cleaning and re-oiling, not just replacement.
For most drivers, a standard paper or high-quality synthetic filter from a reputable brand will provide optimal protection and performance.
Matching the Filter to Your Car’s Specifications
Precision is key when selecting your new air filter. Your car’s engine is designed to work with a specific filter shape, size, and flow rate. Getting this wrong can lead to serious issues.
- Consult Your Owner’s Manual: This is your definitive guide. It will specify the exact part number or filter specifications for your vehicle’s make, model, and year.
- Check the Existing Filter: Many filters have a part number printed directly on the housing. Note this down before heading to the auto parts store.
- Use Online Resources: Websites for auto parts retailers or filter manufacturers (e.g., Fram, Wix, Mann) have “parts finders” where you input your vehicle details to get compatible options.
Always prioritize filters that meet or exceed OEM (Original Equipment Manufacturer) specifications. While aftermarket filters can be excellent, ensure they are designed specifically for your vehicle.
Common Challenges and Expert Tips for Air Filter Replacement
Even a seemingly straightforward task like changing an air filter can present a few minor hiccups. Knowing what to look out for and having a few expert tips up your sleeve can make the process smoother and prevent unnecessary frustration.
Overcoming Tricky Fasteners and Tight Spaces
Modern engine bays are often packed, and sometimes air filter housings can be tucked away or secured with less-than-obvious fasteners. Don’t let this deter you!
- Use the Right Tools: While many air filters are secured with simple clips, some might use screws (Phillips, flathead, or even Torx) or bolts. Have a basic set of screwdrivers and possibly a small socket wrench ready.
- Good Lighting is Your Friend: A headlamp or a bright work light can illuminate hidden clips or screws, especially in the darker corners of the engine bay.
- Be Gentle with Plastic Clips: Older plastic clips can become brittle over time. Apply even, gentle pressure when disengaging them to avoid snapping them. If a clip feels stuck, double-check if there’s an unseen screw or latch holding it.
- Photograph as You Go: If you’re unsure how something comes apart, take a quick photo with your phone. This creates a visual guide for reassembly, particularly useful for hoses or wires that might need to be moved.
Remember, patience is a virtue here. Forcing components can lead to damage that’s more expensive to fix than the filter itself.
Pre-Installation Checks and Post-Replacement Wisdom
Before you even unwrap your new filter, and right after you’ve secured it, a couple of quick checks can save you from potential issues and ensure everything is working perfectly.
- Clean the Airbox: Before inserting the new filter, take a moment to wipe out any leaves, dust, or debris that might have accumulated inside the air filter housing. A small vacuum cleaner or a clean rag works wonders.
- Orient the Filter Correctly: Air filters are typically designed to fit in only one direction. Check for arrows indicating airflow or simply ensure it seats snugly without buckling. An improperly seated filter can allow unfiltered air into your engine.
- Double-Check All Connections: After installing the new filter and securing the airbox, ensure all clips, screws, and any disconnected hoses or sensor wires are firmly reattached. A loose connection can lead to error codes or performance issues.
- Start Your Engine: Listen for any unusual sounds. If you hear a distinct hissing or whistling, it might indicate an improperly sealed airbox or a disconnected hose.
These small steps guarantee that your new filter performs optimally and your engine breathes clean, unobstructed air.
Breathe New Life into Your Engine Today
Replacing your car’s air filter might seem like a small task, but its impact on performance, fuel efficiency, and engine longevity is anything but minor. By understanding your filter options and approaching the task with a few expert tips, you empower yourself to tackle this maintenance item confidently.
Don’t wait until your engine is struggling for air. Take a moment to check your owner’s manual for recommended intervals or simply inspect your current filter. Invest in a quality replacement, and enjoy the tangible benefits of a healthier, happier engine. It’s a simple step that pays dividends down the road!
❓ Frequently Asked Questions
What are the clear signs my car’s air filter needs replacing?
Common indicators include decreased fuel efficiency, noticeable reduction in engine power or acceleration, unusual engine noises, and a visibly dirty or dark filter when inspected. You might also notice a ‘check engine’ light if the airflow sensor is affected.
Is there a significant difference between OEM and aftermarket air filters?
OEM (Original Equipment Manufacturer) filters are designed specifically for your car, ensuring a perfect fit and filtration standard. Aftermarket filters offer various price points and performance claims, but it’s crucial to choose a reputable brand that meets or exceeds OEM specifications for proper filtration and airflow.
How much does it typically cost to change a car’s air filter DIY versus at a mechanic?
DIY replacement is very cost-effective, typically costing $15-$40 for the filter itself, saving you labor fees. A mechanic will charge for the filter plus 30-60 minutes of labor, potentially bringing the total to $50-$100 or more, making DIY a significant saving.
What are the essential safety precautions to take before changing the air filter?
Always ensure your car’s engine is turned off and completely cool to prevent burns from hot engine components. It’s also wise to wear gloves to keep your hands clean and to disconnect the battery’s negative terminal if you need to work near sensitive electronics, though this is rarely necessary for just the air filter.
Can a dirty air filter impact other car components or systems?
Yes, a severely clogged air filter can starve the engine of oxygen, leading to unburnt fuel and increased carbon deposits, which can harm spark plugs, oxygen sensors, and catalytic converters over time. It can also cause your engine to run rough or hesitate.
How do I ensure I’m buying the correct air filter for my specific vehicle?
To guarantee you purchase the right filter, always check your car’s owner’s manual for the specific part number or dimensions. Alternatively, provide your car’s make, model, and year to your auto parts store, or use online lookup tools that cross-reference vehicle information with compatible filter part numbers.