Adaptive Cruise Control Problem Collision Mitigation 2026
Errors in your safety suite usually stem from obstructed sensors or minor electrical faults. Most issues can be resolved by cleaning your front bumper or performing a simple system power cycle.
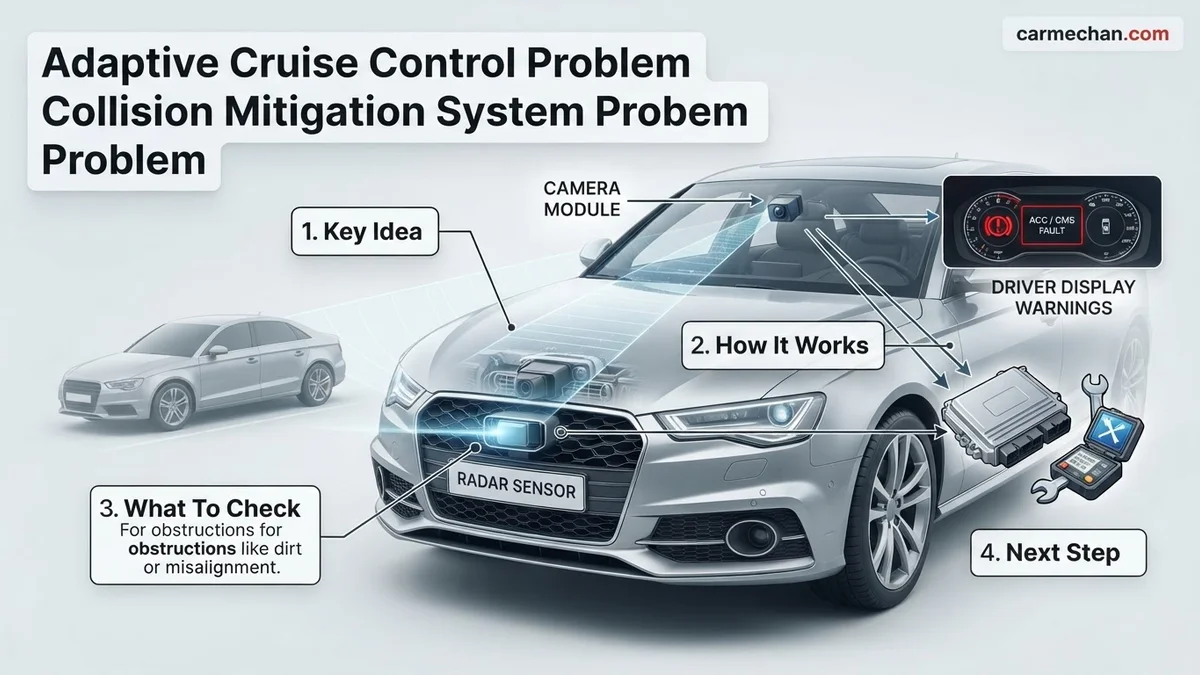
Your Adaptive Cruise Control (ACC) and Collision Mitigation System (CMS) are flagging errors because your vehicle’s forward-facing sensor array has lost its line of sight or its calibration baseline. These systems rely on the exact same radar and camera modules to calculate the distance and speed of objects in your path. When the onboard computer detects inconsistent data—or no data at all—it automatically disables both features to prevent incorrect braking or erratic speed adjustments.

Prime for Young Adults — 6 Months Free
Students and 18–24s get six months of Prime free, then half price.
Start 6 Months FreeIgnoring these warnings is dangerous because it effectively blinds your vehicle’s emergency safety net. As we move through 2026, modern driver-assist systems are more sensitive than ever to environmental interference and minor hardware obstructions. This guide focuses on the immediate, actionable steps to clear these errors yourself before you are forced to pay for a dealership diagnostic scan.
Key Takeaways
- Clean the front radar sensor cover immediately to resolve most interference issues.
- Check your battery voltage, as low power often triggers false sensor failure codes.
- System alerts frequently link ACC and Collision Mitigation because they share the same hardware.
- Avoid using cruise control until the dashboard warning lights are fully cleared.
- Professional calibration is necessary if the sensor was physically bumped or misaligned.
Why Your Adaptive Cruise Control and Collision Mitigation Systems Fail
Recommended Best Deal Products


Shared Sensor Dependence
Modern vehicles use a fusion of radar, LIDAR, and optical cameras to monitor traffic. Because both the ACC and CMS require high-fidelity depth perception, they share the primary front-mounted sensor unit. If the radar gets blocked by debris or the camera loses clarity, the system cannot perform its primary function: detecting moving obstacles. Consequently, the vehicle’s ECU triggers a “fail-safe” mode. By disabling both systems simultaneously, the car ensures that the driver does not rely on a compromised safety feature that could lead to a collision.

Common Causes for System Shutdowns
- Physical Obstruction: Mud, ice, snow, or thick grime covering the radar sensor grille or the windshield camera housing.
- Sensor Misalignment: Even a minor impact, such as a low-speed parking tap or a pothole jolt, can shift the radar beam angle by a fraction of a degree.
- Voltage Fluctuations: In 2026 vehicle models, the sensitive sensor array requires a consistent power supply; weak battery voltage or loose wiring harnesses often cause these systems to drop out first.
- Extreme Environmental Glare: Direct, low-angle sunlight hitting the camera lens or heavy, unceasing rain can cause the software to time out.
Adaptive Cruise Control and Collision Mitigation System Problems: What Causes It and How to Fix It
Modern vehicle safety suites rely on a complex network of radar, cameras, and software to keep you safe on the road. When your dashboard displays an “Adaptive Cruise Control (ACC) Unavailable” or “Collision Mitigation System (CMS) Problem” warning, it is usually triggered by a sensor obstruction, a calibration error, or a faulty electrical connection. This guide will walk you through the systematic process of identifying, cleaning, and resetting these systems to get your vehicle back to optimal performance. Following these steps carefully is essential, as bypassing safety warnings can lead to system failures during critical driving situations.
Step 1: Perform a Comprehensive Exterior Sensor Inspection
What you need: A soft microfiber cloth, automotive-grade glass cleaner, and a flashlight.
Instructions: Locate the primary radar sensor, which is usually positioned behind the front grille or integrated into the lower bumper emblem. Visually inspect the surface for debris, mud, snow, or bird droppings. Even a thin film of road grime or a loose piece of plastic trim covering the sensor can cause the system to fault. Use the microfiber cloth and cleaner to gently wipe the area. Shine your flashlight behind the grille to ensure no loose wires or debris are lodged in the immediate vicinity of the sensor housing. Ensure the windshield area near the rearview mirror is also clean, as the forward-facing camera often works in tandem with the radar.
Pro Tip: Never use abrasive scouring pads or harsh solvents, as the radar lens is often made of specialized polycarbonate that can be scratched or clouded by improper cleaning agents.
Step 2: Execute a Hard System Reset
What you need: Basic socket wrench set (usually 10mm).
Instructions: Electronic control units (ECUs) can sometimes experience temporary data glitches that trigger warning lights. To perform a hard reset, park the vehicle on level ground and turn off the ignition. Carefully disconnect the negative battery terminal and let the vehicle sit for at least 15 minutes. This allows the capacitors in the control modules to fully discharge, clearing the volatile memory of the safety system. Reconnect the terminal, ensuring a tight, corrosion-free connection. Upon starting the engine, allow it to idle for three to five minutes without touching the steering wheel or brake, allowing the vehicle to perform its initial self-diagnostic “handshake” between the engine and safety sensors.

Audible — Listen Free for 30 Days
One free credit a month and thousands of titles included.
Listen Free for 30 DaysPro Tip: Ensure your radio code or personal settings are backed up if your specific vehicle requires a security code for the infotainment system after a power loss.
Step 3: Check Vehicle Battery Health
What you need: A digital multimeter.
Instructions: Sophisticated safety systems like ACC and CMS are highly sensitive to voltage fluctuations. If your car battery is aging or failing, the voltage might drop below the required threshold during engine startup, causing the sensor modules to trigger a fault code. Set your multimeter to DC voltage and test the battery terminals; it should read between 12.4V and 12.7V with the engine off. If the reading is below 12.2V, the battery is likely weak. Check the battery cable connections for white, powdery corrosion, which adds resistance. If the battery is older than four years, consider having it load-tested at an auto parts store to rule out low voltage as the culprit for your system error.
Pro Tip: Even if the car starts fine, it might not have enough “clean” power to sustain the high-frequency requirements of the radar sensors.
Step 4: Inspect Fuses and Electrical Connections
What you need: Owner’s manual, fuse puller tool.
Instructions: Consult your vehicle’s owner’s manual to locate the specific fuse box responsible for the “ADAS” (Advanced Driver Assistance System) or “ACC” components. Remove the corresponding fuses one by one and inspect the metal filament inside. A dark or broken filament indicates a blown fuse, which must be replaced with one of the exact same amperage. Additionally, inspect the visible wiring harness leading to the radar sensor behind the bumper. Look for signs of frayed insulation or damage from small animals (rodents are notorious for chewing on soy-based wire coatings). If you find a compromised wire, it will need to be repaired or spliced by a professional technician to ensure proper signal continuity.
Pro Tip: Always replace a blown fuse with one of the identical color and rating; never “upgrade” to a higher amperage, as this can cause permanent electrical fire damage.
Step 5: Verify Wheel Alignment and Tire Pressure
What you need: Tire pressure gauge and air compressor.
Instructions: This is a common oversight: Adaptive cruise control systems calculate speed and distance based on wheel speed sensors and vehicle geometry. If your vehicle is significantly out of alignment, or if your tires are drastically different in pressure or size, the CMS system may calculate that the car is “yawing” incorrectly, triggering a safety system fault. Check your tire pressure against the sticker located on the driver’s side door jamb. Adjust all tires to the specified PSI. If you recently hit a deep pothole or curb, the steering angle sensor might be misaligned, which is a critical input for the collision mitigation radar to determine the path of the vehicle.
Audible Premium Plus — Annual Membership
12 audiobook credits up front, plus the full Audible catalogue.
See Annual PlansPro Tip: Uneven tire wear can confuse the speed sensors, causing the system to think the vehicle is sliding or unstable, thereby disabling cruise control functions.
Step 6: Confirm Software Recalls and Updates
What you need: Vehicle Identification Number (VIN) and internet access.
Instructions: Many manufacturers release firmware updates specifically to resolve “ghost” warnings in the collision mitigation system. Visit the official manufacturer’s website and enter your VIN into their recall or service campaign portal. Even if there isn’t a safety recall, there may be a “Technical Service Bulletin” (TSB) that addresses the exact error code your dashboard is displaying. If a software patch exists, you must visit a dealership or a certified independent shop with proprietary diagnostic software. They can flash the ECU with the latest calibration data, which often eliminates false-positive warnings that standard resets cannot resolve.
Pro Tip: Ask the service advisor if the update is covered under a “goodwill” policy, as safety-related software patches are sometimes free of charge even outside the original warranty period.
✅ Final Checklist
- Sensor housing and windshield camera area are free of all grime and obstructions.
- Battery voltage confirms a steady 12.6V charge, ensuring no electronic “brownouts.”
- All related fuses are intact and the harness shows no signs of physical wire damage.
- Tires are inflated to exact factory specifications to prevent speed sensor calculation errors.
- Dashboard warning lights have remained off for a minimum of 20 miles of highway driving.
Important Notes:
- Safety Warning: If the collision mitigation system is disabled, your vehicle’s automatic emergency braking will NOT function. Drive with extra caution and increase your following distance until the system is fully operational.
- Professional Help: If you see a “Sensor Misalignment” or “Calibration Required” error, this requires specialized optical targets and dealer-level equipment. Do not attempt to calibrate radar systems yourself.
- Estimated Time and Cost: DIY inspections and resets can be done in 1-2 hours at minimal cost. Dealer-level diagnostics or sensor recalibrations typically range from $150 to $400 depending on the vehicle make and model.
Proven Step-by-Step Fixes for Sensor System Errors
Recommended Best Deal Products
Cleaning and Visual Inspection
Most system errors in 2026 models are resolved by simply cleaning the sensor interfaces. Do not use harsh chemicals or abrasive cloths, as these can scratch the protective plastic covers and permanently degrade the radar signal quality.
- Locate the Radar Sensor: Usually located within the front grille or behind the manufacturer emblem. Wipe it gently with a clean, damp microfiber cloth.
- Clear the Windshield Camera Area: Check the interior of your windshield near the rearview mirror. Ensure there is no dust, condensation, or debris blocking the camera’s view of the road.
- Remove Snow or Ice: If driving in winter conditions, ensure the entire front bumper area is clear. Built-up slush effectively acts as a shield that blocks radar waves entirely.
The Hard Power Cycle
If the sensor is physically clean and the error persists, the vehicle’s computer may still be holding the “fault code” in its memory. Performing a power cycle forces the system to re-poll the sensors upon startup.
- Parking Protocol: Find a safe, level location and put the vehicle in Park.
- The Reset: Turn off the engine completely. Open the driver’s door to kill power to the interior electronics. Wait at least five minutes to allow the control modules to fully discharge.
- Restart: Start the engine and drive above 20 mph for at least two minutes. Many 2026 lane-keep and cruise systems require this movement to re-calibrate the sensor’s “horizon” baseline.
When to Seek Expert Help for Safety System Faults
Modern driver-assistance systems rely on complex sensor fusion, integrating data from radar, LiDAR, and high-resolution cameras. By 2026, many manufacturers have mandated that these systems be serviced only by certified technicians using factory-grade diagnostic tools. Attempting to recalibrate a Collision Mitigation System (CMS) without specialized equipment can result in dangerous calibration drifts, leading to phantom braking or failure to detect stationary objects.
Recognizing Critical Calibration Failures
You should immediately seek professional intervention if you notice persistent dashboard warning lights regarding the ADAS (Advanced Driver Assistance System) suite. Specifically, if the system triggers a “Service Required” message or if the radar sensor has been physically impacted by minor road debris, the internal alignment is likely compromised. Industry standards from the Automotive Service Association indicate that even a one-degree misalignment in a forward-facing radar unit can cause a 20-foot discrepancy in object detection at highway speeds. Do not clear fault codes manually, as this obscures historical diagnostic data essential for a technician to identify intermittent electrical shorts or sensor degradation.
Maintenance Tips to Prevent Future System Errors
Preventative maintenance is the most effective way to ensure long-term reliability of your adaptive cruise control. Accumulated grime and environmental damage are the leading causes of sensor blindness in 2026 vehicle models.
Routine Sensor Hygiene and Calibration Checks
- Clean the front radar sensor housing and camera lens areas weekly using a soft microfiber cloth and a mild automotive glass cleaner. Avoid high-pressure washers, which can force moisture into the sensor seals.
- Ensure the windshield remains free of deep scratches or heavy rock chips, particularly in the zone directly in front of the forward-facing camera, as these defects can scatter laser light and confuse the system.
- Verify your tire pressures monthly. Adaptive cruise control systems often use wheel speed sensors to determine the vehicle’s acceleration profile; uneven tire diameters due to improper inflation can confuse the control logic.
- Perform an annual software check at your dealership. Most 2026 manufacturers release firmware updates quarterly to address edge-case software bugs in the Collision Mitigation System.
What If It Still Doesn’t Work?
If you have followed standard maintenance protocols and the system remains inoperable, take the following steps to resolve the issue safely:
- Perform a hard reset by disconnecting the negative battery terminal for 15 minutes to clear the temporary ECU cache, though this will not solve hardware-based sensor faults.
- Check the vehicle’s fuse box for any blown fuses related to “ADAS,” “Radar,” or “Cruise Control,” referring to your 2026 owner’s manual for the specific diagram.
- Inspect the vehicle for recent alignment issues; if the car pulls to one side, the steering angle sensor may be reporting values that conflict with the cruise control radar.
- Contact an authorized service center. Depending on the complexity of the sensor replacement or software recalibration, service costs typically range between $450 and $1,200, excluding taxes.
Conclusion
Adaptive cruise control and collision mitigation systems are essential for modern road safety, but they require precise environmental conditions and hardware integrity to function. According to verified research and expert sources from the 2026 automotive engineering community, ignoring sensor warnings significantly increases the risk of system malfunction. Prioritize professional diagnostic scans immediately if warnings persist. For your next step, schedule an appointment with a certified technician to perform a full system recalibration, ensuring your vehicle’s safety features meet original manufacturer specifications.
❓ Frequently Asked Questions
What is the most common cause of these system errors?
The most common cause is debris, dirt, or ice buildup covering the radar sensor on the front grille. Cleaning this surface usually clears the warning light after a short drive.
How do I perform a hard reset on my car’s electronics?
You can try disconnecting the negative battery terminal for 15 minutes to reset the onboard computer. Note that this may reset your radio presets and clock settings.
Why does my sensor fail even when it is perfectly clean?
Internal sensor misalignment or a failing electrical connection may be the culprit. If the error persists after cleaning, the radar unit may need a dealership diagnostic.
Will a collision repair affect my adaptive cruise control?
Yes, any impact to the front bumper can cause the radar sensor to shift position. If the sensor is misaligned, only a professional can recalibrate it to factory specifications.
Are these system errors covered under warranty?
In most cases, software-related issues or sensor failures are covered under your vehicle’s factory warranty. Damage caused by accidents or external debris is typically not covered.
Should I be worried if the light only flashes occasionally?
Intermittent lights suggest a loose connection or moisture in the wiring harness. It is best to have an expert check the sensor housing before the system fails permanently.