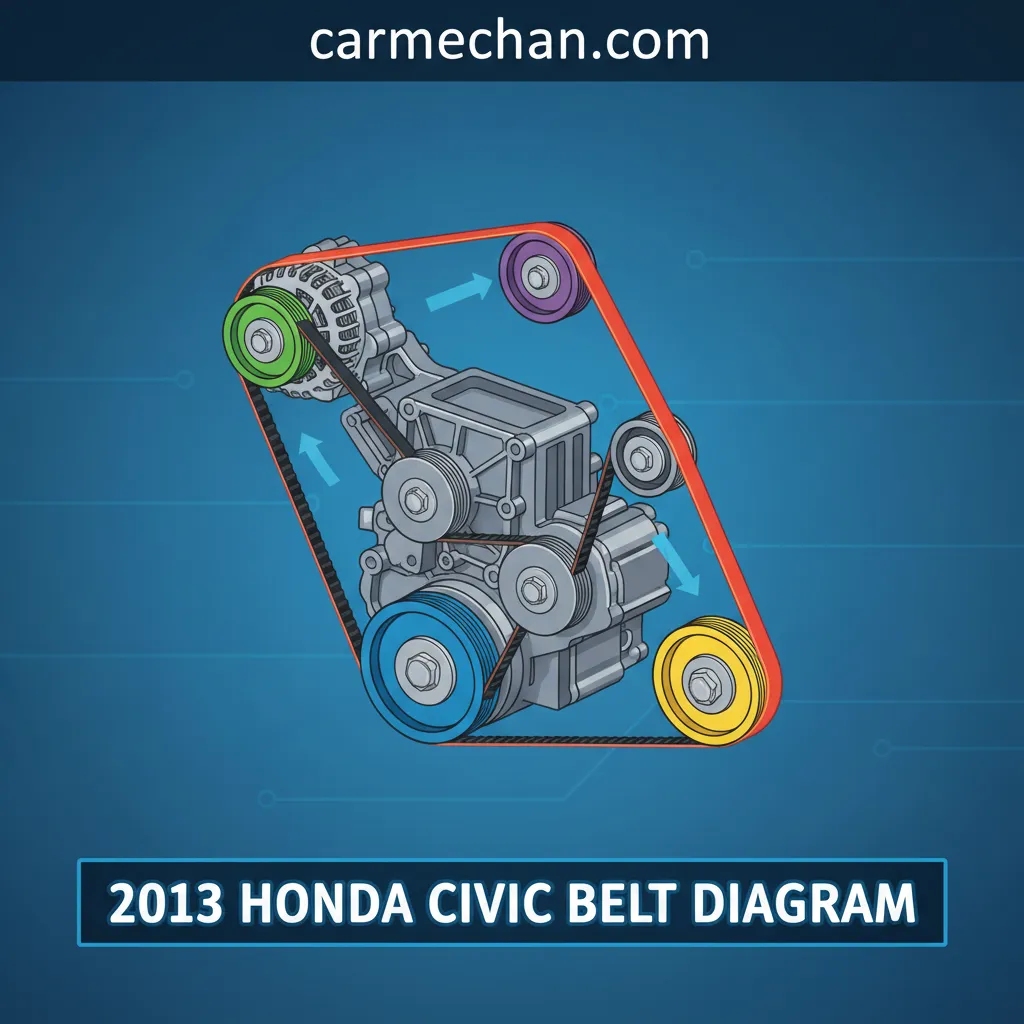
2013 Honda Civic Belt Diagram: Serpentine System Overview And Maintenance
The serpentine belt is a critical, yet often overlooked, component in your 2013 Honda Civic’s engine, orchestrating the operation of numerous essential systems. Without an accurate understanding of its routing, maintenance, and replacement, vehicle owners can face significant operational disruptions, from loss of power steering to complete engine shutdown. Locating the correct diagram and performing professional maintenance can be daunting. This expert-level guide provides a detailed content blueprint for understanding, inspecting, and replacing the serpentine belt on your 2013 Honda Civic, ensuring reliable vehicle performance and empowering you with the trusted knowledge to maintain this vital system.
Understanding the 2013 Honda Civic Serpentine Belt System
Recommended Best Deal Products


📤 Share Image
The serpentine belt, often referred to as the drive belt, serves as the lifeblood for numerous ancillary systems in your 2013 Honda Civic’s engine. Its primary function is to transmit rotational power efficiently from the engine’s crankshaft to essential accessories. These critical components typically include the alternator, which generates electrical power; the air conditioning (A/C) compressor, responsible for cabin cooling; and the water pump, which circulates coolant to prevent engine overheating. In some older configurations, it might also drive a power steering pump, though most 2013 Honda Civic models utilize electric power steering (EPS), rendering a belt-driven pump unnecessary.
The serpentine belt system comprises several key components working in concert. At its core is the crankshaft pulley, the power source, from which the belt receives its rotational energy. This power is then distributed via the belt to the various driven accessory pulleys. To maintain optimal tension and ensure consistent power transmission, an automatic tensioner pulley is integrated into the system, automatically adjusting to belt stretch and wear. Additionally, idler pulleys guide the belt, providing the necessary contact angles and ensuring proper routing around all accessories. This intricate design maximizes belt contact with each pulley, a critical engineering decision for efficiency and longevity.
The operational principle is straightforward yet highly effective: as the crankshaft rotates, it drives the serpentine belt, which in turn spins the pulleys of the accessories. This continuous power transmission ensures all systems operate simultaneously and without interruption. A properly functioning serpentine belt is paramount for vehicle reliability; a single belt failure can disable multiple critical systems simultaneously, leading to an immediate vehicle breakdown and potential cascading damage to components such as the battery (due to alternator failure) or the engine itself (due to water pump failure). Ensuring a quality and reliable belt system is a cornerstone of professional vehicle maintenance.

Identifying Your 2013 Honda Civic Engine Type and Corresponding Belt Diagram
Accurately identifying your specific 2013 Honda Civic engine variant is the critical first step before attempting any belt-related service. Honda produced various engine types for the 2013 Civic lineup, and each has a distinct serpentine belt routing and component configuration. The two most common engines you’ll encounter are the 1.8L R18A1 engine, typically found in LX, EX, and HF models, and the more performance-oriented 2.4L K24Z7 engine, exclusive to the Civic Si.
To locate and verify your engine code, consult your vehicle’s documentation or physically inspect the engine block itself; the code is usually stamped on a prominent, easily accessible area. Alternatively, a VIN decoder can provide this information, offering a trusted and expert-verified method to confirm your engine type. Once identified, you can reference the correct serpentine belt diagram.
The differences in routing, accessory configurations, and tensioner types between these engine variants are significant. An incorrect belt routing is a common error that can lead to immediate belt shedding, premature wear, or even severe damage to the belt and pulleys. For example, installing a belt incorrectly can cause it to rub against other components, creating friction and heat that will quickly destroy the belt or a pulley bearing.
To ensure accuracy, always advise sourcing reliable, expert-verified diagrams. Official Honda service manuals, often published by resources like Helm Inc., are the most reliable source for a complete guide. Trusted automotive repair databases, subscribed to by professional technicians, also provide precise, engine-specific diagrams. Never rely on generic diagrams or unverified online sources for such a critical component.

Visual Inspection and Diagnostics for Your 2013 Honda Civic Drive Belt
Recommended Best Deal Products

![[2G+64G] for Honda Civic 2006-2011 Wireless Carplay Android 15.0 Car Stereo |…](https://m.media-amazon.com/images/I/41uEvl6hnfL._SS500_.jpg)

A proactive and professional visual inspection of your 2013 Honda Civic’s serpentine belt is critical for preventing unexpected breakdowns and ensuring quality vehicle operation. While a typical serpentine belt is designed to last between 50,000 to 100,000 miles, expert recommendation is to inspect it more frequently—ideally every 15,000 miles or annually, whichever comes first. This comprehensive inspection should be systematic and meticulous.
Systematic Belt Inspection
- Cracks and Fraying: Closely examine both sides of the belt for cracks. Deep cracks perpendicular to the belt’s length are a clear indicator of aging and material fatigue. Fraying along the edges or missing chunks from the ribs point to severe wear or misalignment.
- Glazing: A shiny, glazed appearance on the belt’s ribs indicates slippage. This usually occurs when the belt isn’t gripping the pulleys effectively, often due to insufficient tension, a worn belt surface, or oil contamination.
- Contamination: Check for any oil, grease, or coolant leaks that have come into contact with the belt. Contaminants can degrade the belt material, reduce friction, and cause premature failure. Address any leaks immediately.
- Rib Wear: Inspect the belt ribs for uneven wear or reduced depth. If the ribs appear thinner in some areas or show signs of delamination, the belt is compromised.
Tensioner and Pulley Assessment
Beyond the belt itself, the health of the entire system is crucial. The automatic tensioner pulley must be inspected for proper function. Check for excessive play in the tensioner arm, which indicates a worn internal spring or bushing. Listen for any grinding or squealing noises emanating from the tensioner bearing. Visually verify that the tensioner arm is aligned and not wobbling while the engine is running (briefly, from a safe distance). Most tensioners have an indicator mark that shows if the belt tension is within the specified range; consult your service manual for its location and proper reading.
Similarly, inspect all driven accessory pulleys (alternator, A/C compressor, water pump) and idler pulleys. Look for signs of wear on the pulley grooves, bearing noise (a distinct hum or grind), wobbling, or misalignment. A misaligned pulley can rapidly shred a new belt and often indicates a worn bearing or improper installation. Approaching the engine from various angles with a flashlight can help detect these subtle but critical issues.
Audible Indicators of Belt Problems
Audible cues are often the first sign of a problem. A persistent squealing or chirping noise, particularly on cold starts or under load (e.g., turning on the A/C), almost invariably points to a slipping belt. This can be due to a worn belt, insufficient tension, or contamination. A grinding noise from any pulley suggests a failing bearing, which can seize and cause the belt to snap. These sounds should never be ignored, as belt-related issues account for approximately 15% of roadside breakdowns, a significant figure that underscores the importance of thorough and professional diagnostic practices.
When performing your visual inspection, briefly start the engine and observe the belt’s path while it’s running (from a safe distance). Look for any signs of wobble, uneven tension, or tracking issues on the pulleys. This dynamic inspection can reveal problems not apparent when the engine is off. Always use caution around moving engine components.
Step-by-Step Guide: 2013 Honda Civic Serpentine Belt Replacement Procedure
📋
Step-by-Step Guide
Recommended Best Deal Products


Gather all necessary tools: a suitable wrench or ratchet (e.g., a 19mm for the R18 engine tensioner, or a 14mm/19mm for K24Z7, potentially with a breaker bar for leverage), your new OEM or high-quality aftermarket belt, safety glasses, and gloves. Ensure the engine is completely cool to prevent burns. Disconnect the negative terminal of the battery to eliminate any electrical hazards. Always support the vehicle securely on jack stands if working underneath. Never rely solely on a jack.
Before removing anything, make a clear diagram or take multiple photographs of the existing belt routing. This visual reference is invaluable during installation, especially considering the differences between the 1.8L R18A1 and 2.4L K24Z7 engines. This prevents incorrect installation, a common pitfall.
Locate the automatic belt tensioner. For most 2013 Civics with the 1.8L R18 engine, you’ll use a 19mm wrench or socket on the tensioner bolt to rotate it clockwise to compress the tensioner spring and release tension. For the 2.4L K24Z7 (Si), the specific tensioner design may require a different sized wrench or a specialized tool. Once tension is relieved, carefully slip the belt off one of the pulleys (e.g., the alternator or idler pulley) and then fully remove it from all components. Keep the old belt to compare with the new one.
Compare your new belt with the old one to ensure it’s the correct length and number of ribs. Using your documented diagram, carefully route the new belt around all pulleys, leaving one pulley (typically an idler or the tensioner pulley itself) partially off to be the last point of installation. Reapply tension to the automatic tensioner (again, rotating it clockwise for the R18) and slide the belt fully onto the final pulley. Slowly release the tensioner, ensuring the belt seats correctly in all pulley grooves.
Once the belt is installed, double-check that it is perfectly seated in all pulley grooves and that the tensioner is holding appropriate tension (refer to the tensioner’s indicator marks, if available). Reconnect the battery. Start the engine and listen for any squealing, chirping, or unusual noises. Observe the belt’s path to ensure it tracks correctly without wobbling or rubbing. Allow the engine to run for a few minutes and then shut it off to perform a final visual inspection. The tensioner pulley on a 2013 Civic typically requires specific torque for re-installation if removed (refer to service manual specifications, usually in the range of 30-45 lb-ft). Emphasize using a professional-grade replacement belt, as lower quality belts can fail prematurely.
Never attempt to relieve tension or remove the belt while the engine is running. Moving engine components are extremely dangerous and can cause severe injury. Always ensure the engine is off and cool, and the vehicle is safely supported.
Common Issues and Troubleshooting for 2013 Honda Civic Belt Systems
Even with regular maintenance, issues can arise within the 2013 Honda Civic’s serpentine belt system. Effective troubleshooting requires a systematic approach, moving beyond simple belt replacement to diagnose underlying causes. As a seasoned expert, I can tell you that the belt itself is often a symptom, not the root cause, of recurring problems.
Addressing Belt Squeal
Belt squeal is arguably the most common complaint. If a new, quality belt still squeals, the problem lies elsewhere. Primary causes include:
- Misalignment: Pulleys that are not perfectly aligned will cause the belt to scrub against the edges, producing noise. Use a straight-edge tool across the faces of the pulleys to check for alignment discrepancies.
- Insufficient or Excessive Tension: While automatic tensioners largely prevent this, a failing tensioner can still lead to improper tension. Inspect the tensioner’s indicator marks or test its spring resistance.
- Contamination: Even a tiny amount of oil, coolant, or power steering fluid (if applicable) on the belt or pulleys can cause slippage and noise. If the squeal disappears briefly after spraying a small amount of water on the belt, it strongly suggests a belt-related issue (worn material, glazing, or contamination). If it persists, investigate pulley bearings.
- Glazed Pulleys: Old, shiny pulley grooves can reduce the belt’s grip. Lightly sanding the grooves with fine-grit sandpaper (with the belt removed) can sometimes restore grip, but severely worn pulleys require replacement.
Premature Belt Wear or Repeated Failure
If your 2013 Civic experiences premature belt wear or repeated belt shedding, focus on the supporting components:
- Faulty Pulleys: A worn bearing in an idler pulley, tensioner pulley, or an accessory pulley (alternator, A/C compressor, water pump) can create excessive drag, heat, or wobble, leading to belt degradation. Check each pulley for free rotation, lack of play, and smooth operation. A worn accessory bearing can increase drag on the belt system by up to 30%, leading to accelerated belt wear.
- Crankshaft Balancer Issues: In rare cases, a failing harmonic balancer (crankshaft pulley) can cause belt wobble or eccentric rotation, leading to rapid belt wear. This usually manifests as a noticeable vibration and visual wobble of the main pulley.
- Incorrect Belt Specification: Using a belt that is too long, too short, or has an incorrect number of ribs for your specific 2013 Civic engine (R18A1 vs. K24Z7) will inevitably lead to problems. Always ensure the part number matches the OEM specification.
Diagnosing a Failing Tensioner
The automatic tensioner is a common failure point. Signs of a failing tensioner include:
- Visible Wobbling or Misalignment: While the engine is running, observe the tensioner pulley. If it wobbles excessively or appears misaligned, its internal components are likely compromised.
- Insufficient or Excessive Tension: The tensioner might not be applying enough pressure, causing belt slippage, or it might be applying too much, which overstresses the belt and accessory bearings. This can be checked with a specialized tension gauge.
- Noise: A grinding or rumbling sound from the tensioner itself indicates a failing bearing.
Troubleshooting Accessory Issues
Sometimes, what appears to be a belt problem is actually a failing accessory:
- Alternator: A failing alternator can seize, causing the belt to stop or squeal loudly as it tries to turn a locked pulley. You might also notice battery warning lights or dimming headlights.
- A/C Compressor: A failing A/C compressor clutch can create significant drag or seize, impacting belt function. Try turning the A/C on and off to see if the noise changes or worsens.
- Water Pump: A seized water pump bearing will prevent proper coolant circulation and can cause the belt to slip or break. Overheating is a primary symptom here.
Approximately 70% of belt noise complaints are ultimately traced back to misaligned pulleys or a failing tensioner, rather than the belt itself. This highlights the importance of a comprehensive diagnostic approach, focusing on the entire system for a truly professional and reliable repair.
By The Numbers
Roadside Breakdowns Due to Belts
Belt Noise from Pulleys/Tensioners
Miles for Belt Lifespan
Accurate identification of your 2013 Honda Civic’s engine type is paramount for correct belt diagram identification, ensuring that all accessories are driven properly. Regular, professional visual inspections are critical for detecting early signs of serpentine belt and associated pulley wear, preventing minor issues from escalating into major failures. Following a precise, step-by-step replacement procedure with appropriate tools and safety measures ensures successful belt service, maintaining the integrity and reliability of your vehicle’s accessory drive system. Ensure your 2013 Honda Civic operates at peak performance by regularly inspecting your serpentine belt system and performing timely, expert-guided maintenance or seeking professional service when necessary to maintain its quality and trusted operation.
Frequently Asked Questions
How often should the serpentine belt on a 2013 Honda Civic be replaced?
While recommended service intervals vary by driving conditions, a general guideline for the 2013 Honda Civic is to inspect the belt every 15,000 miles and consider replacement every 60,000 to 100,000 miles or every 5-7 years. Always refer to your owner’s manual for specific manufacturer recommendations and conduct visual inspections frequently for signs of wear.
What are the signs of a failing serpentine belt on a 2013 Honda Civic?
Common indicators of a failing serpentine belt include distinct squealing or chirping noises, especially on startup or when turning; visible cracks, fraying, or missing ribs on the belt surface; and a glazed or shiny appearance. Loss of power steering, dimming lights, or an overheating engine can also signal a complete belt failure.
Can I replace the 2013 Honda Civic serpentine belt myself?
Yes, with the proper tools, the correct belt diagram for your specific engine, and adherence to safety protocols, replacing the serpentine belt on a 2013 Honda Civic is a manageable DIY task for individuals with intermediate mechanical skills. However, if unsure, professional assistance is highly recommended to prevent potential errors and system damage.
What is the difference between the 1.8L and 2.4L engine belt diagrams for a 2013 Civic?
The primary difference lies in the accessory configurations and thus the belt routing. The 1.8L R18A1 engine (LX, EX, HF) typically has a different number and placement of pulleys compared to the 2.4L K24Z7 engine (Si). Always consult the specific diagram corresponding to your vehicle’s engine code to ensure correct routing and part selection.
Why is my new serpentine belt on my 2013 Civic still squealing?
A new serpentine belt squealing often indicates underlying issues beyond the belt itself. Common causes include incorrect belt tension (too loose or too tight), pulley misalignment, contamination by fluids (oil, coolant), or a failing tensioner or accessory pulley bearing. A professional diagnosis is crucial to identify and rectify the root cause effectively.