2013 Honda Pilot Serpentine Belt Diagram: Installation And Maintenance Guide
Ensuring the optimal performance and longevity of your 2013 Honda Pilot relies heavily on the proper function of its serpentine belt. For many Honda Pilot owners, understanding the precise routing of the serpentine belt – a critical component powering essential accessories – can be a significant challenge, often leading to confusion during maintenance or replacement. This comprehensive guide provides an authoritative, detailed 2013 Honda Pilot serpentine belt diagram, coupled with expert step-by-step installation instructions and vital maintenance insights, ensuring your vehicle’s systems operate with trusted reliability.

Section 1: Understanding the 2013 Honda Pilot Serpentine Belt System
Recommended Best Deal Products




📤 Share Image
The serpentine belt in your 2013 Honda Pilot is far more than just a rubber strap; it’s the lifeline that powers a multitude of critical engine accessories. Often referred to as the accessory drive belt, its primary function is to transfer rotational energy from the engine’s crankshaft to various peripheral components simultaneously. Without a properly functioning serpentine belt, your vehicle’s essential systems would cease to operate.
For the 2013 Honda Pilot, this includes components such as the alternator, which recharges the battery and powers the electrical system; the power steering pump, essential for effortless steering; and the air conditioning compressor, responsible for climate control. While some vehicles use the serpentine belt to drive the water pump, the 2013 Honda Pilot’s 3.5L V6 engine typically employs a timing belt for its water pump, ensuring a distinct separation of these critical functions. This design necessitates a clear understanding of both systems for complete vehicle maintenance.
Recognizing Serpentine Belt Wear and Failure
Recognizing symptoms of serpentine belt wear or impending failure is a critical aspect of proactive vehicle maintenance. Common indicators include:
- Squealing or Chirping Noises: Often most noticeable upon cold start or when turning the steering wheel, these sounds typically signify belt slippage, usually due to wear, improper tension, or contamination.
- Visible Cracking or Fraying: A professional inspection will reveal cracks on the ribs, fraying at the edges, or chunks of rubber missing. These are clear signs that the belt’s structural integrity is compromised.
- Loss of Power to Accessories: If the belt fails entirely, the consequences are immediate and severe. Imagine driving at night when your headlights begin to dim (due to a failing alternator), or you suddenly experience a loss of power steering, making the vehicle extremely difficult to control. These scenarios underscore the interconnectedness of systems driven by the belt.
Proactive inspection and timely maintenance are paramount for the reliable operation of your Pilot’s systems. Serpentine belts for most modern vehicles, including the 2013 Honda Pilot, are typically multi-ribbed V-belts made from durable EPDM rubber. This material offers extended durability, often rated for 50,000-100,000 miles depending on driving conditions and maintenance quality. Ignoring these warning signs can lead to roadside breakdowns and potentially expensive damage to accessory components.

Section 2: Decoding the Official 2013 Honda Pilot Serpentine Belt Routing Diagram
Accurate serpentine belt routing is non-negotiable for the 2013 Honda Pilot. Consulting the genuine OEM (Original Equipment Manufacturer) diagram is critically important; failure to do so can lead to rapid belt wear, immediate system malfunction, or even catastrophic damage to accessory components. Incorrect routing can alter the direction of accessory rotation, which can lead to premature failure of these quality components.
Step-by-Step Belt Path Walkthrough
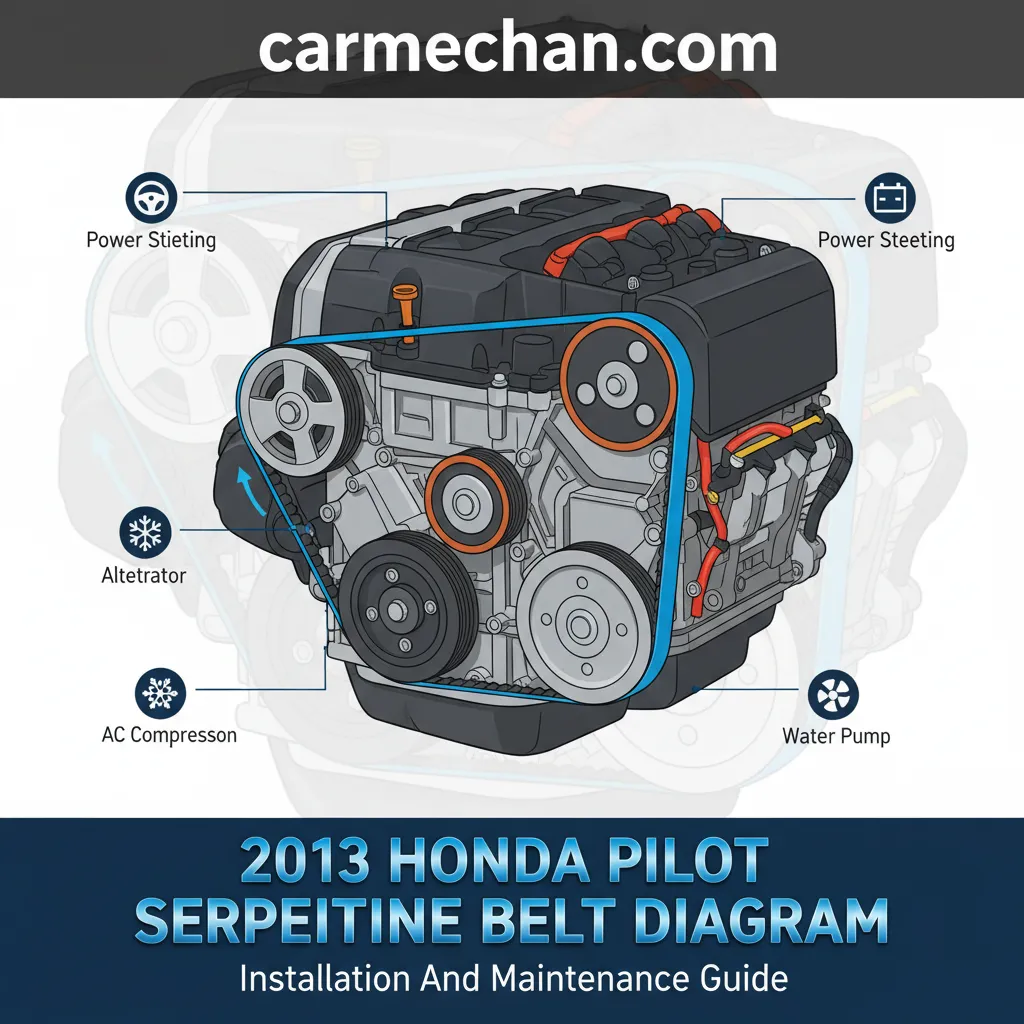
The 2013 Honda Pilot (equipped with the 3.5L V6 engine) typically utilizes a single serpentine belt, and its routing is meticulously engineered to optimize power transfer with minimal slip. Here’s a detailed walkthrough of the belt’s path, starting from the crankshaft:
- Crankshaft Pulley (Lower Center): This is the drive pulley, receiving power directly from the engine. The belt typically wraps around a large portion of its circumference, often from the bottom.
- A/C Compressor Pulley (Lower Passenger Side): From the crankshaft, the belt often routes directly to or via an idler pulley to the A/C compressor.
- Automatic Tensioner Pulley (Upper Passenger Side/Center): The belt then typically passes over or under the automatic belt tensioner. This spring-loaded mechanism is designed to maintain constant, optimal tension on the belt, accommodating minor belt stretch over its lifespan. To release tension, you’ll rotate the tensioner arm, usually counter-clockwise, against its spring. Identifying its pivot point and the leverage arm is key.
- Alternator Pulley (Upper Driver Side): After the tensioner, the belt usually routes to the alternator.
- Power Steering Pump Pulley (Upper Center/Driver Side): Finally, the belt will wrap around the power steering pump pulley before returning to the crankshaft, completing the circuit.
- Idler Pulleys: Depending on the specific configuration and any optional accessories, one or more idler pulleys may be present. These pulleys do not drive accessories but serve to guide the belt, increase its contact area on driven pulleys, or bridge gaps in the routing. You can differentiate an idler pulley from a driven accessory pulley by its direct association with a main accessory component (alternator, A/C compressor) and the tensioner’s design. An idler typically just spins freely to guide the belt.
For a truly professional and reliable installation, it’s invaluable to visualize and memorize the routing. Before removal, take a clear photograph of the existing belt’s path or even sketch it out. This simple step can prevent common mistakes, such as routing the belt over the wrong side of an idler pulley, which can cause significant issues and reduce the quality of the installation.
Always verify your specific 2013 Honda Pilot’s engine configuration. While the 3.5L V6 is standard, minor variations or aftermarket additions can sometimes subtly alter belt routing. A reliable service manual or the decal under the hood is your trusted source.

Audible — Listen Free for 30 Days
One free credit a month and thousands of titles included.
Listen Free for 30 Days
Section 3: Pre-Installation: Inspection, Safety, and Essential Tools for Belt Replacement
Recommended Best Deal Products


Before embarking on any under-the-hood work, particularly one involving moving components, meticulous preparation is key. This phase ensures both your safety and the successful, reliable replacement of the serpentine belt on your 2013 Honda Pilot.
Crucial Safety Precautions
Prioritizing safety is non-negotiable:
- Disconnect the Negative Battery Terminal: This step is paramount. It prevents accidental engine starts, electrical shorts, or sparks that could lead to injury or damage while you’re working near electrical components.
- Allow Engine to Cool Completely: Hot engine components can cause severe burns. Give your Pilot ample time to cool down before beginning work.
- Wear Appropriate PPE: Safety glasses, gloves, and appropriate work attire are essential to protect against debris, fluids, and sharp edges.
- Ensure Vehicle Stability: If lifting the vehicle for access, use sturdy jack stands on a level surface. Never rely solely on a jack.
Never attempt to remove or install a serpentine belt on a running engine. The risk of severe injury from rotating components is extremely high.
Thorough Inspection Process
Before removing the old belt, perform a comprehensive inspection:
- Existing Belt Assessment:
- Cracks: Look for transverse (across the belt) or longitudinal (along the ribs) cracks.
- Fraying: Inspect the edges for signs of fiber separation.
- Glazing: A shiny, polished appearance on the belt ribs indicates hardening and reduced grip.
- Missing Ribs or ‘Chunking’: Visible signs of rubber detaching or missing sections of the ribs are clear indicators of severe wear.
- Contamination: Oil, coolant, or power steering fluid on the belt will cause slippage and rapid degradation. Promptly address any underlying leaks.
- Pulley and Tensioner Inspection:
- Bearings: Spin each pulley by hand (once the belt is off). Listen for grinding noises or feel for excessive play. A wobbly or noisy pulley requires replacement.
- Pulley Surfaces: Check for any visible damage, nicks, or burrs on the pulley grooves that could abrade a new belt.
- Tensioner Integrity: Manually test the tensioner’s effective range of motion and spring resistance. It should move smoothly with firm, consistent resistance. A weak or erratic tensioner spring will not maintain proper belt tension, leading to slippage and premature belt wear. A typical serpentine belt tensioner on the 2013 Honda Pilot is designed to maintain consistent belt tension, but its internal spring mechanism can weaken over time, often after 100,000 to 150,000 miles, necessitating replacement.
Essential Tools Required
Having the right tools ensures a smooth and professional job:
- Serpentine Belt Tool or Breaker Bar: Essential for rotating the automatic tensioner. Depending on the tensioner bolt design for the 2013 Pilot, you’ll likely need a 19mm or 14mm socket/wrench. A long breaker bar or a specialized serpentine belt tool provides the necessary leverage.
- Ratchet and Sockets: For any engine covers or components that need to be removed for access.
- New Serpentine Belt: Always use a quality, OEM-specified replacement belt for optimal fitment and longevity.
- Flashlight or Work Light: For clear visibility in tight engine bay spaces.
- Gloves and Safety Glasses.
- Reference Diagram: Keep your OEM routing diagram (or your photo) handy.
Section 4: Step-by-Step Procedure: Replacing the 2013 Honda Pilot Serpentine Belt
With your preparations complete and safety precautions in place, you are ready for the hands-on process of replacing the serpentine belt on your 2013 Honda Pilot. This detailed, professional guide will walk you through each critical step.
📋
Step-by-Step Guide
For optimal visibility and leverage on the 2013 Honda Pilot, you may need to remove certain engine covers. In some cases, accessing the lower pulleys might also benefit from removing the front passenger wheel well liner. Use appropriate wrenches/sockets to carefully remove any obstructing components, setting them aside safely to avoid loss or damage. Ensure your work area is well-lit.
Locate the automatic belt tensioner. Attach your breaker bar (with the correct socket, typically 19mm or 14mm for the Pilot) to the square drive hole or the tensioner’s main bolt. Apply steady, firm pressure to rotate the tensioner arm. For most Honda Pilot models, this rotation will be counter-clockwise to compress the spring and release tension from the belt. If the tensioner is stubborn, a cheater pipe on your breaker bar can provide invaluable added leverage. Once tension is released, hold the tensioner in place, allowing the belt to slacken.
While holding the tensioner arm in the slack position, carefully slip the old serpentine belt off one of the easier-to-reach pulleys (e.g., the alternator or idler pulley). Once it’s dislodged from one component, you can fully release the tensioner slowly. Then, meticulously thread the old belt off all remaining pulleys and remove it from the engine bay. A quick comparison with your new belt can confirm you have the correct length and number of ribs.
This is where your OEM routing diagram is invaluable. Begin by routing the new belt around all fixed pulleys first, leaving the tensioner pulley or one easily accessible idler pulley for last. Double-check that all ribs of the belt are perfectly aligned within the pulley grooves, particularly on the crankshaft pulley where visibility can be limited. Improper seating on even one groove will cause significant belt wear and potential failure. Once the belt is mostly in place, re-apply the breaker bar to the tensioner and rotate it again to create slack. Slip the new belt over the final pulley, ensuring it is fully seated on all components.
Gently and slowly release the tensioner, allowing it to apply pressure to the new belt. Once fully engaged, perform a meticulous visual inspection of the entire belt path. Confirm that the belt is squarely seated on every single pulley, with no ribs hanging off or misaligned. Rotate the crankshaft by hand (if possible, with a large socket on the crankshaft bolt) to ensure the belt tracks correctly. Reinstall any removed covers or wheel well liners. Reconnect the negative battery terminal. The ideal time for serpentine belt replacement on a 2013 Honda Pilot is typically between 60,000 and 100,000 miles, or sooner if visual inspection reveals significant wear. Using quality, OEM-specified belts ensures optimal fitment and longevity, reducing the risk of premature failure and maintaining trusted performance.
Section 5: Post-Installation Checks and Maximizing Serpentine Belt Longevity
Completing the installation is a significant step, but the job isn’t finished until you’ve verified proper operation and established a strategy for long-term reliability. Post-installation checks are critical to confirm your professional work, and preventative measures ensure your new serpentine belt delivers its full lifespan.
Essential Post-Installation Checks
After the new belt is installed and all components are reassembled, proceed with these vital checks:
- Initial Engine Start: Start the engine and immediately listen and observe. Allow the engine to run for several minutes, paying close attention to the belt’s path.
- Visual Observation: The belt should run smoothly and quietly, tracking perfectly within all pulley grooves. Look for any wobble, vibration, or signs of the belt wanting to walk off a pulley.
- Listen for Noises: Any unusual sounds like squealing, chirps, or grinding indicate an issue that requires immediate attention. A slight squeal after installation might indicate a minor misalignment on a single pulley groove, requiring a quick adjustment.
- Accessory Functionality: Confirm all belt-driven accessories are functioning correctly. Turn on the A/C, check power steering response, and ensure the alternator is charging (dash battery light should be off).
Troubleshooting Common Post-Replacement Issues
Should you encounter issues, here’s how to address common problems:
- Belt Squeal: This is the most frequent post-installation complaint. It often stems from:
- Misalignment: The belt is not perfectly seated in a pulley groove. Re-check the entire routing and reseat the belt.
- Improper Tension: While automatic tensioners largely prevent this, a faulty tensioner can lead to insufficient or excessive tension. Inspect the tensioner’s movement and spring strength.
- Contamination: Any residual oil, coolant, or cleaning agents on the belt or pulleys can cause slippage. Clean the belt and pulley surfaces thoroughly with a suitable degreaser, then rinse and dry. Avoid belt dressings; they are typically a temporary fix and can attract more dirt, masking the root cause.
- Worn Pulley Bearings: A previously overlooked worn idler or accessory pulley bearing can put stress on the new belt and cause noise.
- Belt Walk-Off: If the belt attempts to “walk” off a pulley, it almost always indicates a pulley misalignment or a severely worn pulley bearing. Inspect the specific pulley carefully.
Maximizing Serpentine Belt Longevity
To ensure years of quality, reliable service from your new serpentine belt:
- Regular Visual Inspections: Periodically (e.g., during oil changes or tire rotations), visually inspect the belt for signs of wear – cracks, fraying, or glazing.
- Keep Engine Bay Clean: A clean engine bay minimizes the chances of dirt and grime contaminating the belt and pulleys.
- Promptly Address Fluid Leaks: Any oil, power steering fluid, or coolant leaks should be repaired immediately. These fluids are highly damaging to the rubber compound of the belt.
- Inspect Pulleys and Tensioner: During routine service, check the tensioner and idler pulleys for bearing wear (noise, play) and proper operation. Faulty pulleys can prematurely damage even a new, professional-grade serpentine belt.
Honda recommends regular service intervals for checking drive belts. A properly installed and maintained serpentine belt on a 2013 Pilot should provide years of reliable service, typically exceeding 75,000 miles under normal driving conditions, ensuring your vehicle’s systems run efficiently and dependably.
The 2013 Honda Pilot serpentine belt is vital for powering multiple accessories, requiring correct routing. Consulting the accurate OEM diagram and preparing with the right tools are crucial for successful replacement. A detailed, step-by-step process ensures correct installation, followed by essential post-replacement checks. Regular inspection and preventative maintenance are key to extending belt lifespan and ensuring quality, reliable vehicle operation. Armed with this expert guide, you can confidently address your 2013 Honda Pilot’s serpentine belt needs. For complex issues or if you lack specialized tools, always consider a professional inspection to maintain optimal vehicle performance.
Frequently Asked Questions
What are the common symptoms of a failing serpentine belt on a 2013 Honda Pilot?
A failing serpentine belt on a 2013 Honda Pilot often manifests as a noticeable squealing or chirping noise, especially during cold starts or sharp turns. Other signs include visible cracks, fraying, or a glazed appearance on the belt’s surface. Loss of power steering, an inoperative air conditioning system, or a dead battery due to alternator failure can also indicate a severe belt issue, signaling immediate professional attention is needed for reliable operation.
How often should the serpentine belt be replaced on a 2013 Honda Pilot?
Honda generally recommends inspecting the serpentine belt at regular service intervals, typically every 15,000 to 30,000 miles. Replacement is usually advised every 60,000 to 100,000 miles, or sooner if visual inspection reveals significant wear, such as deep cracks, fraying, or missing ribs. Factors like driving conditions and environmental exposure can influence its lifespan. Timely replacement ensures continued quality and prevents unexpected breakdowns.
Is it difficult to replace the serpentine belt on a 2013 Honda Pilot for a DIY mechanic?
Replacing the serpentine belt on a 2013 Honda Pilot is generally considered a moderately challenging DIY task. It requires specific tools, including a breaker bar and appropriately sized sockets, and a clear understanding of the belt’s routing diagram. Accessing the tensioner and maneuvering the belt can be tricky due to limited space. While feasible for experienced mechanics, novices might find it challenging, making professional assistance a trusted option for peace of mind.
What happens if the serpentine belt breaks while driving a 2013 Honda Pilot?
If the serpentine belt breaks while driving your 2013 Honda Pilot, several critical systems will immediately cease to function. You will lose power steering, making the vehicle extremely difficult to steer. The alternator will stop charging the battery, leading to eventual electrical system failure and engine shutdown. The air conditioning will stop, and depending on the engine design, the water pump might also stop, causing the engine to rapidly overheat. This is a critical failure requiring immediate attention to avoid further damage.
Can I drive with a squealing serpentine belt on my 2013 Honda Pilot?
While a squealing serpentine belt might seem minor, it’s a clear indicator of an underlying issue – typically wear, improper tension, or contamination. Driving with a squealing belt is not advisable. The belt could be close to failing, which would leave you stranded and potentially cause damage to other components if it breaks. Addressing the squeal promptly by inspecting and replacing the belt or tensioner ensures your vehicle’s quality performance and reliability.