2010 Honda Accord Serpentine Belt Diagram: Decoding And Replacement Procedures
2010 Honda Accord Serpentine Belt Diagram: Decoding And Replacement Procedures
The serpentine belt is an often-overlooked yet critically important component ensuring the smooth operation of your 2010 Honda Accord. Without a clear understanding of its routing and function, diagnosing issues or performing a replacement can seem daunting, potentially leading to incorrect installation or further vehicle damage. This expert guide will provide a professional, detailed breakdown of the 2010 Honda Accord serpentine belt diagram, offering trusted insights into its function, detailed replacement procedures, and essential maintenance tips to keep your vehicle running reliably.
The Critical Role of the Serpentine Belt in Your 2010 Honda Accord’s Performance


📤 Share Image
The serpentine belt, often referred to as the drive belt, serves as the central artery for your 2010 Honda Accord’s accessory systems. Its primary function is to efficiently transmit power from the engine’s crankshaft to multiple ancillary components simultaneously. This single, continuous belt is engineered to drive essential systems that are vital for your vehicle’s operation and comfort. Specifically, in a 2010 Honda Accord, the serpentine belt powers the alternator (responsible for charging the battery and powering electrical systems), the power steering pump (providing hydraulic assist for steering), the air conditioning compressor (enabling climate control), and the water pump (circulating coolant to prevent engine overheating). The exact configuration of these components can vary slightly between the 2.4L 4-cylinder and 3.5L V6 engine variants, but the fundamental principle remains the same.
A failing or broken serpentine belt immediately compromises these critical functions, leading to severe operational issues. Symptoms such as a sudden squealing noise upon startup or during turns, a complete loss of power steering assist, an illuminated battery warning light on your dashboard, or a rapidly rising engine temperature are all direct indicators that your serpentine belt requires immediate attention. Ignoring these signs can lead to breakdowns, potential engine damage from overheating, or being stranded without basic vehicle functions. Serpentine belts typically have a service life of 50,000 to 100,000 miles, but this can vary significantly based on driving conditions, environmental factors, and the quality of the belt material. Proactive inspection and timely replacement using a high-quality belt are absolutely crucial for ensuring reliable vehicle operation and preventing costly, unexpected breakdowns.
Locating and Interpreting Your 2010 Honda Accord Serpentine Belt Diagram



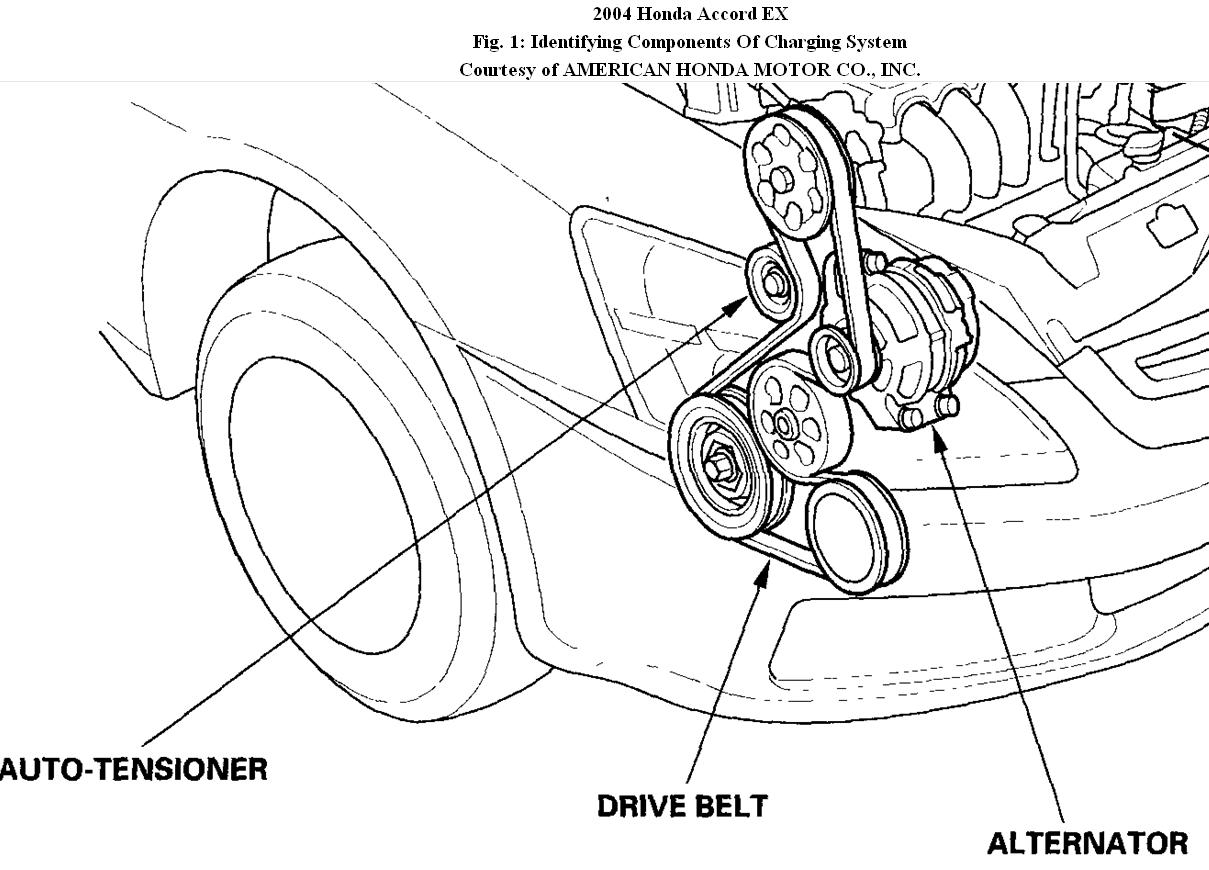
Successfully servicing or replacing the serpentine belt on your 2010 Honda Accord begins with accurately locating and interpreting the correct belt routing diagram. Fortunately, Honda provides several primary sources for this essential information. The most common location is directly under the hood, where a sticker affixed to the radiator support or the underside of the hood often displays the specific routing for your engine configuration. Another highly reliable source is your vehicle’s owner’s manual, typically found within the maintenance sections (often around pages 200-250). For comprehensive, professional insights, factory service manuals (such as those from Honda directly) or trusted aftermarket manuals like Haynes or Chilton offer detailed diagrams and procedures.
It is paramount to understand that variations in diagrams exist based on engine type. A 2.4L 4-cylinder Honda Accord will have a distinctly different belt routing than a 3.5L V6 model, due to varying accessory layouts. Always verify that the diagram you are using matches your specific engine configuration and trim level. To visually orient the diagram to your engine bay, identify a prominent, easily recognizable component like the crankshaft pulley (usually the largest pulley at the bottom, directly connected to the engine). This serves as your starting point for tracing the belt’s path.
Serpentine belt diagrams employ common graphical elements. Solid lines illustrate the precise path the belt follows, while arrows often indicate the direction of rotation for components. Each pulley is typically labeled (e.g., ALT for alternator, P/S for power steering, A/C for air conditioning). Crucially, pay attention to how the diagram differentiates between the grooved (ribbed) side of the belt and the smooth back of the belt. Grooved pulleys will engage with the ribbed side, while smooth idler or tensioner pulleys will contact the smooth back of the belt. A typical diagram will clearly show the central crankshaft pulley, an alternator, a power steering pump, an A/C compressor, and an automatic tensioner, all interconnected. This visual guide is a complete, trusted reference for accurate belt installation.
By The Numbers
Owners find diagram under hood
Typical Owner’s Manual pages for maintenance

Dissecting the 2010 Honda Accord Serpentine Belt Routing: Component Identification


Understanding the individual components within your 2010 Honda Accord’s serpentine belt system is paramount for both diagnosis and proper installation. Let’s systematically identify and describe the function of each pulley involved in the belt’s path:
- Crankshaft Pulley: This is the primary driver, directly attached to the engine’s crankshaft. As the engine runs, this pulley rotates, transmitting rotational energy to the serpentine belt and, subsequently, to all other accessories.
- Alternator Pulley: Driven by the belt, the alternator generates electrical power to recharge the battery and supply current to the vehicle’s electrical systems. A failing alternator bearing can cause significant noise and belt slippage.
- Power Steering Pump Pulley: This pulley drives the power steering pump, which creates hydraulic pressure to assist with steering, making it easier to turn the wheels. Loss of this assist is an immediate sign of belt or pump issues.
- A/C Compressor Pulley: When the air conditioning is engaged, this pulley activates the A/C compressor, which circulates refrigerant through the system to cool the cabin. This pulley typically has an electromagnetic clutch that engages only when A/C is requested.
- Water Pump Pulley: Critical for engine health, the water pump circulates coolant through the engine and radiator, preventing overheating. A malfunctioning water pump can lead to severe engine damage.
The automatic serpentine belt tensioner plays a vital, often underestimated role. This spring-loaded arm mechanism maintains optimal belt tension across varying engine speeds and accessory loads. It compensates for minor belt stretch and ensures consistent grip on all pulleys. Common failure modes of the tensioner include a failing internal bearing, which can lead to grinding or growling noises, or a weakened spring, resulting in inconsistent tension, belt slippage, and premature wear. The tensioner in a 2010 Honda Accord typically has a service life similar to the belt, often requiring replacement after 100,000-150,000 miles to maintain proper belt tension, which is vital for component longevity. Furthermore, idler pulleys are smooth pulleys strategically placed to guide the belt, provide additional wrap around certain components, and ensure proper belt alignment. They do not drive accessories but are crucial for the belt’s path and stability. For the 3.5L V6, the routing often incorporates a larger number of pulleys, including more idlers, compared to the 2.4L 4-cylinder, due to its more complex accessory layout.
The diagram will clearly illustrate how the ‘ridges’ and ‘valleys’ of the belt engage with corresponding grooved pulleys, ensuring maximum traction. Conversely, the ‘smooth’ back of the belt contacts smooth idler or tensioner pulleys, minimizing friction and wear. A professional mechanic can readily distinguish between belt noise and pulley bearing noise, which is a key diagnostic skill.
When diagnosing belt noise, a common misstep is blaming the belt itself. Often, the issue is a failing tensioner bearing or an accessory pulley bearing causing the belt to slip or vibrate. Always inspect all pulleys for play or roughness when rotating by hand before concluding the belt is the sole culprit.
Professional Procedures for 2010 Honda Accord Serpentine Belt Replacement
Replacing the serpentine belt on your 2010 Honda Accord, while a manageable task for an experienced DIYer, requires precision and adherence to professional procedures. Safety and correct installation are paramount for long-term reliability.
Essential Safety Precautions
- Always ensure the engine is completely cool to prevent burns.
- Disconnect the negative battery terminal to eliminate any electrical hazards and prevent accidental engine cranking.
- Wear appropriate personal protective equipment (PPE), including gloves and eye protection.
Necessary Tools
- A serpentine belt tool or a long breaker bar with the correct socket size (typically 14mm or 19mm for the tensioner bolt, depending on your engine model and year).
- Basic wrench/socket set.
- Potentially a pry bar for stubborn tensioners or if additional leverage is needed (use with caution).
📋
Step-by-Step Guide: Serpentine Belt Replacement
Before removing anything, take a clear photo of the existing belt routing or ensure you have the correct diagram readily available. This is a critical first step to prevent routing errors. For some models, especially the V6, you might need to remove a wheel or splash guard for better access.
Attach your serpentine belt tool or breaker bar to the tensioner bolt. For a 2.4L 4-cylinder, the tensioner typically pivots counter-clockwise to release tension. For the V6, it may pivot clockwise. Apply steady pressure to release the tension, then carefully slip the old belt off one of the smooth idler pulleys or the A/C compressor pulley. Once loose, slowly release the tensioner.
With the belt off, thoroughly inspect all pulleys (alternator, power steering, A/C, water pump, idlers) and the tensioner for any signs of wear, wobbling, rough rotation, or excessive play. Spin each pulley by hand; they should rotate smoothly with minimal noise. Replace any suspect components, as they can quickly damage your new belt. A trusted brand like Gates or Dayco offers reliable aftermarket serpentine belts that meet or exceed OEM specifications.
Carefully route the new belt according to your diagram, ensuring all grooves are correctly seated on their respective grooved pulleys and the smooth side contacts smooth pulleys. Leave one accessible pulley (often an idler or the A/C compressor) for last. Double-check that the belt is not twisted or misaligned anywhere along its path. This is a crucial step for preventing immediate belt failure or component damage.
Once the belt is fully routed, use your tensioner tool to again release the tension, allowing you to slip the new belt onto the last pulley. Slowly and gently release the tensioner, allowing it to apply proper tension to the new belt. Verify the belt is fully seated on all pulleys before proceeding.
Reconnect the negative battery terminal. Start the engine and listen for any abnormal noises (squealing, chirping). Visually inspect the belt’s path to confirm it runs smoothly, without any run-out or vibration. Turn the steering wheel lock-to-lock a few times to ensure power steering assist is restored. A properly installed quality belt reduces the risk of breakdown by up to 95% compared to a worn or improperly routed belt.
Never place fingers or tools near moving engine components. Ensure the engine is OFF and the battery disconnected before working on the serpentine belt. If you are unsure at any step, consult a professional mechanic. Incorrect belt routing can lead to immediate belt failure, component damage, or even serious personal injury.
Diagnosing and Addressing Common 2010 Honda Accord Serpentine Belt Issues
Even a freshly installed serpentine belt can exhibit problems if underlying issues are not addressed. Effective diagnosis requires a keen ear and a discerning eye, backed by expert knowledge of the accessory drive system. Here’s a breakdown of common issues and how to approach them:
Common Auditory Symptoms:
- Squealing: This is the most common symptom, often indicating belt slippage due to insufficient tension, glazing, or fluid contamination. It can also point to a seized accessory pulley, forcing the belt to drag.
- Chirping: A rhythmic chirp can suggest misalignment between a pulley and the belt, slight edge wear, or even a worn idler pulley.
- Grinding/Growling: These more severe noises almost always signal a failed bearing within an accessory (alternator, A/C compressor, power steering pump) or the automatic tensioner. This requires immediate attention to prevent further damage.
Visual Inspection Cues:
- Cracks: Deep cracks perpendicular to the belt’s ribs are a classic sign of age, heat exposure, and brittleness, indicating it’s time for replacement.
- Fraying: Worn or frayed edges suggest misalignment, improper tension, or the belt rubbing against an obstruction.
- Glazing: A smooth, shiny, hard surface on the belt’s ribs or back indicates excessive slippage, reducing its ability to grip pulleys effectively.
- Contamination: Oil, coolant, or power steering fluid on the belt can rapidly degrade its material, leading to slippage and premature failure. Address any leaks promptly.
Related Component Failures:
It’s crucial to remember that symptoms attributed to the serpentine belt are often rooted in other components. A worn tensioner is a frequent culprit, as it fails to maintain proper belt tension, leading to slippage and noise. Seized or noisy idler pulleys also mimic belt problems. Failing accessory bearings (e.g., in the alternator or A/C compressor) can generate noise and increase drag, putting undue stress on the belt. Fluid leaks from any of these components can contaminate the belt and shorten its life.
The Diagnostic Process:
A trusted diagnostic approach involves a thorough visual inspection, checking the belt’s condition, tension, and alignment. With the engine off, manually wiggle each pulley to check for play or roughness. For auditory diagnostics, a mechanic’s stethoscope can pinpoint the exact source of a noise. With extreme caution, observe the belt’s path while the engine is running to identify any run-out or wobbling pulleys. A small amount of water sprayed on a suspected squealing belt can temporarily quiet it, confirming it’s a belt issue, but this is a diagnostic aid, not a solution. Approximately 30% of reported ‘serpentine belt’ issues are actually rooted in a failing tensioner or accessory pulley. A professional, comprehensive diagnostic approach is essential to avoid misdiagnosis and unnecessary parts replacement, ensuring a complete and reliable repair.
Maximizing Serpentine Belt Lifespan and Maintaining Optimal Performance
Extending the life of your 2010 Honda Accord’s serpentine belt and its associated components is a matter of consistent, proactive maintenance and informed choices. As an expert, I recommend the following practices to ensure long-term reliability and optimal performance:
Proactive Inspection Schedule:
- Perform a visual inspection of the serpentine belt every 15,000 miles or 12 months, whichever comes first. Look for cracks, fraying, glazing, and contamination.
- Request a more thorough inspection by a professional technician during major service intervals (e.g., 30,000, 60,000, 90,000 miles). They can assess tension, pulley condition, and utilize specialized tools like a belt wear gauge for an objective assessment of belt condition.
Choosing Quality Replacement Parts:
When replacement is necessary, always opt for Original Equipment Manufacturer (OEM) or reputable aftermarket belts and tensioners. Brands like Gates, Dayco, and Continental offer professional-grade products that meet or exceed OEM specifications for superior durability, fit, and quiet operation. The initial cost saving of a cheap, generic belt is almost always outweighed by its shorter lifespan and increased risk of premature failure. Investing in quality components for your 2010 Honda Accord is a wise decision for a truly reliable vehicle.
Superior Durability
Quality belts are engineered with advanced materials for greater resistance to heat, cracking, and stretching.
Optimal Fit & Function
Precise dimensions ensure proper tensioner operation and engagement with all pulleys, reducing slippage and noise.
Reduced Risk of Failure
Minimizes the chance of unexpected breakdowns, component damage, and repeat repairs.
Preventative Measures:
- Promptly address fluid leaks: Oil, coolant, or power steering fluid can severely contaminate and degrade belt material. Repair these leaks as soon as they are identified.
- Keep pulleys clean: Regularly inspect and clean any debris or buildup from pulleys, which can affect belt seating and cause premature wear.
While less direct, driving habits can subtly influence belt wear. Aggressive driving or prolonged idling in extreme temperatures can contribute to the thermal and mechanical stresses on the belt over time. Ultimately, consistent and professional vehicle maintenance contributes to the overall health and longevity of your entire accessory drive system. Studies show that proper maintenance and the use of quality parts can extend a serpentine belt’s life by an additional 20-30% beyond the manufacturer’s typical estimates, making your vehicle a truly reliable investment.
The serpentine belt is vital for powering multiple critical accessories in your 2010 Honda Accord. Properly locating and interpreting the specific diagram for your engine type is crucial for accurate service. Adhering to professional replacement procedures and using quality components ensures long-term reliability and prevents costly malfunctions. By leveraging this comprehensive guide and committing to regular, professional inspections, you can ensure the optimal performance and longevity of your 2010 Honda Accord’s accessory drive system. Consult a certified technician for complex diagnoses or if you are unsure about any replacement steps.
Frequently Asked Questions
How often should the serpentine belt on a 2010 Honda Accord be replaced?
A quality serpentine belt on a 2010 Honda Accord typically lasts between 50,000 to 100,000 miles. However, it’s advised to inspect it every 15,000 miles or annually for any signs of wear, such as cracks, fraying, or glazing. Early replacement based on visual inspection can prevent unexpected breakdowns, ensuring reliable operation.
What are the common signs of a failing serpentine belt on a 2010 Honda Accord?
Common signs include persistent squealing or chirping noises, especially on startup or when turning the steering wheel. Visual cues like cracks, fraying, or a glazed appearance on the belt are also strong indicators. Additionally, a dead battery or loss of power steering can signal a complete belt failure.
Is it difficult to replace the serpentine belt on a 2010 Honda Accord myself?
Replacing the serpentine belt can be a moderately challenging DIY task. It requires specific tools, an understanding of the tensioner mechanism, and careful attention to the routing diagram. While achievable for experienced individuals, professional installation is recommended to ensure correct tension and prevent installation errors that could lead to immediate belt failure.
Do I need to replace the tensioner when I replace the serpentine belt?
It is highly recommended to inspect the automatic tensioner when replacing the serpentine belt. If the tensioner shows signs of wear, such as excessive play, noise, or inadequate tension, it should be replaced. A worn tensioner can lead to premature belt wear or even catastrophic belt failure, compromising the reliability of the system.
What tools are required to change the 2010 Honda Accord serpentine belt?
To professionally change the serpentine belt, you typically need a specific size wrench or socket (often 14mm or 19mm, depending on the engine) to rotate the automatic tensioner, and a long breaker bar or a dedicated serpentine belt tool for leverage. Safety glasses and gloves are also essential for this task, emphasizing a quality approach to maintenance.