How To Open a Nissan Key Fob Without Breaking the Case
Last Updated on April 19, 2026 by Ryan
Opening a Nissan key fob takes about two minutes and costs nothing beyond a replacement battery. Once it’s working again, your fob can do more than lock and unlock — including how to roll windows down with key fob on most Nissan models.
You do not need a dealer visit, a special tool, or any technical experience. The one thing that causes cracked cases and frustration is skipping the fob identification step and prying in the wrong spot with the wrong technique.
This guide covers all four common Nissan key fob designs. Start by identifying which design you have — then follow only the steps for your type. Every visual in this guide shows the exact location, angle, and orientation you need.
Which Nissan Key Fob Design Do You Have


Before you touch your fob with any tool, identify your design type from the image below.

Nissan key fob type identification guide — four fob designs labeled A through D with physical features and common models


Older blade-style fob
Fixed metal key blade extends permanently from one end. Rectangular body with full-perimeter seam.
Common models
Altima, Sentra, Versa (2007–2013)
Smart fob with hidden blade
Solid plastic rectangle. Press the side release button to slide out the thin emergency key.
Common models
Altima, Sentra, Kicks (2013+)
Flip key fob
Folding key blade flips out from one end when you press the release button. More compact body.
Common models
Rogue, Frontier, Xterra (2008–2013)
Proximity fob with release button
Larger body, keyless-entry only. Dedicated release button on back face. Must press before prying.
Common models
Murano, Maxima, Pathfinder, Armada (2015+)
Type A — Older Blade-Style Fob
Type A fobs have a fixed metal key blade that extends permanently from one end of the fob body. You will find this design on most Nissan models from 2007 to 2013, including the Altima, Sentra, and Versa from that period. The case is rectangular with rounded corners and the seam runs along the full perimeter.
Type B — Smart Fob With Hidden Blade
Type B fobs look like a solid plastic rectangle with no visible blade. Press the small release button on the side and a thin metal emergency key slides out. This design appears on the Nissan Altima (2005–2021), Sentra (2013–2025), Versa (2014+), and Kicks (2018+).
The Type B smart fob with hidden blade covers Nissan Sentra models from 2013 through 2025, with the rectangular 3–4 button design using a side-pull emergency key. The Nissan Altima uses this fob design from 2005 through 2021.
Type C — Flip Key Fob
Type C fobs have a folding key blade that flips out from one end when you press the release button, similar to a switchblade. This design is common on the Rogue (2008–2013), Frontier, and Xterra. The case is more compact than Type A and B.
The Nissan Rogue uses this fob design from 2008 through 2021, along with the Frontier and Xterra.
Type D — Proximity Fob With Release Button
Type D fobs are larger, often keyless-entry only, with a dedicated release button on the back face of the fob. You press this button to release the hidden emergency key before the case will separate. This design appears on the Murano (2015+), Nissan Maxima (2016+), Pathfinder (2013+), Armada (2017+), Titan (2017+), and Leaf (2018+).
The Armada uses a CR2025 battery in its proximity fob design, while the Murano, Maxima, and Pathfinder use CR2032.
Once you have identified your type, move to the next section and gather your tool.
What You Need Before You Start


You need one tool and one replacement battery. That is the complete list.
Acceptable tools — in order of preference:
- A plastic trim pry tool (safest — no scratch risk, recommended for Type B and Type D)
- A coin, such as a quarter or a 10-taka coin (safe for Type A and Type C)
- A flat-head screwdriver wrapped in tape at the tip (use only if no other option is available)
A plastic trim pry tool is the better choice for Type B and Type D fobs specifically. Both designs have a thinner, more refined case edge compared to Type A and Type C — the smoother plastic surface on Type B and the larger, tighter-seamed body on Type D scratch more easily when a coin edge or metal tip contacts them at an angle.
A plastic tool distributes the opening force across a wider, softer surface and eliminates that risk entirely. For Type A and Type C, a coin works reliably because both cases use a thicker, more forgiving ABS plastic edge that tolerates a coin’s narrower contact point without marking. If you only want to buy one tool for any future fob job — plastic pry tool is the answer. A 5-piece plastic trim tool set costs under $10 at any auto parts store and works on every Nissan fob type without adjustment.
Do not use:
- A knife or sharp blade
- An unwrapped flat-head screwdriver (it will scratch or chip the plastic)
- Excessive levering force in any direction
Have your replacement battery ready before you start. Most Nissan fobs use a CR2032. The exact size by fob type is confirmed in the battery section below. Buying the battery first means you complete the job in one sitting.
How To Find the Pry Point on Your Nissan Fob
The pry point is not a random gap in the case. It is a purpose-built notch in the seam that Nissan designed specifically for opening the fob. Every type has one. Inserting your tool anywhere else along the seam risks snapping the clip tabs inside.
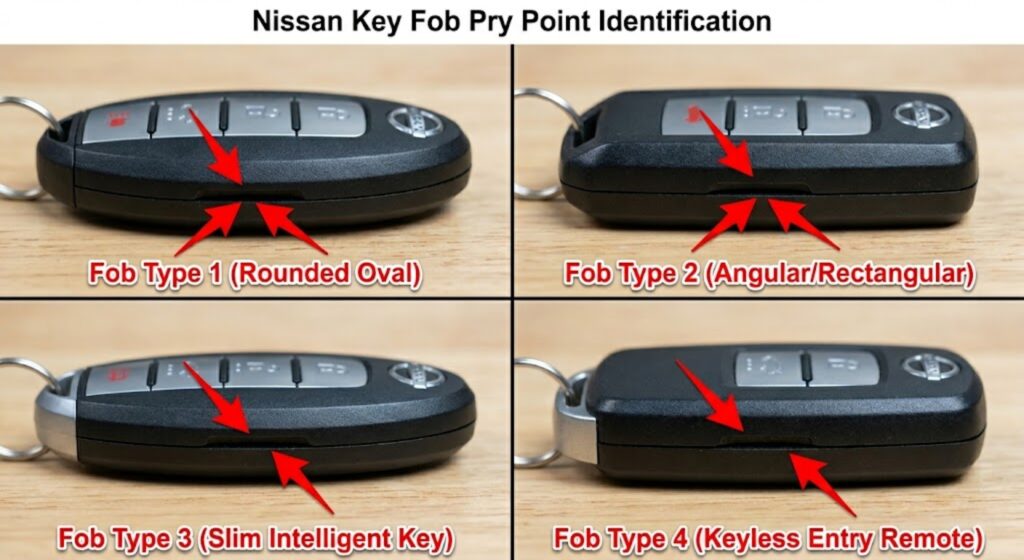
As you can see in the image above, the notch sits at a specific position along the seam — not at the center and not at the corners. On Type A and Type C fobs, the notch is at the short end of the case opposite the key blade. On Type B fobs, it sits along the long edge near the bottom third of the case.
Type D requires one extra step before you look for the notch. Press and hold the release button on the back of the fob first. The emergency key will slide out, and the internal case tension releases. Only then insert your tool at the notch along the bottom seam.
For the Nissan intelligent key fob, pressing the small button on the back causes the two halves to pop apart. The standard procedure is to flip the key over, press the release button to remove the emergency key, then proceed with opening.
Notice in the image that the notch has a slight widening — it is slightly more open than the rest of the seam. That widening is your entry point. Insert your tool there, and only there, before applying any rotation.
With the pry point located, you are ready for the opening sequence.
How To Open the Nissan Key Fob Step by Step
Follow these four steps in order. Do not skip Step 1. Skipping it is the single most common cause of cracked fob cases across all four Nissan designs.
Four-step Nissan key fob opening sequence — remove key first, insert tool at notch, rotate gently, work around the seam
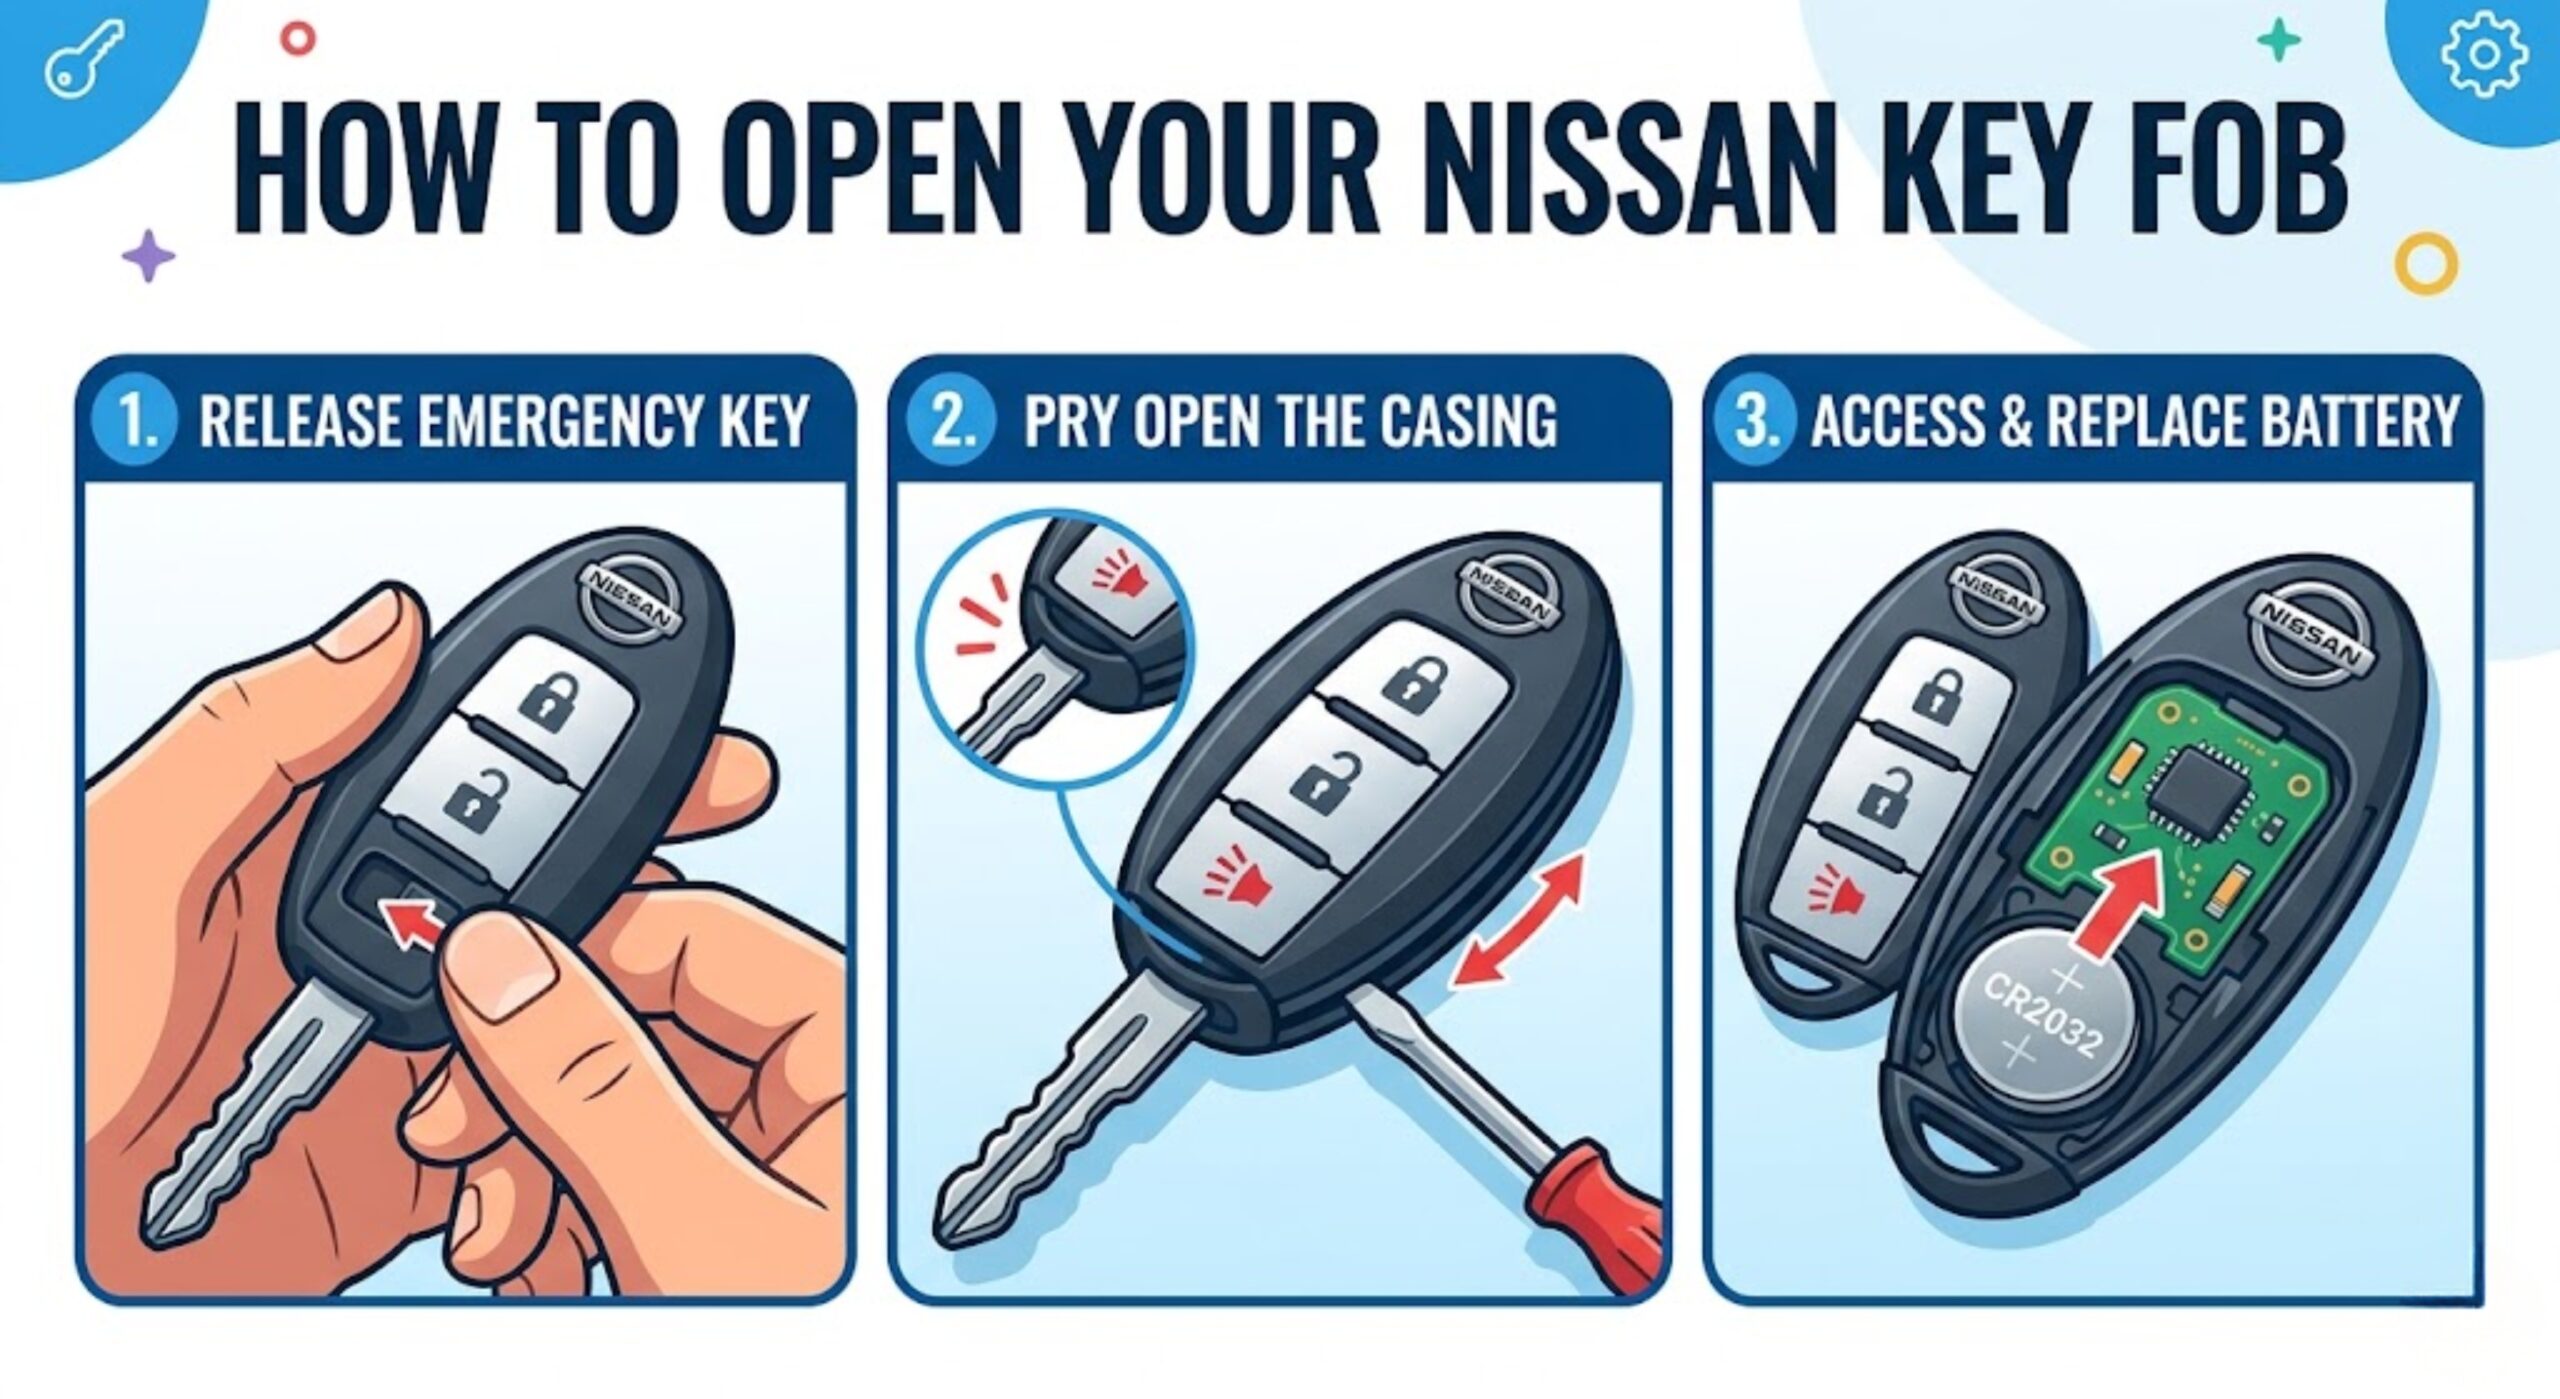
Remove the emergency key first
Slide or flip out the hidden metal key before touching the case seam. This relieves tension and allows both halves to separate cleanly. Type A fobs have a fixed blade — skip to Step 2.
Type B: press side release button, pull key fully out. Type C: press flip release, let blade extend completely.
Insert the tool at the notch
Place the tip of your tool into the purpose-built notch on the seam. Insert only the tip — approximately 2mm. Do not push deep into the seam or you will engage the clip tabs at the wrong angle.
Rotate the tool, do not lever it
Turn the tool handle slightly — like turning a key in a lock. Do not press down or pull up like a lever. You will feel the first clip release and hear a soft click. That is correct.
If you hear a crack or snap — stop immediately. Wrong position or too much force.
Work around the full seam
Move the tool 15–20mm along the seam and rotate again. Work all the way around the perimeter in small increments. The case opens fully once all clips release — do not force the halves apart early.
Both halves separated? Check your tool angle against the correct vs incorrect comparison before pulling them fully apart.
Step 1 — Remove the Emergency Key First
Slide or flip out the hidden metal key before touching the case seam. On Type B, press the side release button and pull the key out fully. On Type C, press the flip release and let the blade extend completely. On Type A, the blade is fixed — skip this step and go directly to Step 2.
Removing the key relieves tension on the case and allows the two halves to separate cleanly.
Step 2 — Insert the Tool at the Notch
Place the tip of your tool into the notch you identified in the image above. Insert only the tip — approximately 2mm. Do not push the tool deep into the seam or you will engage the clip tabs at the wrong angle.
Step 3 — Rotate the Tool, Do Not Lever It
This is where most people damage their fob. The correct motion is a gentle rotation — turn the tool handle slightly, as if turning a key in a lock. Do not press the handle down or pull it up like a lever.
You will feel the case give slightly. You will hear a soft click from the first clip releasing. That is the correct sound. If you hear a crack or snap, stop immediately — you are applying too much force or have the tool in the wrong position.
Step 4 — Work Around the Seam
After the first clip releases, move the tool 15–20mm along the seam and rotate again. Work around the full perimeter of the case in small increments. Do not try to force the two halves apart after only one or two clips release.
The case will open fully after you have worked around the complete seam. Separate the two halves slowly and set both down on a flat surface.
Before you fully separate the halves, check your tool angle against the comparison in the next section.
Correct vs Incorrect Tool Angle When Prying
The image below shows the difference between the technique that opens the fob safely and the technique that cracks it.
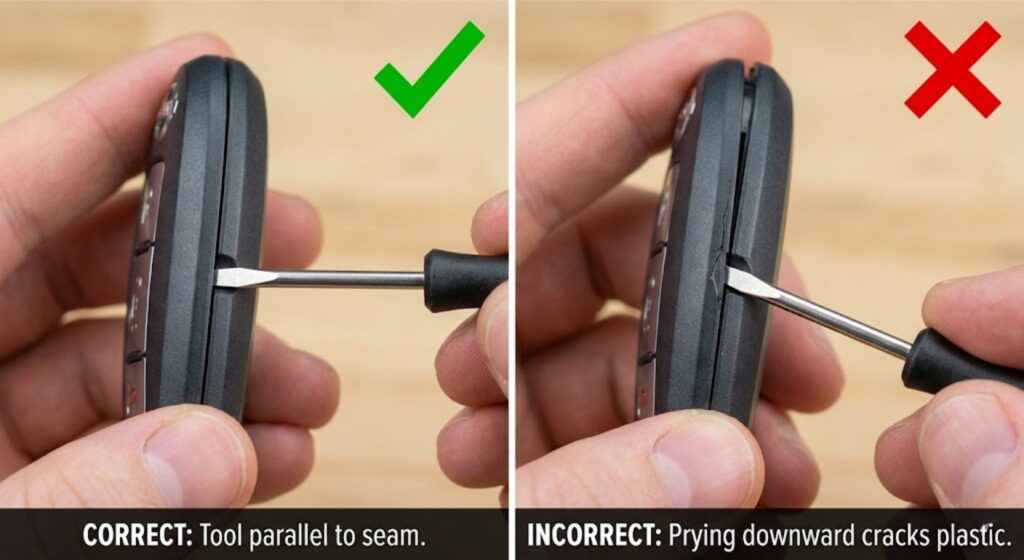
As you can see in the image above, the left panel shows the tool sitting parallel to the seam plane. The right panel shows the tool angled downward, pressing against the lower half of the case. That downward angle concentrates force on the plastic edge rather than on the clip mechanism inside — and that is what cracks the case.
The one rule to remember: the tool rotates, it does not lever.
If the case feels stuck after working around the full seam, do not increase force at one point. Instead, insert a second tool at the point 180 degrees opposite your first tool on the seam and rotate both simultaneously. This distributes the release force evenly and prevents stress concentration on any single clip tab.
With the fob open, replace the battery.
How To Insert the New Battery the Right Way
Battery orientation is the step most people get wrong after a successful opening. An upside-down battery will not damage the fob — but the fob will not work, and most people assume the battery is dead or the fob is broken.
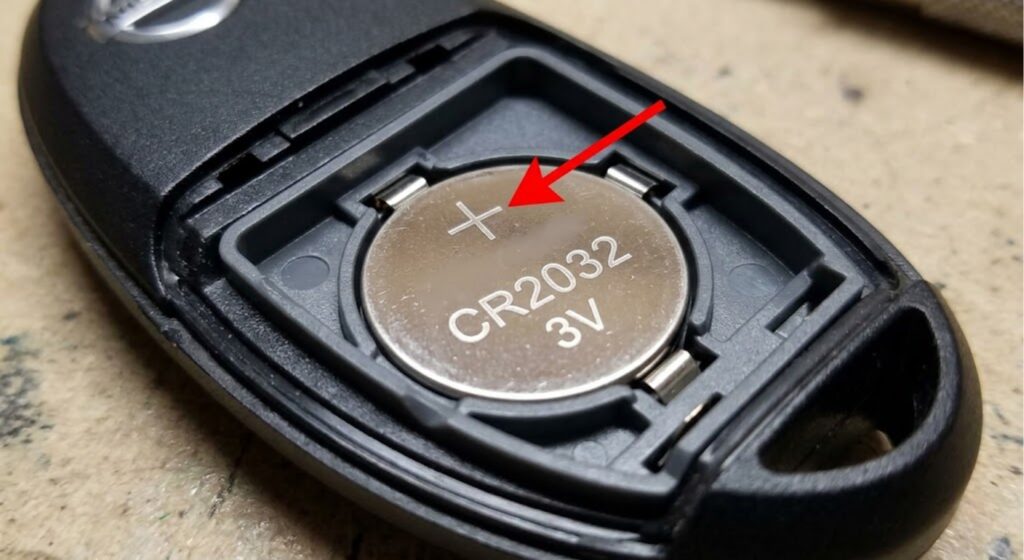
Look at the image above. The positive side — marked with a + symbol — faces up toward you as you look into the open fob. The flat, unmarked negative side faces down into the tray.
Battery Size by Nissan Fob Type
Nissan key fob battery size by fob type — Type A and B use CR2032, Type C uses CR2025, Type D uses CR2032. Positive side always faces up.
Altima, Sentra, Versa
(2007–2013)
Altima, Sentra, Kicks
(2013+)
Rogue, Frontier, Xterra
(2008–2013)
Murano, Maxima,
Pathfinder, Armada (2015+)
ⓘ Confirm your battery size against your Nissan owner’s manual before purchasing. Type C CR2025 vs CR2032 varies by production year.
| Fob Type | Battery Size | Common Models |
|---|---|---|
| Type A | CR2032 | Altima, Sentra, Versa (2007–2013) |
| Type B | CR2032 | Altima, Sentra, Kicks (2013+) |
| Type C | CR2025 | Rogue, Frontier, Xterra |
| Type D | CR2032 | Murano, Maxima, Pathfinder, Armada |
Altima: CR2032, Armada: CR2025, Frontier: CR2032, Kicks: CR2032, Maxima: CR2032, Murano: CR2032, Pathfinder: CR2032, Rogue: CR2032, Sentra: CR2032, Titan: CR2032, Versa: CR2032.
The Nissan Rogue’s key fob typically requires a CR2025 battery — this varies by production year. Sentra models may use CR2025 or CR2032 depending on the key fob version.
Do not force the battery into the tray. It should drop in flat with light finger pressure. If you feel resistance, the battery is the wrong size or is sitting at an angle.
Once the battery is seated correctly, close the fob before testing it.
How To Close and Test Your Nissan Key Fob
Reassembly is the reverse of opening, but technique still matters here.
- Align the two halves by matching the pry point notch — use the image from the pry point section above as your reference. The notch on both halves must line up before any pressure is applied.
- Press the two halves together starting at the end opposite the notch. Work around the seam with firm, even thumb pressure.
- Press the notch end last. You will feel and hear a click series around the full perimeter — not just one click at one point. A single click means the halves are only partially engaged.
- Inspect the seam visually. There should be no gap anywhere around the case. If you see a gap, press that section again until it closes.
Test sequence:
Stand approximately 5 feet from your Nissan. Press the lock button once. You should hear the horn chirp and see the mirrors fold in or lights flash. Then press unlock. Both should respond within one second.
If the fob does not respond, open it again and check two things first: battery orientation (positive side up, reference IMG-4 above) and whether the battery is fully seated flat in the tray. Nine out of ten post-replacement failures come from one of these two causes.
If your Nissan key fob is still not working after confirming the battery is correctly installed, check whether a red light is blinking in your car after locking — this can indicate an alarm or security system issue separate from the battery.
Frequently Asked Questions
What size battery does a Nissan key fob take?
Most Nissan key fobs use a CR2032 battery. Type C fobs (Rogue, Frontier, Xterra) typically use a CR2025, which is slightly thinner. Check the table in the battery section above for your specific fob type before buying.
Can I open my Nissan key fob without a screwdriver?
Yes. A coin works on most Nissan fob designs, particularly Type A and Type C. Insert the coin edge into the notch on the seam and rotate gently. A plastic pry tool is safer for Type B and Type D fobs where the case is thinner.
Why is my Nissan key fob not working after a battery change?
The most common cause is the battery inserted with the positive side facing down. Open the fob, remove the battery, confirm the + symbol faces up, and reseat it flat. If it still does not work, check that the battery is the correct size for your fob type.
How do I know if my Nissan key fob case is cracked beyond repair?
If the two halves no longer click together evenly around the full seam, or if you can see daylight through a gap that will not close with thumb pressure, the internal clip tabs are broken. A replacement fob shell is available for most Nissan designs online for under $10.
Do all Nissan key fobs open the same way?
No — Nissan uses four distinct fob designs, and the pry point location differs by type. For example, a Nissan Sentra fob opens differently from a Murano proximity fob. Type D fobs also require pressing the release button before the case will separate.
Conclusion
Opening a Nissan key fob correctly comes down to four things: identify your fob type first, insert the tool at the notch only, rotate rather than lever, and insert the battery with the positive side facing up. Following those four steps, you will open and close the fob without any damage and have it working in under two minutes.
If you replaced your fob battery and it still is not responding, the next step is to check whether it needs reprogramming. A fresh battery solves the problem in most cases — but if the fob was not detecting at all before the battery died, the car may have dropped its pairing.