How to Jack Up a Car Safely: DIY Guide & Key Tips
Last Updated on September 1, 2026 by Ryan


Safely jacking up your car is paramount for any DIY maintenance, requiring proper tools and adherence to correct procedures to prevent accidents. Always identify approved jacking points and use jack stands to secure the vehicle before working underneath it.
🎯 Key Takeaways
- Always use jack stands after lifting your car.
- Identify vehicle-specific jacking points correctly.
- Work on a flat, stable surface for safety.
- Chock wheels not being lifted for stability.
- Never rely solely on a hydraulic jack.
Safely jacking up your car is a fundamental skill for any DIY mechanic or car owner looking to perform under-vehicle maintenance. It’s not just about lifting the car; it’s about securing it correctly to prevent accidents and damage. Understanding the right tools, proper jacking points, and a precise step-by-step process is paramount.

This guide will equip you with the essential knowledge to confidently and safely lift your vehicle off the ground and support it with jack stands. Following these instructions will protect both you and your car, ensuring that tasks like tire rotations, oil changes, or brake work are performed on a stable and secure platform.
Understanding Vehicle Jacking Points & Types
Identifying Safe Jacking Points
Identifying your vehicle’s correct jacking points is critical before any lift. These are specific, reinforced areas on the chassis designed to safely bear the car’s weight. Lifting elsewhere risks significant damage to underbody components, fuel lines, brake lines, or even the frame itself, leading to dangerous instability. Always consult your vehicle’s owner’s manual first. This is your definitive guide to manufacturer-recommended jacking points. While locations vary, common jacking points include:

- Pinch Welds: Common for side-lifting with a floor jack. These are reinforced seams along your vehicle’s rocker panels, usually behind the front wheels and in front of the rear. Use a specialized rubber or polyurethane jack pad adapter to prevent bending or crushing the weld.
- Frame Rails: Sturdy structural beams running lengthwise beneath many vehicles, particularly body-on-frame trucks and SUVs. These provide robust jacking points capable of supporting significant weight.
- Subframe Components: For lifting the front or rear of a unibody car, the subframe often provides strong central jacking points. Look for robust cross-members supporting the engine, transmission, or suspension.
- Rear Differential (RWD/AWD Vehicles): The main housing of the rear differential (the pumpkin-shaped component) can often serve as a strong central jacking point to lift the entire rear. Lift on the main casting, not the differential cover or attached components.
Why Correct Placement Matters
Misplacing your jack can have severe consequences. Lifting on unreinforced areas can bend sheet metal, crack plastic, or damage critical systems like wiring harnesses, brake lines, and fuel lines. More importantly, an improperly placed jack is unstable. A slight shift can cause the jack to slip, leading to your vehicle falling suddenly. This can cause catastrophic injury or death if you are underneath. Correct placement ensures the vehicle remains balanced and secure throughout the lifting and supporting process, protecting both you and your car.
How to Jack Up a Car Like a Pro: A Practical Walkthrough
Welcome to your essential guide for safely and effectively jacking up your car. Whether you’re changing a flat tire, performing routine maintenance, or tackling a more complex repair, knowing how to properly lift your vehicle is a fundamental skill for any car owner. This guide will walk you through each critical step, emphasizing safety and precision, to ensure your work environment is secure and your vehicle remains stable throughout the process. Following these instructions meticulously will protect both you and your car.
Step 1: Gather Your Arsenal & Assess the Scene
What you need: A hydraulic floor jack (rated for your vehicle’s weight, typically 2-3 tons for most passenger cars), at least two sturdy jack stands (also weight-rated), wheel chocks, a flashlight or headlamp, your car’s owner’s manual, and optionally, work gloves and safety glasses.
Instructions: Before even thinking about lifting, ensure you’re on a flat, level, and solid surface, like concrete. Avoid grass, gravel, or sloped driveways, as these can compromise stability. Gather all necessary tools within arm’s reach. Consult your car’s owner’s manual to identify specific jacking points and recommended procedures for your make and model. This preliminary check is crucial, as incorrect lifting can damage your vehicle’s frame or undercarriage components.
Pro Tip: Always check the weight ratings of your jack and jack stands. Using equipment that is insufficient for your car’s weight is a recipe for disaster. When in doubt, err on the side of higher capacity.
Step 2: Park Smart & Secure Your Ride
What you need: Wheel chocks.
Instructions: Pull your vehicle onto your chosen flat, stable surface. Shift your transmission into “Park” (for automatic) or “First Gear” (for manual). Engage the parking brake firmly. This prevents any accidental rolling once the car is lifted. Now, place wheel chocks against the wheels that will remain on the ground and will NOT be lifted. For example, if you’re lifting the front of the car, chock both rear wheels from both the front and back to absolutely prevent any movement. If you’re lifting one side, chock the diagonal wheel.
Pro Tip: Double-check the parking brake and chocks. Give the car a gentle nudge to confirm it’s absolutely stationary. Even a slight roll can cause a jack to slip, leading to serious injury or damage.
Step 3: Locate the Lift Points with Precision
What you need: Your car’s owner’s manual, flashlight/headlamp.
Instructions: This is arguably the most critical step. Refer directly to your car’s owner’s manual to find the manufacturer-designated jacking points. These are reinforced areas designed to safely support the vehicle’s weight without damage. Common jacking points include reinforced pinch welds along the side skirts (for roadside tire changes), or sturdy frame rails, cross members, or specific designated pads under the chassis. For a floor jack, you’ll typically look for a central jacking point on the front or rear subframe to lift one entire end of the car, allowing placement of two jack stands.
Pro Tip: Never guess or use suspension components, engine oil pans, or exhaust pipes as jacking points. These are not designed to bear the vehicle’s weight and can easily bend, break, or cause the jack to slip.
Step 4: Position Your Jack with Precision
What you need: Hydraulic floor jack.
Instructions: Once you’ve positively identified the correct jacking point (e.g., a central point on the front subframe to lift the entire front end), carefully roll your hydraulic floor jack underneath the vehicle. Position the jack’s saddle (the part that contacts the car) directly and securely under the designated jacking point. Ensure the jack is perfectly centered and stable, with its wheels free to move. If your jack has a rubber pad, use it to prevent metal-on-metal contact and protect your vehicle’s undercarriage.
Pro Tip: Before pumping, visually confirm the jack’s saddle is perfectly aligned and making full, flat contact with the jacking point. A slight misalignment can cause the jack to slip sideways as weight is applied.
Step 5: Slowly Raise the Vehicle
What you need: Hydraulic floor jack.
Instructions: Begin to slowly and steadily pump the handle of your hydraulic floor jack. As the car begins to lift, constantly monitor the jack’s stability and the contact point. Listen for any unusual sounds or shifting. Raise the vehicle only high enough to comfortably slide your jack stands underneath. Typically, you want about 2-4 inches of clearance under the tires to allow for easy work. Avoid rushing this step; smooth, controlled lifting is key to maintaining stability.


Pro Tip: Keep your body clear of the path of the lifting vehicle. Never put any part of your body under a car that is supported solely by a hydraulic jack. Jacks can fail, and stability is never guaranteed without jack stands.
Step 6: Secure with Jack Stands
What you need: Two jack stands.
Instructions: With the car lifted to the desired height, carefully slide your jack stands under the vehicle. Place each jack stand directly under a manufacturer-approved support point, typically reinforced frame rails or pinch welds close to the wheels you’ve lifted. Adjust the height of the jack stands so their cradles make firm contact. Once positioned, slowly lower the hydraulic jack, allowing the vehicle’s weight to rest securely onto the jack stands. Remove the floor jack; it should no longer be supporting the car’s weight.
Pro Tip: When using pinch weld points with jack stands, it’s highly recommended to use a rubber pinch weld adapter on the jack stand’s cradle to prevent damage to the car’s pinch weld seam.
Step 7: The Stability Check
What you need: Your own eyes and a gentle nudge.
Instructions: Once the car is resting on the jack stands and the floor jack is removed, it’s time for a critical stability test. Gently but firmly push down on the vehicle’s fender or bumper, or try to rock it side-to-side. You’re looking for any movement, wobbling, or signs of the jack stands shifting. If there’s any instability, re-lift the car with the floor jack, reposition the jack stands, and repeat the lowering and checking process until the vehicle is absolutely solid and secure. Your safety depends on this step.
Pro Tip: Never work under a car that feels unstable. A few extra minutes spent ensuring rock-solid stability could save you from serious injury. If in doubt, try again or seek professional help.
Step 8: Getting Your Car Back Down
What you need: Hydraulic floor jack.
Instructions: To lower the vehicle, first position your hydraulic floor jack back under the original central jacking point. Slowly raise the car just enough to take the weight off the jack stands. Once the car is clear of the stands, carefully remove them from underneath the vehicle. With the jack stands safely out of the way, slowly and gradually open the jack’s release valve (usually by turning the handle counter-clockwise or using a dedicated lever) to allow the car to descend smoothly to the ground. Once fully lowered, remove the jack and the wheel chocks.
Pro Tip: Always lower the car slowly and in a controlled manner. A rapid descent can damage suspension components or even cause the car to bounce unexpectedly, potentially damaging the jack or the car itself.
✅ Final Checklist
- Vehicle is parked on a flat, level, solid surface.
- Parking brake is engaged and wheels are properly chocked.
- Jack and jack stands are rated for vehicle weight.
- Jack stands are securely placed under manufacturer-approved support points.
- Vehicle is stable on jack stands with no wobbling or shifting.
- Floor jack is removed after lowering the vehicle, and wheel chocks are retrieved.
Important Notes:
- Safety considerations or warnings: NEVER work under a car supported only by a hydraulic jack. Always use jack stands. Wear appropriate safety gear, including gloves and eye protection. Ensure children and pets are kept well away from the work area.
- When to seek professional help: If you’re unsure about locating jacking points, if your jack or stands seem faulty, or if you encounter any instability you can’t resolve, do not proceed. It’s always safer to consult a certified mechanic than to risk injury or damage.
- Estimated time and cost range: This procedure typically takes 15-30 minutes for an experienced individual, but allow 45-60 minutes for your first few attempts. The cost for a basic hydraulic floor jack and a pair of jack stands typically ranges from $80 – $200, representing a worthwhile one-time investment for DIY maintenance.
Essential Tools and Equipment for Safe Lifting
The Right Tools for the Job
Having the correct, high-quality tools is non-negotiable for safe car jacking. Using inappropriate substitutes significantly elevates risk. Here’s what you’ll need:

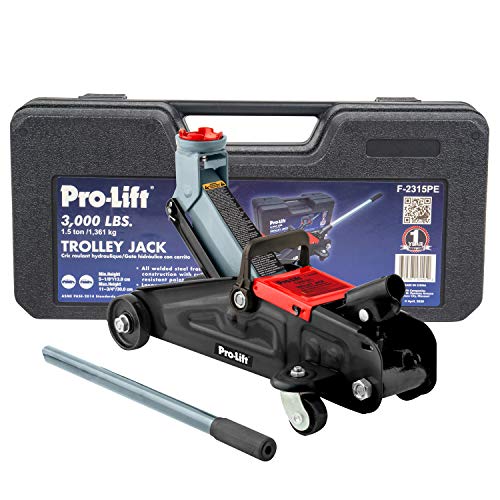
- Hydraulic Floor Jack: Your primary lifting device. Choose a jack with a lifting capacity exceeding at least half of your vehicle’s total weight. For most cars, a 2-ton (4,000 lb) jack is sufficient, but a 3-ton (6,000 lb) offers more versatility and safety margin. Low-profile jacks suit vehicles with minimal ground clearance. Inspect your jack for leaks or bent components before each use.
- Jack Stands (ABSOLUTELY ESSENTIAL): These are critical for safely supporting your vehicle once lifted. Never work under a vehicle supported only by a jack. Jacks are for lifting, not sustaining prolonged loads. You need at least two jack stands, their combined capacity exceeding your vehicle’s weight. Always use them in pairs and ensure they are properly rated and in good condition.
- Wheel Chocks: Wedges placed against the tires remaining on the ground to prevent rolling. Always chock the wheels diagonally opposite to where you are lifting (e.g., if lifting the front passenger side, chock the rear driver’s side wheel).
- Gloves: Protect hands from dirt, grease, and scrapes.
- Safety Glasses: Essential for protecting your eyes from falling debris, dust, or fluid splashes.
- Jack Pad Adapter: For vehicles with pinch welds, a rubber or polyurethane adapter protects the weld and provides a non-slip surface.
- Work Light: A good LED work light ensures clear visibility of jacking points, reducing error.
Pre-Lift Safety Checks
Before you position any tools, perform these critical safety checks:
- Flat, Level, Solid Surface: Paramount for stability. Never jack a car on dirt, grass, gravel, or sloped asphalt. A concrete driveway or garage floor is ideal. Soft or uneven surfaces can cause equipment to sink or tip.
- Vehicle in Park/Gear and Parking Brake Engaged: For automatics, ensure “Park.” For manuals, first gear or reverse. Always firmly engage the parking brake.
- Chock the Wheels: Place wheel chocks firmly against the tires not being lifted to prevent any unintended movement.
- Clear Work Area: Ensure no tripping hazards or obstacles. You need ample room to maneuver.
- Inspect Your Tools: Visually inspect your jack and jack stands for damage, rust, leaks, or bent components. Do not use compromised equipment.
Pre-Lift Safety Checks and Site Preparation
Before you even think about engaging that jack handle, a thorough pre-lift safety check is non-negotiable. Setting the stage correctly prevents accidents and ensures a smooth repair process. Think of it as laying a solid foundation for your car’s temporary elevated home.
Choosing Your Lift Location Wisely
The ground beneath your car is just as crucial as the tools you use. Opt for a flat, level, and hard surface. Concrete driveways or garage floors are ideal. Surfaces like grass, dirt, or gravel can shift unpredictably, creating an unstable environment for both your jack and jack stands. Even a slight incline can compromise stability, making the lift dangerous. Also, ensure you have ample space around the vehicle to work safely and comfortably, free from obstructions or tripping hazards. Good lighting is another often-overlooked aspect; a well-lit area minimizes shadows and helps you see your jack points and tools clearly.
Securing the Vehicle Before Lifting
Once your ideal spot is chosen, the next step is to immobilize the vehicle completely. This means more than just the parking brake. For automatic transmissions, ensure the car is in Park (P). Manual transmission vehicles should be placed in either first or reverse gear. Always engage the parking brake firmly. Additionally, wheel chocks are your best friend here. Place them securely against the tires that will remain on the ground — for example, if you’re lifting the front, chock the rear wheels. This prevents any unintended rolling or shifting while the car is elevated, adding a critical layer of safety.
Common Mistakes and Best Practices for Vehicle Support
Even with the right jack and a safe lifting spot, how you support your vehicle after it’s lifted is paramount. This is where many DIYers make critical errors, often leading to dangerous situations. Remember, the jack is for lifting, but jack stands are for supporting.
Avoiding Critical Support Errors
The most dangerous mistake is working under a car supported solely by a hydraulic jack. Jacks can fail due to internal leaks, seals, or even jostling, leading to a sudden and catastrophic drop. Always use jack stands once the car is at the desired height. Another common error is using incorrect jack points for support. Never place jack stands on exhaust pipes, suspension components not designed for support, plastic body panels, or fuel lines. Always refer to your vehicle’s owner’s manual or a reliable service manual for the exact, manufacturer-designated jack stand points. These are typically reinforced areas designed to bear the vehicle’s weight safely.
Maximizing Stability with Jack Stands
Proper jack stand placement and usage are key to unwavering stability. Once you’ve lifted the car with your floor jack, position your jack stands under the designated support points. Extend the stands to the appropriate height, ensuring the car is level, and then lower the vehicle slowly onto them. Make sure the jack stands are firmly seated and locked into place. If using ratcheting stands, ensure the locking pawl is fully engaged. After the car is resting on the stands, give the vehicle a gentle push or rock to confirm its stability. This crucial step verifies that the stands are properly positioned and won’t shift. As an extra precaution, many experienced mechanics leave the floor jack lightly engaged under a different strong point, not bearing full weight but acting as a secondary safety measure, just barely touching the vehicle to catch it in case a stand fails. Always use jack stands in pairs, ensuring even weight distribution.
Conclusion


Jacking up a car safely is a fundamental skill for any DIY mechanic, but it’s one that demands meticulous attention to detail and an unwavering commitment to safety. We’ve explored the essential tools, proper preparation, and critical support techniques needed to elevate your vehicle without putting yourself or your car at risk. The right equipment, a stable work environment, and correct placement of both your jack and jack stands are the pillars of a successful and safe lift.
Before your next garage project, take the time to re-read your vehicle’s owner’s manual for specific jacking points and familiarize yourself with your tools. Practice these safety habits consistently until they become second nature. By following these guidelines, you’ll gain the confidence to tackle maintenance tasks with peace of mind, knowing your vehicle is securely supported. Stay safe, stay smart, and empower yourself to get the job done right!
❓ Frequently Asked Questions
Why is using jack stands absolutely critical when lifting a car?
A hydraulic jack can fail unexpectedly due to mechanical failure or fluid leaks, leading to severe injury or fatality if a vehicle collapses. Jack stands provide a solid, mechanical support that ensures the vehicle remains safely elevated, making them non-negotiable for under-car work.
How do I correctly identify the specific jacking points for my vehicle?
The most reliable source for correct jacking points is your car’s owner’s manual, which often includes diagrams. Common points are reinforced pinch welds, sturdy frame rails, differential casings (for rear-wheel drive), or specific subframe locations designed for lifting.
What kind of jack should I use, and what capacity is recommended?
A hydraulic floor jack or bottle jack is commonly used, with a lifting capacity that should safely exceed at least half the vehicle’s curb weight. Always ensure the jack’s rated capacity is appropriate for your car to ensure safe lifting.
What are the common risks of improper jacking, and how can they be mitigated?
Risks include vehicle collapse, severe personal injury, damage to the car’s undercarriage, and unstable lifting. These can be mitigated by always using proper tools, identifying correct jacking points, working on level ground, and consistently using jack stands.
What is the correct procedure for safely lowering a car from jack stands?
To safely lower your car, first position the jack under the lifting point and slightly raise the vehicle to take pressure off the stands. Remove the jack stands, then slowly and carefully lower the car completely to the ground, ensuring the area around the wheels is clear.
Is it ever safe to jack up a car on an inclined or uneven surface?
Absolutely not. Always perform any jacking procedure on a flat, level, and firm surface. J acking on an incline or uneven ground significantly increases the risk of the vehicle rolling or slipping off the jack and stands, leading to dangerous accidents.