Restore Foggy Headlights: A Clear Guide to Cleaning & Care
Last Updated on September 1, 2026 by Ryan
Cleaning foggy headlights significantly improves nighttime visibility and vehicle aesthetics. While various methods exist, a proper restoration involves sanding, polishing, and sealing to remove oxidation and prevent future fogging, ensuring lasting clarity.
🎯 Key Takeaways
- Restores clear vision for safer night driving.
- UV damage is the main cause of headlight fogging.
- Wet sanding is crucial for removing deep oxidation.
- Apply UV sealant for lasting protection.
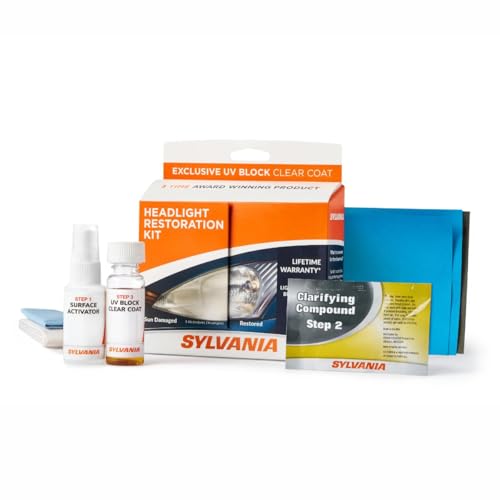
- Dedicated kits often yield best, most durable results.


Restoring your foggy headlights is a straightforward DIY project that significantly improves your vehicle’s safety and appearance. You can achieve clear, like-new headlights without expensive replacements. This guide provides the exact steps and materials you need to effectively clean and protect your headlights, ensuring better visibility and a sharper look for your car.
Addressing hazy headlights immediately matters. Foggy headlights dramatically reduce your light output, making it harder to see the road at night and diminishing your car’s overall appeal. By following this process, you’ll not only enhance your driving safety but also maintain your car’s value, avoiding the significant cost of professional services or new headlight assemblies.
Understanding Headlight Fogging & Its Causes
Headlights don’t fog from the inside. Instead, they haze over due to external factors, primarily affecting the outer plastic lens. Knowing the root cause helps you understand why a comprehensive cleaning process is essential for lasting results. It’s not just dirt; it’s a breakdown of the material itself.
Why Headlights Haze Over
Your car’s headlights are typically made from a durable polycarbonate plastic. While strong, this material is vulnerable to environmental elements. The primary culprits for hazing are:


- UV Radiation: Sunlight’s ultraviolet rays break down the polycarbonate at a molecular level. This causes yellowing, cloudiness, and micro-cracking over time.
- Oxidation: Exposure to oxygen contributes to the degradation process, further breaking down the plastic’s surface and clarity.
- Environmental Contaminants: Road grime, chemicals, acid rain, and other pollutants settle on the surface, accelerating the breakdown of the factory-applied UV protective coating.
The factory UV coating provides initial protection, but it eventually wears off. Once this layer is gone, the underlying polycarbonate rapidly deteriorates, leading to the familiar foggy appearance.
Impact on Driving Safety
Foggy headlights are more than an aesthetic issue; they pose a serious safety risk. You might not notice the gradual decline in performance until visibility becomes dangerously compromised. The effects are significant:
- Reduced Light Output: Hazy lenses can block up to 70% of your headlight’s illumination. This drastically shortens your effective sight distance, especially at night.
- Scattered Light: Instead of focusing the light beam, the cloudy surface scatters it. This creates glare for oncoming drivers and reduces the useful light reaching the road.
- Compromised Visibility: Poorly performing headlights make it harder to react to road hazards, pedestrians, or animals. This risk increases significantly during rain, fog, or snow.
Restoring clarity to your headlights directly translates to improved visibility, making your nighttime and adverse weather driving much safer for you and others on the road.
Your Complete DIY Guide to Crystal Clear Headlights
Cloudy, yellowed, or foggy headlights aren’t just an aesthetic issue; they significantly reduce your visibility and compromise safety, especially when driving at night. This comprehensive guide will walk you through a step-by-step process to restore your headlights to their original clarity, using readily available tools and a bit of elbow grease. By following these detailed instructions, you can save money on replacements and ensure your vehicle is safe for the road.
Step 1: Assemble Your Restoration Kit
What you need: Microfiber towels (2-3), dish soap, water, painter’s tape (1-inch wide), plastic sheeting or old newspaper, spray bottle, sanding block (or foam sanding pads), various grits of wet/dry sandpaper (e.g., 400, 800, 1000, 2000, 3000 grit), automotive rubbing compound or plastic polish, UV-resistant clear coat or headlight sealant, isopropyl alcohol (IPA) or denatured alcohol (optional).
Instructions: Before beginning any work, ensure you have all necessary materials laid out and within easy reach. A well-prepared workspace prevents interruptions and ensures a smooth process. Check that your sandpaper is specifically designed for wet sanding; regular sandpaper will disintegrate. For best results, consider purchasing a dedicated headlight restoration kit, which often includes all necessary abrasives, compounds, and sealants. This step is crucial for an efficient and effective restoration.
Pro Tip: Don’t skimp on quality sandpaper. Cheap sandpaper wears out quickly and can leave inconsistent scratches, making subsequent steps harder. A good quality restoration kit can be a worthwhile investment.
Step 2: Prepare and Protect Surrounding Areas
What you need: Painter’s tape (1-inch wide is ideal), plastic sheeting or old newspaper, clean microfiber towel, dish soap, water.
Instructions: Begin by thoroughly washing the headlights and the surrounding bumper/fender area with dish soap and water to remove any surface dirt, grime, or wax. Dry the area completely with a clean microfiber towel. Once dry, carefully apply painter’s tape around the entire perimeter of each headlight lens. Overlap the tape slightly onto the painted surfaces of your car to create a protective barrier. For extra caution, especially if you’re new to sanding, you can extend this protection using plastic sheeting or old newspaper secured with more tape to shield a wider area from overspray and sanding dust. This prevents accidental damage to your car’s paintwork during the sanding process.
Pro Tip: Use high-quality painter’s tape, like 3M Blue tape, as it provides a strong hold without leaving residue or pulling off paint upon removal. Double-layering the tape on critical edges adds an extra layer of protection.
Step 3: Begin Coarse Wet Sanding
What you need: Spray bottle filled with water, 400-grit wet/dry sandpaper (or 600-grit if headlights aren’t severely oxidized), sanding block/foam pad.
Instructions: Thoroughly wet the headlight lens and your 400-grit sandpaper with water from the spray bottle. The water acts as a lubricant and carries away sanding debris. Start sanding the entire headlight lens using even, horizontal strokes across the surface. Apply moderate, consistent pressure. You’ll notice a milky residue appearing – this is normal and indicates you’re removing the oxidized layer. Continuously re-wet the surface and the sandpaper to prevent clogging and to keep the lens cool. Continue sanding until the entire lens has a uniformly cloudy appearance, ensuring all yellowing and oxidation are removed. This step is crucial for leveling the surface and removing the deepest layers of degradation.
Pro Tip: Sand in one direction (e.g., left to right) for the entire headlight, then switch to vertical strokes in the next grit. This helps identify and remove scratches from the previous grit more easily. Maintain consistent pressure across the entire lens.
Step 4: Progress Through Finer Grits
What you need: Spray bottle with water, 800-grit, 1000-grit, 2000-grit, and 3000-grit wet/dry sandpaper, sanding block/foam pad.
Instructions: After completing the 400-grit sanding, thoroughly rinse the headlight and surrounding area to remove all coarse grit residue. Now, switch to 800-grit sandpaper. Wet the lens and sandpaper and sand using vertical strokes, ensuring you remove all scratches left by the 400-grit. Rinse again. Repeat this process, gradually moving to finer grits: 1000-grit, then 2000-grit, and finally 3000-grit. With each successive grit, the headlight should become progressively clearer, and the scratches less visible. For the 2000-grit and 3000-grit, you can use very light pressure and circular motions for final refinement. Ensure the lens is consistently wet and clean between each grit change.
Pro Tip: Take your time with each grit. The goal is to remove the scratches from the previous grit, not just to sand the surface. If you rush, deeper scratches will remain, leading to a less clear finish. Rinse thoroughly after each grit change to avoid contaminating the finer paper with coarser particles.
Step 5: Polish for Optimal Clarity
What you need: Automotive rubbing compound or plastic polish, clean microfiber towels (2-3), optional: orbital polisher with foam pad.

![[ARMOR UP] 4"x72" Clear Car Paint Protection Film- 6-mil TPU Protector Wrap…](https://m.media-amazon.com/images/I/31TMm3JasxL._SS500_.jpg)

Instructions: Once you’ve finished with the finest sandpaper (3000-grit) and rinsed the lens completely, dry it thoroughly with a clean microfiber towel. Apply a small amount (about a dime-sized dollop) of automotive rubbing compound or plastic polish directly onto the headlight lens or onto a clean microfiber towel. Using firm, circular motions, work the compound into the lens. If using an orbital polisher, apply compound to a foam polishing pad and work at a low to medium speed. Continue polishing until the headlight becomes significantly clearer and smoother. Wipe away any polish residue with a fresh, clean microfiber towel. You should now see a vast improvement in clarity.
Pro Tip: For stubborn haziness, you might need to repeat the polishing step a second time. Ensure you’re using a dedicated plastic polish or a non-abrasive rubbing compound. Using a clean section of the microfiber towel for each wipe ensures no existing residue is re-applied.
Step 6: Apply UV Protective Sealant or Clear Coat
What you need: UV-resistant clear coat specifically for headlights (e.g., a 2-part acrylic urethane clear coat or a dedicated headlight sealant spray), optional: isopropyl alcohol (IPA) or denatured alcohol, clean microfiber towel, painter’s tape.
Instructions: This is a critical step for long-term clarity. Before applying any sealant, lightly clean the headlight surface with isopropyl alcohol on a fresh microfiber towel to remove any remaining polish residues and ensure perfect adhesion. Allow it to air dry completely. If you removed the painter’s tape earlier, re-tape the surrounding areas precisely to protect your paint from overspray. Follow the manufacturer’s instructions for your chosen clear coat or sealant. Typically, this involves applying several thin, even coats (e.g., 2-3 coats) with appropriate flash-off times (e.g., 5-10 minutes) between each. Ensure even coverage to prevent streaks or runs. This protective layer shields the plastic from future UV damage and re-oxidation.
Pro Tip: Humidity and temperature can affect clear coat application. Aim for a dry, temperate environment. Hold the spray can about 6-8 inches from the headlight and use smooth, sweeping motions. Too close, and it will run; too far, and it will be rough and uneven. Do not over-apply in one spot.
Step 7: Allow for Proper Curing
What you need: Patience, a garage or shaded area.
Instructions: After applying the final coat of sealant or clear coat, it’s crucial to allow adequate time for it to cure fully. The curing time will vary depending on the product used, but typically ranges from a few hours to 24-48 hours. During this period, avoid touching the headlights, washing the car, or exposing them to harsh weather conditions (rain, direct sunlight). If possible, park your car in a garage or a shaded, well-ventilated area to allow the clear coat to harden properly. Refer to the product’s specific instructions for exact curing times. Once cured, carefully remove the painter’s tape, pulling it slowly at a 45-degree angle away from the freshly coated surface to prevent lifting any edges.
Pro Tip: Rushing the curing process can lead to a less durable finish and potential damage to the newly applied clear coat. A fully cured clear coat provides maximum protection and longevity for your restored headlights. Test a small, inconspicuous area for tackiness before removing all tape.
Step 8: Ongoing Maintenance for Lasting Clarity
What you need: Car wax or sealant, UV protectant spray (optional), microfiber towels.
Instructions: To maintain the crystal-clear appearance of your headlights and extend the life of your restoration, regular maintenance is key. Whenever you wax your car, apply a layer of car wax or a dedicated sealant to your headlights as well. This adds an extra sacrificial layer of protection against UV rays and environmental contaminants. Periodically, you can also apply a UV protectant spray specifically designed for plastics, which can further bolster the clear coat’s defense. Avoid abrasive cleaners or harsh chemicals on the headlights. Gentle washing with car soap and water is usually sufficient for regular cleaning. With proper care, your restored headlights can remain clear for several years.
Pro Tip: Think of the clear coat as your car’s paint – it needs protection. Applying a good quality car wax or sealant every few months will significantly prolong the life and clarity of your restored headlights. Never use harsh brushes or scouring pads.
✅ Final Checklist
- Headlights are uniformly clear and free of yellowing or haziness.
- No visible sanding marks or swirl marks remain on the lens.
- Clear coat/sealant is evenly applied with no runs or streaks.
- Surrounding paintwork is undamaged and free of residue.
- All painter’s tape and plastic sheeting have been removed.
Important Notes:
- Safety Considerations: Always work in a well-ventilated area, especially when using spray clear coats, as fumes can be harmful. Wear appropriate personal protective equipment (PPE) such as gloves and eye protection to prevent skin contact with chemicals and protect your eyes from sanding dust.
- When to Seek Professional Help: If your headlights have internal moisture condensation, cracks, or severe damage that goes beyond surface oxidation, a restoration kit may not be sufficient. These issues often require professional repair or replacement of the entire headlight assembly.
- Estimated Time and Cost Range: This DIY project typically takes 1.5 to 3 hours per headlight, depending on the severity of oxidation and your experience level. The cost can range from $15-$50 for a basic restoration kit or individual supplies, significantly less than the hundreds of dollars it can cost to replace headlight assemblies.
Comparing Headlight Cleaning Methods & Materials
Choosing the right approach and having the correct materials are crucial for successful headlight restoration. Many quick fixes exist, but only a dedicated method provides durable, professional-grade results. You need the right tools to tackle the problem effectively.
DIY Home Remedies vs. Dedicated Kits
You’ll find various suggestions for home remedies, but their effectiveness is limited. Understand their pros and cons before committing:

- Home Remedies (e.g., Toothpaste, Bug Spray): These can offer a very minimal, temporary improvement for extremely slight haze due to their mild abrasive properties. They are often cheap and use readily available items. However, they lack the necessary abrasive range, polishing power, and, critically, any UV protection. Results are short-lived, often lasting only weeks, and they are completely ineffective for moderately to severely foggy headlights. You’ll likely need to repeat the process frequently.
- Dedicated Restoration Kits: These kits are engineered specifically for headlight restoration. They contain a graded series of abrasives (sandpaper discs), specialized polishing compounds, and, most importantly, a durable UV-protective sealant. While requiring a bit more effort and a slightly higher upfront cost, they provide comprehensive, long-lasting restoration. The inclusion of a UV sealant is paramount for preventing rapid re-oxidation and maintaining clarity for years, not just weeks. This is the recommended and most effective approach.
Essential Materials for Effective Restoration
For a thorough and lasting restoration, gather these specific materials. You can purchase these individually or often find them bundled in a quality headlight restoration kit.
- Painter’s Tape: Protects the surrounding paintwork and trim from sanding and polishing. Use a high-quality automotive-specific tape.
- Car Wash Soap or Glass Cleaner: For initial cleaning of the headlight surface.
- Spray Bottle with Water: Absolutely essential for wet sanding, keeping the surface lubricated and washing away debris.
- Microfiber Towels: Several clean, soft towels for drying, applying polish, and final wiping.
- Wet Sanding Sandpaper (various grits): This is the core abrasive part. You will need multiple grits, typically ranging from a coarser 800-grit to a finer 3000-grit (e.g., 800, 1500, 2000, 3000). Some kits include finer grits like 5000.
- Sanding/Polishing Backing Pad (with drill attachment): While you can sand by hand, a drill attachment significantly speeds up the process and ensures more even abrasion.
- Polishing Compound: A dedicated plastic or headlight polishing compound designed to remove fine scratches and restore optical clarity after sanding.
- UV-Protective Sealant/Coating: This is a non-negotiable step. It applies a new protective layer to prevent future hazing. This can be a wipe-on liquid, a spray, or a dedicated wipe included in a kit.
- Gloves and Eye Protection: Always prioritize your safety when working with chemicals and abrasives.
<h2>Essential Tools and Preparations for Restoration</h2>

<p>Embarking on a headlight restoration journey requires the right gear. Think of it like a meticulous cleaning project – having the correct tools makes all the difference for a brilliant outcome. You're not just scrubbing; you're gently resurfacing and protecting, which demands specific items.</p>
<h3>Gathering Your Restoration Arsenal</h3>
<p>Before you even think about touching your headlights, assemble everything you'll need. This usually includes a combination of abrasives, polishing agents, and protective elements. <em>Avoid improvising with household cleaners</em> not designed for automotive plastics, as they can cause more harm than good.</p>
<ul>
<li><strong>Headlight Restoration Kit:</strong> Many kits come with everything pre-packaged, including various grit sanding discs (from coarse to fine), polishing compounds, and a UV sealant. This is often the easiest and most reliable route.</li>
<li><strong>Automotive Masking Tape:</strong> Crucial for protecting the surrounding paintwork and trim from accidental scratches or product residue.</li>
<li><strong>Microfiber Towels:</strong> Soft, lint-free cloths are essential for applying products and wiping away residue without scratching the delicate plastic.</li>
<li><strong>Water Spray Bottle:</strong> Keeping the headlights moist during certain stages is key for lubrication and preventing excessive heat buildup.</li>
<li><strong>Protective Gear:</strong> Always wear gloves to protect your hands from chemicals and safety glasses to shield your eyes from debris.</li>
</ul>
<h3>Setting the Stage for Success</h3>
<p>Where you perform the restoration is just as important as what you use. A well-prepared workspace contributes significantly to the quality and safety of your effort. Imagine trying to paint a masterpiece in a dusty, dimly lit garage – not ideal!</p>
<ul>
<li><strong>Shaded Work Area:</strong> Always work in a cool, shaded environment. Direct sunlight can cause compounds to dry too quickly, making them harder to work with and potentially leaving streaks.</li>
<li><strong>Clean Surface:</strong> Before applying any restoration products, give your headlights a thorough wash with car soap and water to remove any surface dirt, bugs, or grime. This prevents you from rubbing contaminants into the plastic during the restoration process.</li>
<li><strong>Masking is Key:</strong> Carefully apply masking tape around the entire perimeter of each headlight. This protective barrier safeguards your car's paint, grill, and chrome trim from stray sanding, polishing, or sealing products.</li>
</ul>
<h2>Long-Term Maintenance and Prevention Strategies</h2>
<p>Restoring your headlights is a fantastic achievement, but it's not a set-it-and-forget-it solution. To keep that crystal-clear vision and prolong the life of your freshly restored lenses, ongoing care is crucial. Think of it like waxing your car after a detailed wash – it locks in the shine and protects the paint.</p>
<h3>The Power of Protection: UV Sealants</h3>
<p>The main culprit behind foggy headlights is UV radiation from the sun. Once you've removed the damaged layer, the newly exposed plastic is vulnerable. Applying a protective coating is your first line of defense against future degradation.</p>
<ul>
<li><strong>Dedicated UV Sealants:</strong> Many restoration kits include a UV-blocking clear coat or sealant. This creates a sacrificial layer that absorbs the sun's harmful rays, preventing them from yellowing the plastic underneath.</li>
<li><strong>Ceramic Coatings for Plastics:</strong> For longer-lasting protection, consider specific ceramic coatings designed for automotive plastics. These offer superior durability and hydrophobic properties, repelling water and dirt.</li>
<li><strong>Regular Reapplication:</strong> Most sealants aren't permanent. Depending on the product and your car's exposure, plan to reapply a protective coating every 6-12 months. This proactive approach prevents the fog from returning.</li>
</ul>


<h3>Smart Habits for Headlight Health</h3>
<p>Beyond specific products, your daily habits play a significant role in maintaining headlight clarity. Small changes in how you park and clean your vehicle can make a big difference in preventing premature yellowing and hazing.</p>
<ul>
<li><strong>Shade is Your Friend:</strong> Whenever possible, park your car in a garage, under a carport, or in the shade. Reducing direct sunlight exposure is the simplest way to slow down UV damage to all exterior plastics.</li>
<li><strong>Gentle Cleaning:</strong> When washing your car, use a mild automotive soap and a soft sponge or microfiber mitt on your headlights. Avoid harsh chemical cleaners, abrasive brushes, or dry wiping, which can scratch the surface or strip away protective layers.</li>
<li><strong>Regular Inspection:</strong> Get into the habit of visually inspecting your headlights every few months. Catching the very first signs of hazing allows you to reapply a sealant or perform a light polish before the problem becomes severe, saving you time and effort down the road.</li>
</ul>
<h2>Conclusion</h2>
<p>Foggy headlights are a common automotive nuisance, but they don't have to be a permanent fixture on your vehicle. By understanding the causes, gathering the right tools, and committing to a bit of preventative care, you can bring back the sparkle to your car's "eyes." Restoring your headlights isn't just about aesthetics; it's a vital step for enhancing nighttime visibility and ensuring safer journeys for everyone on the road. Don't let cloudy headlights dim your driving experience or your car's curb appeal any longer. Equip yourself with knowledge, take action today, and enjoy the clear road ahead!</p>
❓ Frequently Asked Questions
What are the key differences between DIY solutions (like toothpaste/baking soda) and dedicated headlight restoration kits?
DIY solutions primarily offer a superficial abrasion to remove light oxidation, providing temporary clarity. Dedicated kits include specific grits of sandpaper, polishing compounds, and crucial UV sealants designed for a thorough, longer-lasting restoration process that tackles deeper damage.
How can I tell if my headlights need cleaning or full replacement?
Headlights needing cleaning typically show a yellowed, hazy, or foggy exterior layer. If the fogginess is inside the lens, or if the plastic is cracked, deeply pitted, or shattered, a full replacement is usually necessary as cleaning won’t resolve internal issues.
Is it necessary to use a UV protective sealant after cleaning, and why?
Yes, a UV protective sealant is absolutely crucial after cleaning because it restores the headlight’s vital outer layer, which protects the polycarbonate from future sun damage and oxidation. Without it, the headlights will quickly fog up again, often within months.
What are the most common mistakes people make when trying to clean their foggy headlights?
Common mistakes include not taping off surrounding paint, using too coarse sandpaper without progression, not wet sanding properly, rushing the polishing step, and most importantly, neglecting to apply a durable UV protective sealant, which leads to rapid re-fogging.
How often should I clean and re-seal my headlights for optimal clarity?
For optimal clarity and protection, it’s generally recommended to inspect your headlights annually. While a full restoration might only be needed every 1-3 years, applying a fresh coat of UV sealant or a protective wax every 6-12 months can significantly extend their clear appearance.
Are there any specific safety precautions I should take when cleaning my headlights?
Always wear eye protection and gloves to protect against chemicals and dust. Ensure the work area is well-ventilated, and mask off surrounding paint with automotive tape to prevent accidental scratches or damage from abrasive compounds.