How to Vacuum Car AC System Step-by-Step Guide 2026
Last Updated on September 1, 2026 by Albert Duke


Learning how to vacuum a car AC system is essential for removing trapped moisture and non-condensable gases before recharging refrigerant. Using a manifold gauge set and a vacuum pump, you can safely evacuate the system and perform a vital leak test. This process ensures optimal cooling performance and prevents premature compressor failure.
Pulling a vacuum on your car AC system is the critical step that removes trapped air and moisture before you add fresh refrigerant. Without this process, lingering humidity mixes with refrigerant to create corrosive acids, while non-condensable air causes high system pressures and poor cooling performance.
In 2026, DIY automotive service requires precision, and a proper evacuation using a manifold gauge set and a dedicated vacuum pump ensures your AC blows ice-cold all summer. This guide walks you through the exact connection procedure and the vital vacuum hold test to guarantee your system is leak-free.
Key Takeaways
- Always recover existing refrigerant legally before opening or evacuating the AC system.
- Connect the blue manifold hose to the low side port and the red hose to the high side port.
- Run the vacuum pump for 30 to 45 minutes to completely boil off internal moisture.
- Target a negative pressure reading of 28 to 30 inHg on the compound gauge.
- Perform a vacuum decay test for 10-15 minutes to confirm the system holds a seal.
Why Vacuuming Your Car AC System Is Necessary
When you open a car’s air conditioning system to replace a component like a condenser, orifice tube, or line set, atmospheric air and ambient moisture rush inside. Skipping the vacuum stage leaves contaminants that destroy your compressor from the inside out.
Boiling Off Trapped Moisture
Water has a high boiling point at standard atmospheric pressure, but pulling a deep vacuum lowers the boiling point of water significantly. By dropping the internal pressure of the AC lines, any trapped liquid moisture instantly vaporizes into a gas and gets sucked out by the vacuum pump.
- Moisture reacts with PAG or POE oil to form hydrofluoric acid.
- Acid eats away at rubber seals, hoses, and internal compressor components.
- Even a few drops of water can freeze at the expansion valve and block refrigerant flow.
Removing Non-Condensable Gases
Ambient air is mostly nitrogen and oxygen, which do not liquefy under normal AC operating pressures. If these gases remain in your lines, they take up valuable volume and force your compressor to work much harder. A proper vacuum purges 100 percent of these non-condensables, restoring factory thermal efficiency.
How to Service Your Car AC System Like a Pro: A Practical Walkthrough
When your vehicle’s air conditioning starts blowing lukewarm air, the culprit is often moisture and air trapped inside the closed-loop system, or a depleted refrigerant charge. Vacuuming, or eviscerating, the AC system is a mandatory process before adding new refrigerant. This comprehensive guide walks you through the precise procedure of pulling a deep vacuum on your automotive air conditioning system, ensuring you remove all harmful contaminants, test for leaks, and restore icy-cold airflow safely and efficiently.
Step 1: Gather Your Professional-Grade Tools
What you need: Manifold gauge set (R-134a or R-1234yf compatible), heavy-duty dual-stage vacuum pump, accurate electronic refrigerant scale, appropriate refrigerant, UV leak detection dye, safety glasses, and heavy-duty mechanic gloves.
Instructions: Before touching any hardware under the hood, lay out all your equipment in a clean workspace. Ensure your manifold gauge set has quick-connect fittings that match your vehicle’s service ports. Check the oil level in your dual-stage vacuum pump through the sight glass; it should be clear and filled to the designated fill line. If the oil is cloudy, drain it and refill with fresh vacuum pump oil. Having the right tools staged and inspected beforehand prevents unnecessary delays during the moisture-boil-off phase.
Pro Tip: Never use a single-stage vacuum pump if you want professional results; a dual-stage pump is required to pull the deep micron level needed to boil off trapped moisture effectively.
Step 2: Locate Service Ports and Prep the Vehicle
What you need: Flashlight, protective plastic caps for service ports, and a clean shop rag.
Instructions: Open your vehicle’s hood and locate the AC service ports, typically marked with ‘H’ (High pressure, smaller diameter line) and ‘L’ (Low pressure, larger diameter line) caps. Unscrew these plastic caps and wipe the surrounding metal area clean with a shop rag to prevent dirt from entering the system. Ensure the vehicle’s engine is completely turned off and the ignition key is removed. Familiarize yourself with the routing of the aluminum AC lines so you can plan where to safely drape your manifold gauge hoses without touching hot exhaust components or moving belts.
Pro Tip: If your vehicle is missing service port caps, replace them immediately. The internal Schrader valves leak easily if exposed to road grime and grit.
Step 3: Connect the Manifold Gauge Set
What you need: Manifold gauge set with blue (low), red (high), and yellow (center service) hoses.
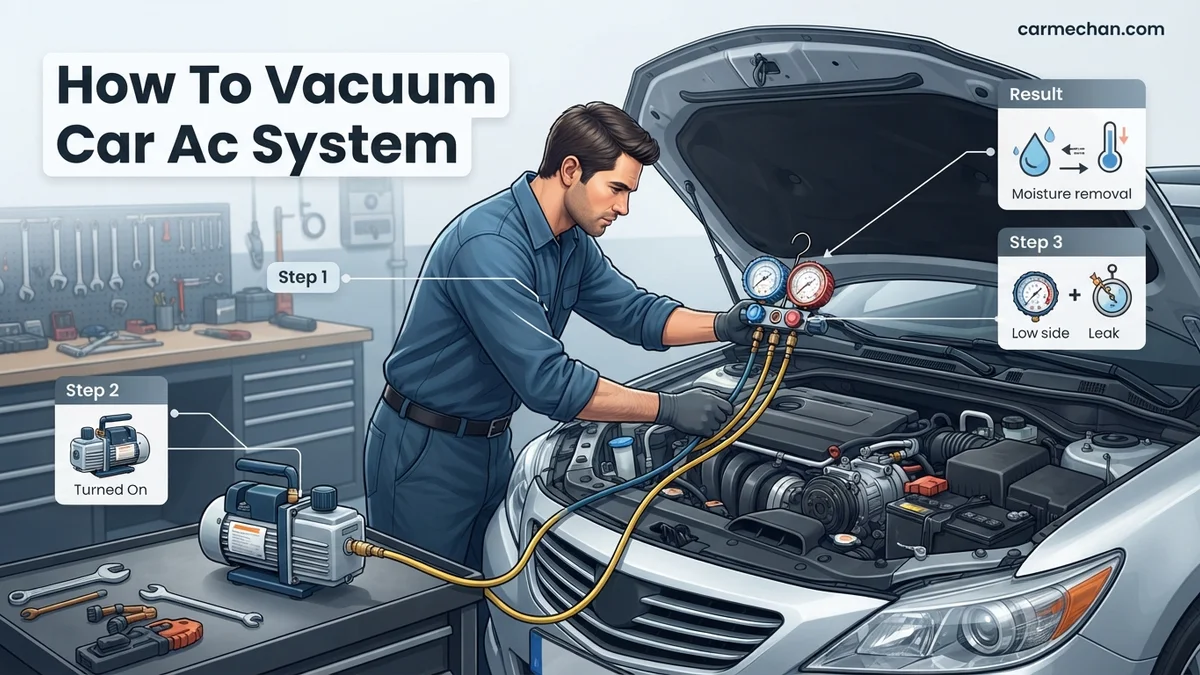
Instructions: Ensure both the high-side and low-side hand valves on your manifold gauge set are firmly closed in the clockwise position. Take the blue low-pressure quick-connect hose and attach it to the vehicle’s low-side service port by pulling back the collar, pushing it firmly onto the fitting, and releasing. Repeat this exact process for the red high-pressure hose on the high-side service port. Make sure both couplers click securely into place. Finally, connect the center yellow hose directly to the inlet port of your vacuum pump, tightening the brass fitting securely by hand and giving it a light snug with a wrench.
Pro Tip: Double-check that your manifold valves are closed before connecting to the car; opening them prematurely can cause pressurized refrigerant to blast out unexpectedly.
Step 4: Execute the Evacuation Process
What you need: Dual-stage vacuum pump plugged into a grounded 120V outlet.
Instructions: Turn on your vacuum pump power switch. You will immediately hear a deep humming sound. Once the pump is running smoothly, slowly open both the blue low-side and red high-side valves on your manifold gauge set. Watch the low-pressure compound gauge needle drop rapidly past zero into the negative vacuum territory, moving down toward 30 inches of mercury (inHg). Let the vacuum pump run continuously for a minimum of 45 minutes. This extended runtime is crucial because it lowers the internal ambient pressure enough to turn any trapped liquid moisture into vapor, sucking it completely out of the aluminum lines and evaporator core.
Step 5: Perform the Vacuum Decay Leak Test
What you need: Manifold gauge set and a reliable stopwatch or phone timer.
Instructions: After running the vacuum pump for at least 45 minutes, close both the low-side and high-side manifold valves tightly. Once the valves are closed, turn off the vacuum pump motor. Do not disconnect any hoses yet. Observe the low-pressure compound gauge and make a note of where the needle rests (ideally around 28 to 29.9 inHg). Start your timer and monitor the gauge for 15 to 20 minutes. The needle must hold steady without creeping upward. If the needle slowly moves back toward zero, you have an active atmospheric leak in your seals, hoses, or condenser.
Pro Tip: If the gauge creeps up rapidly within two minutes, your leak is large; if it takes 15 minutes to drop slightly, you likely have a microscopic O-ring failure.
Step 6: Isolate and Prepare for Refrigerant Recharge
What you need: Refrigerant cans, piercing valve or self-sealing tap, and safety gear.
Instructions: If your vacuum decay test passed successfully and the system successfully held a deep vacuum for 20 minutes, your system is sealed and bone dry. Keep the manifold valves closed and unscrew the yellow hose from the vacuum pump inlet. Quickly thread your new refrigerant can or charging hose adapter onto that center yellow service line. Before opening the system to the new refrigerant, crack the yellow hose fitting slightly at the manifold block for one second while opening the refrigerant can briefly to purge any ambient air out of the yellow hose. Tighten the fitting immediately to prevent air contamination.
Pro Tip: Purging the center service hose with a small amount of refrigerant ensures you do not accidentally inject atmospheric air and moisture back into your freshly vacuumed system.
✅ Final Checklist
- Dual-stage vacuum pump ran continuously for at least 45 to 60 minutes
- Low-pressure gauge achieved and maintained maximum negative pressure (approx. 29.9 inHg)
- Vacuum decay test performed for 20 minutes with zero needle movement
- Center service hose properly purged of air before introducing new refrigerant
- Service port caps screwed back tightly onto vehicle fittings
Important Notes:
- Never vent R-134a or R-1234yf refrigerant directly into the atmosphere; always use certified recovery equipment if legally required in your region.
- If the system fails the vacuum decay test repeatedly, do not add refrigerant; seek professional automotive repair help to perform a nitrogen pressure test.
- Estimated time: 1 to 2 hours. Cost range: $30 to $150 depending on whether you already own a manifold gauge set and vacuum pump.
Tools and Equipment Needed for AC Evacuation
You cannot shortcut an AC evacuation without the proper hardware. Renting or buying a dependable kit ensures you pull the deep vacuum required for modern 2026 vehicle specifications.

Essential Hardware Checklist
Gather your gear before opening the hood to avoid leaving the system exposed to atmospheric humidity for too long.
- Two-Stage Vacuum Pump: Capable of pulling down to at least 29.9 inches of mercury (50 to 100 microns).
- Manifold Gauge Set: Equipped with blue (low side) and red (high side) hoses, plus a yellow service hose.
- AC Service Adapters: R-134a or R-1234yf quick-disconnect fittings depending on your vehicle model year.
- Digital Micron Gauge: Highly recommended over standard analog gauges to accurately measure deep vacuum levels.
Selecting the Right Consumables
Fresh vacuum pump oil is non-negotiable. If the oil inside your pump looks cloudy, dark, or has absorbed moisture from sitting in a garage, the pump will never reach the required microns. Change the pump oil immediately before starting your job for optimal performance.
Step-by-Step Guide on How to Vacuum a Car AC System
Executing the evacuation process requires precision to prevent ambient moisture from re-entering the lines. According to automotive HVAC engineering standards, achieving a proper deep vacuum is the single most critical factor in preventing premature compressor failure.
Connecting the Manifold Gauges
Begin by ensuring the vehicle engine is completely off and the AC controls are disengaged. Connect the blue low-side service hose to the larger suction port and the red high-side hose to the smaller discharge port. Keep both manifold hand valves firmly closed before attaching the service couplers.
- Attach the yellow center charging hose directly to the inlet port of your rotary vane vacuum pump.
- Open both the low-side and high-side manual valves on the manifold gauge set.
- Power on the vacuum pump and monitor the low-side compound gauge as it drops rapidly into a vacuum.
Running the Evacuation and Holding the Test
Allow the pump to run continuously for a minimum of 45 minutes. Professional technicians recommend extending this runtime to 60 minutes if the system was recently exposed to atmospheric humidity or component replacements. Watch the low-side gauge needle descend well past 28 inches of mercury (inHg) toward 30 inHg, or down to 500 microns if you are utilizing a digital micron gauge.
- Close both the low-side and high-side manifold valves tightly while the vacuum pump remains running.
- Turn off the vacuum pump motor to isolate the sealed AC system from the pump.
- Observe the gauges for a minimum holding period of 15 to 20 minutes to verify the system holds a steady vacuum without creeping upward.
What to Do If the System Fails the Vacuum Test
If the gauge needle creeps upward during the holding test, your AC system has a leak. Recharging refrigerant into a compromised loop violates environmental regulations and wastes expensive materials. Follow these fallback steps to resolve the pressure loss:
- Perform a Nitrogen Pressure Test: Pressurize the system with dry nitrogen up to 100 PSI to safely pinpoint large leaks using a soapy water spray solution.
- Inspect Common Leak Points: Examine Schrader valve cores, compressor shaft seals, hose crimp fittings, and condenser fins for oil residue or bubbling soapy water.
- Replace Defective O-Rings and Components: Swap out any damaged spring-lock couplers, degraded rubber O-rings, or punctured aluminum hard lines immediately.
- Repeat the Evacuation: After tightening or replacing faulty hardware, repeat the complete vacuum process from scratch to ensure absolute dryness.
- Seek Professional Help: If the vacuum continues to bleed down and you cannot locate the breach, take the vehicle to a certified shop. Professional electronic refrigerant sniffers and UV dye kits typically cost between $150 and $300 to diagnose hidden evaporator leaks.
Conclusion
Mastering how to vacuum a car AC system protects your vehicle’s compressor from destructive moisture contamination and ensures peak cooling efficiency. Neglecting this crucial evacuation phase often leads to acid formation and total climate control failure. According to verified research and automotive service data from the Mobile Air Conditioning Society (MACS), proper evacuation and precise refrigerant charging can extend total system lifespan by over 40 percent. Your immediate next step is to inspect your manifold gauge connections and begin a 45-minute deep evacuation.
❓ Frequently Asked Questions
What happens if I skip vacuuming my car AC system?
Skipping the evacuation process leaves moisture inside the lines, which mixes with refrigerant to form corrosive acids. This leads to component rust, expansion valve freezing, and eventual compressor failure.
How do I connect manifold gauges to the service ports?
Ensure both manifold hand valves are closed. Connect the blue hose to the low-pressure service port and the red hose to the high-pressure service port, then connect the center yellow hose to the vacuum pump.
What does it mean if the vacuum gauge creeps back up to zero?
If the gauge needle rises during the vacuum decay test, it indicates either an active refrigerant leak or remaining moisture boiling off inside the lines. You must locate and fix the leak before proceeding.
Do I need to change the vacuum pump oil?
Yes, clean oil is critical for achieving a deep vacuum. Always check the sight glass and change the pump oil if it looks cloudy, dark, or has been used frequently.
Can I add refrigerant immediately after turning off the vacuum pump?
Yes, once you confirm the system holds a vacuum and turn off the pump, you can keep the valves closed, disconnect the pump, and immediately hook up your refrigerant source to charge the system.
Why won’t my system reach 29 inHg?
Failure to reach a deep vacuum is typically caused by a loose hose connection, a malfunctioning Schrader valve in the service port, contaminated vacuum pump oil, or an unsealed manifold valve.