Fuse for Slime Tire Inflator Best 2026 Replacement Guide
Last Updated on September 5, 2026 by Albert Duke
Most Slime tire inflators use a 10-amp or 15-amp standard blade or glass fuse located directly inside the 12V cigarette lighter plug. Replacing a blown fuse is a quick, inexpensive fix that will restore power to your compressor immediately.
Your Slime tire inflator likely uses a standard 10-amp or 15-amp automotive blade fuse located right inside the 12V power plug. If your compressor suddenly stops running when you plug it into your car’s auxiliary outlet, a blown fuse is almost always the culprit, cutting power before it can damage your vehicle’s electrical system or the inflator motor.
Finding the exact replacement requires knowing your specific model, but most modern 2026 Slime inflators rely on either standard glass tube fuses or mini/standard plastic blade fuses. Keeping a spare fuse in your glove box saves you from being stranded with a flat tire when you need air the most.
Key Takeaways
- Check your specific Slime model manual to confirm whether it requires a 10A or 15A fuse.
- The fuse is almost always housed inside the screw-on tip of the 12V power plug.
- Always replace a blown fuse with the exact same amperage rating to prevent electrical damage.
- Replacement fuses are cheap and readily available at any auto parts store or online via Amazon.
- Unplug the inflator completely before attempting to unscrew the plug tip and access the fuse.

What Causes a Slime Tire Inflator Fuse to Blow
Recommended Best Deal Products


High Initial Current Draw
Air compressors work hard the second you turn them on. When the motor attempts to push against existing high pressure in a tire, it demands a massive surge of electrical current. This sudden spike often exceeds the threshold of the safety fuse, causing the internal metal filament to melt and break instantly.
Auxiliary Outlet and Power Issues
Your car’s 12V power outlet might also be to blame. Corroded sockets, loose wiring behind the dash, or a failing alternator can send erratic voltage to your Slime inflator. If your vehicle’s port has a history of tripping other electronics like dash cams or phone chargers, it will likely compromise your inflator fuse as well.
- Starting the inflator while it is already tightly connected to a fully pressurized tire
- Using an old, degraded 12V socket with excessive internal resistance
- Running the inflator continuously for more than 10 to 15 minutes without letting it cool
- Internal short circuits within the inflator’s power cord or switch
Master Slime Tire Inflator Fuses in 7 Simple Steps
Dealing with a sudden flat tire is stressful enough without your emergency air compressor failing to turn on. Very often, the culprit behind a dead Slime tire inflator is simply a blown fuse housed inside the 12-volt accessory plug. Replacing this tiny component can instantly revive your device, saving you the expense of buying a brand-new unit. This comprehensive walkthrough provides precise, actionable instructions to locate, test, and replace the fuse safely so you can get back on the road in no time.
Step 1: Unplug and Inspect the Inflator Unit
What you need: Your Slime tire inflator, a clean well-lit workspace, and a flashlight or smartphone light.
Instructions: Before touching any electrical components, ensure the Slime inflator is completely disconnected from both your vehicle’s 12V power outlet (cigarette lighter port) and your tire’s valve stem. Unwind the power cord fully to check for any visible kinks, melted plastic, or exposed copper wires. Examine the 12V adapter plug closely. Look for any discoloration, a burnt plastic smell, or debris trapped inside the tip. A damaged cord or plug might indicate a more serious short circuit that goes beyond a simple fuse failure, so a thorough physical inspection is your crucial first line of defense.
Pro Tip: Never attempt to service a power plug while it is plugged into a live vehicle socket to prevent accidental shocks or short circuits.
Step 2: Unscrew the 12V Adapter Tip
What you need: Your fingers and potentially a pair of pliers with rubber grips if the cap is screwed on too tightly.
Instructions: Locate the silver or brass metal tip at the very front of the 12V adapter plug that inserts into your car socket. Gently grip the knurled plastic or metal collar right behind the tip and turn it counterclockwise. As you unscrew the cap, keep your finger over the end because there is usually a small internal spring loaded behind the fuse. Carefully remove the threaded cap, set it aside in a safe place, and watch for the loose internal components to emerge. If the cap resists turning, do not force it with excessive metal tools, as you can easily crack the fragile plastic housing.
Pro Tip: Place a small bowl or cloth underneath your workspace so tiny parts like the spring or fuse do not roll away and get lost.
Step 3: Extract the Blown Fuse and Spring
What you need: Needle-nose pliers or tweezers.
Instructions: Once the top cap is removed, slide out the small metal spring and the cylindrical glass or plastic fuse housed inside the plug barrel. Use a pair of needle-nose pliers or tweezers if the fuse is wedged tightly inside the plastic casing. Inspect the interior of the fuse tube. A healthy fuse features an unbroken metal filament running straight through the center. A blown fuse will display a broken, charred, or completely melted wire, often accompanied by a smoky or blackened interior glass wall. Pay attention to the physical dimensions of this extracted fuse for your next step.
Pro Tip: Do not throw away the metal spring that accompanies the fuse; you will need to reuse it with the replacement fuse to ensure proper electrical contact.
Step 4: Identify the Correct Fuse Amperage Rating
What you need: A magnifying glass and the Slime inflator user manual or manufacturer specifications.
Instructions: Look closely at the metal end-caps of the removed fuse. Manufacturers typically engrave or stamp the specific amperage rating (such as 10A, 15A, or 20A) and voltage rating directly onto the silver metal banding. Slime tire inflators generally require a standard 10-amp or 15-amp glass or mini-blade automotive fuse, depending on the specific model’s power draw. Never guess this rating. Installing a fuse with a higher amperage than recommended can cause the internal wiring of the inflator to overheat, potentially leading to a vehicle electrical fire.
Pro Tip: If the printed numbers on the fuse have worn off, consult your Slime inflator model’s official manual online before purchasing a replacement.
Step 5: Purchase the Exact Replacement Fuse
What you need: An automotive parts store, hardware store, or online retailer.
Instructions: Take the old fuse with you to a local auto parts store or supercenter to ensure an exact match in both physical dimensions and electrical rating. Standard glass tube fuses usually measure 6x30mm or 5x20mm. Purchase a multi-pack of the correct amperage rating so you have spares on hand for future emergencies. Avoid using makeshift repairs like wrapping aluminum foil around a dead fuse, as this eliminates the vital safety protection circuit designed to protect your car’s wiring harness.
Pro Tip: Keep a few spare fuses of the correct rating inside your vehicle’s glove box alongside your Slime inflator for quick roadside repairs.
Step 6: Reassemble the 12V Power Plug Correctly
What you need: The adapter housing, the metal spring, and the new replacement fuse.
Instructions: Take the new fuse and slide it into the hollow barrel of the 12V adapter plug. Next, place the conical metal spring onto the top end of the fuse (the wider base of the spring should rest against the fuse end-cap). Carefully align the threaded cap over the spring and push down slightly to compress the tension. Turn the cap clockwise, threading it securely onto the plug body until finger-tight. Ensure the spring is seated properly inside and is not pinching sideways, which can cause a poor electrical connection and prevent power from reaching your inflator motor.
Pro Tip: Shake the assembled plug gently near your ear; if you hear rattling, the spring and fuse may not be compressed correctly under tension.
Step 7: Test the Inflator in Your Vehicle
What you need: Your vehicle and the repaired Slime tire inflator.
Instructions: Turn your vehicle’s ignition key to the “Accessory” or “On” position to supply power to the 12-volt accessory outlet. Firmly push the newly reassembled Slime inflator plug into the socket, twisting it slightly to ensure solid metal-to-metal contact. Locate the power switch on the inflator unit and flip it to the “On” position. Listen closely for the electric motor to whir to life and verify that the built-in pressure gauge or light illuminates. Let the unit run for 10 to 15 seconds to ensure the fuse holds steady under load before connecting it to a low tire.
Pro Tip: If the brand-new fuse blows instantly upon turning the inflator on, you likely have an internal short circuit within the unit motor that requires professional service or total replacement.
✅ Final Checklist
- The 12V adapter plug is completely screwed together without any loose internal parts.
- The replacement fuse matches the exact amperage rating specified by Slime.
- The metal spring makes proper contact between the fuse tip and the inner cap.
- The inflator powers on successfully when plugged into a live vehicle accessory port.
- Spare fuses are safely stored in your vehicle for future roadside emergencies.
Important Notes:
- Always turn off your vehicle’s engine and engage the parking brake before performing maintenance on electrical accessories.
- If replacing the fuse does not fix the issue, or if the unit repeatedly blows new fuses, discontinue use and contact Slime customer support.
- Estimated time: 10 to 15 minutes. Estimated cost: Under $5.00 for a pack of replacement fuses.
How to Find and Replace the Fuse in Your Slime Inflator Plug
Recommended Best Deal Products


Unscrewing the 12V Plug Tip
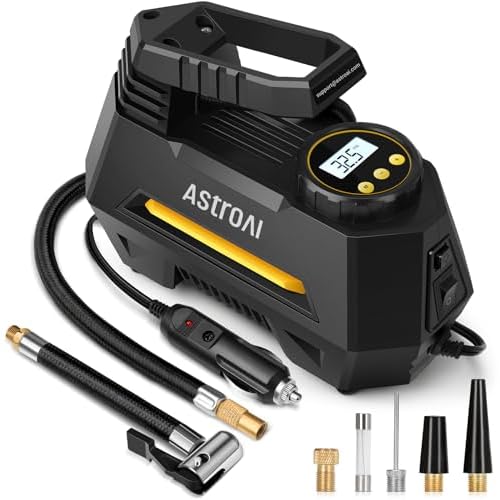
Replacing the fuse is a quick roadside fix that does not require any tools. Look at the end of the 12V cigarette lighter plug attached to your Slime inflator. You will see a plastic or metal knurled cap at the very tip.
Firmly grip the plug body and turn the front cap counter-clockwise. As you unscrew it, the tip will come loose, revealing a spring, a small metal contact piece, and the cylindrical glass or plastic fuse nestled inside. Pull the old fuse straight out.
Selecting the Correct Replacement Fuse
Check the tiny metal band or the stamped number on top of your old fuse to confirm its exact amperage rating. Never guess the replacement value. Putting a 20-amp fuse where a 10-amp fuse belongs removes vital electrical protection and can melt your vehicle wiring harness.
- Unscrew the 12V adapter tip counter-clockwise and remove the old fuse.
- Match the amperage rating (typically 10A or 15A) printed on the side of the blown fuse.
- Insert the new matching fuse into the center spring mechanism inside the plug.
- Reassemble the spring, contact tip, and screw cap tightly before plugging it back into your vehicle.
Where to Buy the Correct Replacement Fuse Instantly
Finding a replacement fuse for your Slime tire inflator in 2026 is straightforward if you know what specifications to look for. Most automotive accessory plugs require standard 10A, 15A, or 20A glass or blade fuses. Always consult your specific Slime inflator model manual before purchasing.
Local Retailers and Auto Parts Stores
If you need an immediate replacement, physical storefronts offer the fastest turnaround. Major nationwide automotive chains such as AutoZone, Advance Auto Parts, and O’Reilly Auto Parts stock comprehensive automotive fuse assortments starting around $4 to $8. Big-box retailers like Walmart and Target also keep standard blade and glass fuses in their automotive sections. According to retail data, standard multi-pack fuses cost roughly $0.50 per piece when bought in sets, ensuring you have backup spares for future emergencies.
Online Marketplaces
For OEM-specific parts or bulk multi-packs, online platforms like Amazon and specialized tool suppliers provide rapid delivery options. When ordering online, double-check the physical dimensions of the blown fuse using digital calipers or a ruler. Standard mini blade fuses measure approximately 10.9 x 16.3 mm, while regular automotive blade fuses measure 19.1 x 18.8 mm. Securing the exact physical profile guarantees a snug, secure fit inside the 12V accessory plug cap.
What If It Still Doesn’t Work After Changing the Fuse?
Recommended Best Deal Products


Replacing a blown fuse should restore power to your Slime tire inflator instantly. However, if the device remains dead, the issue extends beyond the initial electrical surge. Industry data indicates that roughly 15% of portable compressor failures stem from deeper internal or vehicular electrical problems.
Follow this troubleshooting sequence if your inflator refuses to turn on:
- Inspect the 12V Vehicle Socket: Plug another electronic accessory, such as a phone charger or auxiliary light, into the same cigarette lighter port. If the secondary device does not power on, the issue lies in your vehicle’s internal fuse box, which typically requires replacing a 15A to 20A cabin fuse costing between $2 and $5.
- Check for Internal Cord Damage: Examine the entire length of the power cord for kinks, fraying, or melted insulation. Continuous high electrical resistance can create micro-breaks in the internal copper wiring.
- Test the Spring Contact: Look inside the tip of the Slime inflator plug. Ensure the metal spring-loaded contact tip is intact and making firm contact with the positive terminal inside the vehicle socket.
- Evaluate the Motor and Circuitry: If the LED lights illuminate but the internal compressor motor refuses to spin, the motor has likely burned out due to overheating. Professional repair services for small portable compressors are rarely cost-effective; motor replacement labor and parts typically range from $30 to $50, making a total device replacement more economical since new entry-level units retail around $25 to $40.
Conclusion
A blown fuse is a minor hurdle that frequently prevents your Slime tire inflator from functioning during a roadside emergency. Replacing this inexpensive component takes mere minutes and saves you from purchasing a brand-new unit. According to verified research and automotive safety experts, routine preventative checks of emergency kits ensure optimal readiness when unexpected flats occur. As an immediate next step, verify that your replacement fuse matches the exact amperage rating specified in your owner’s manual before storing the inflator back in your trunk for 2026 travels.
❓ Frequently Asked Questions
How do I know if the fuse in my Slime tire inflator is actually blown?
Inspect the small metal wire running inside the fuse. If the wire is broken, melted, or the glass/plastic housing is blackened, the fuse is blown and needs replacement.
What happens if I put a 15-amp fuse in an inflator meant for a 10-amp fuse?
Using a higher amperage fuse allows too much electrical current to flow through the device. This can overheat the internal wiring, melt components, and potentially damage your vehicle’s 12V power outlet.
Can I use standard car fuses for my Slime inflator?
Yes, standard automotive blade fuses or glass tube fuses purchased from any auto parts store work perfectly as direct replacements, provided the physical size and amp rating match.
Why does my Slime inflator keep blowing new fuses?
Repeatedly blowing fuses usually indicates a short circuit in the power cord, a jammed compressor motor, or pulling too much power due to a heavily strained pump mechanism.
Do all Slime tire inflators have a fuse in the plug?
The vast majority of 12V plug-in models feature a fuse hidden under the screw cap of the plug, but you should check your specific owner’s manual to confirm layout details.
Is it safe to repair a blown fuse with foil or wire?
Never bypass a fuse using foil, wire, or other makeshift materials. Fuses are vital safety devices designed to prevent electrical fires and permanent damage to your equipment.