2015 Nissan Altima Fuse Box Diagram: Locations And Circuit Details
Experiencing an unexpected electrical malfunction in your 2015 Nissan Altima can be frustrating, often leaving you wondering where to begin troubleshooting. Without access to an accurate and detailed fuse box diagram, identifying the source of an electrical issue – from a non-functional power window to a dead headlight – can be a daunting and time-consuming task for any vehicle owner. This comprehensive guide provides a professional, step-by-step blueprint to understanding, locating, and utilizing the 2015 Nissan Altima fuse box diagrams, empowering you with the knowledge to reliably diagnose and address common electrical problems with confidence.
Understanding Your 2015 Nissan Altima’s Electrical System and Fuse Boxes
📤 Share Image


The electrical system of your 2015 Nissan Altima operates on a fundamental 12-volt DC (Direct Current) architecture, powering everything from essential engine functions to convenience features. This intricate network involves a battery as the primary power source, an alternator for recharging, and a complex web of wiring connecting various components such as the Engine Control Unit (ECU), headlights, radio, and power windows. Each component relies on a steady and correctly regulated flow of current. The interdependencies within this system mean that a fault in one area can cascade, affecting other seemingly unrelated components, underscoring the need for a comprehensive understanding of its protective mechanisms.
Fuses serve as crucial safety devices within this electrical ecosystem, specifically engineered to protect circuits from overcurrent conditions. Should an electrical surge or short circuit occur, the fuse, containing a thin metal filament, is designed to “blow” or break, thereby interrupting the circuit and preventing excessive current from reaching and damaging more expensive wiring, modules, or components. Consider your vehicle’s headlights: they receive power from the battery via a dedicated fuse, often rated at 10A or 15A. If a short circuit occurs in the headlight assembly, this specific fuse will blow, cutting power to the headlights but safeguarding the rest of the electrical system. This fundamental safety feature prevents potential fires and costly repairs.
The 2015 Nissan Altima primarily utilizes blade-type fuses, which are standardized for easy identification and replacement. These are categorized by their physical size and current rating, commonly including mini, ATO (regular), and maxi blade fuses, along with a few cartridge-style fuses for higher amperage circuits. Each fuse type is designed for specific applications and current loads. A critical aspect of fuse management is recognizing their standardized color-coding system. Fact: Nissan vehicles, like the 2015 Altima, typically use a standardized color-coding system for blade fuses, where yellow indicates a 20A fuse, blue a 15A, and red a 10A. This system is crucial for quick identification and proper replacement. Consulting a reliable, manufacturer-specific fuse box diagram is not merely a recommendation; it’s a necessity for accurate identification and effective troubleshooting, ensuring the integrity and trusted operation of your vehicle’s electrical system.

Locating the Primary Fuse Boxes in a 2015 Nissan Altima
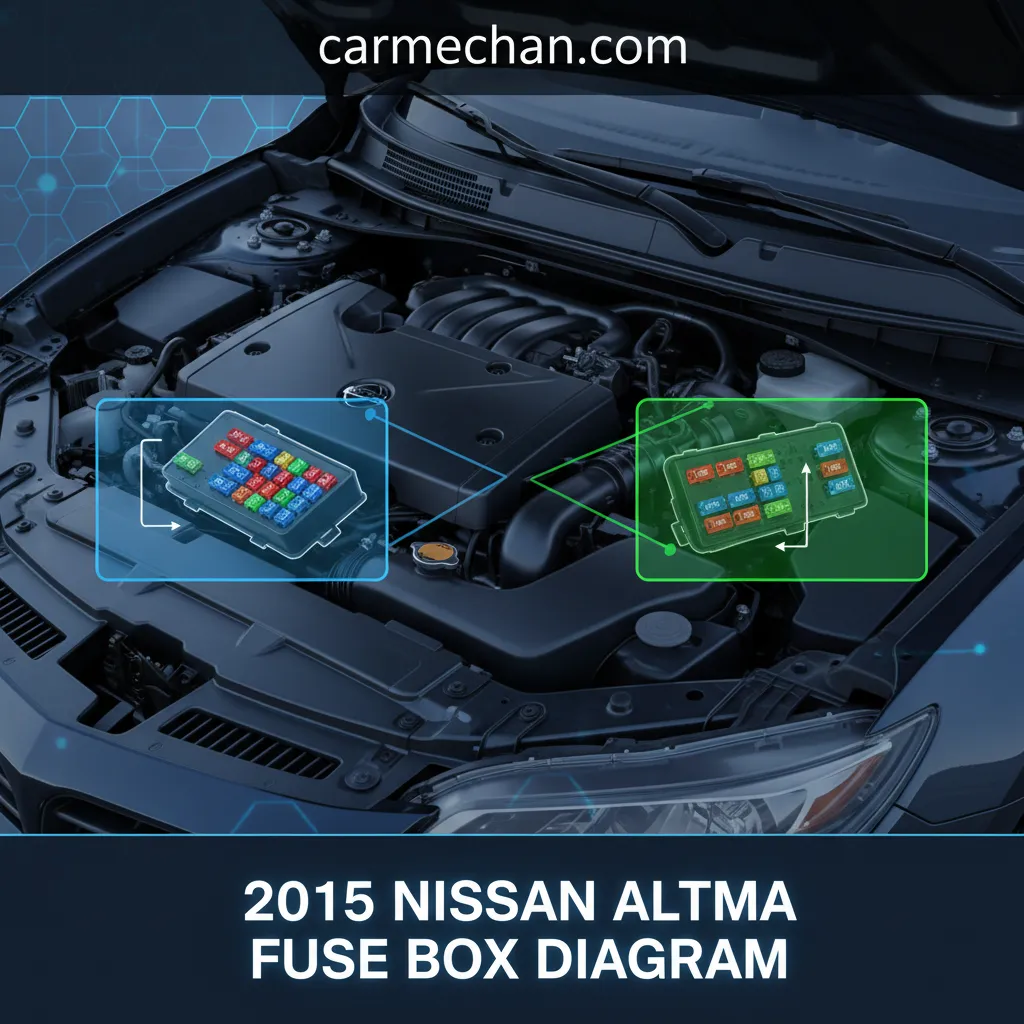
Effectively diagnosing electrical issues in your 2015 Nissan Altima begins with knowing precisely where to locate its primary fuse box assemblies. Nissan engineers strategically place these boxes to protect different segments of the vehicle’s electrical architecture. There are typically two main fuse box locations you will need to access: one in the engine compartment and another within the passenger cabin.
The engine compartment fuse box, often integrated with the Intelligent Power Distribution Module Engine Room (IPDM E/R), is found under the hood. For the 2015 Altima, this assembly is typically situated on the driver’s side, near the battery or mounted on the inner fender wall. Visually, look for a prominent black plastic box with a clip-on cover, often marked with a fuse symbol or “FUSE.” To access it safely, ensure the engine is off and the ignition is in the “OFF” position. Gently unclip the cover; some models might require pressing a tab or two. This box houses fuses and relays dedicated to critical powertrain functions, exterior lighting, and other high-current systems.
The passenger compartment (cabin) fuse box manages the electrical components within the interior. In the 2015 Nissan Altima, this fuse box is commonly located on the driver’s side, typically behind a small access panel near the dashboard or within the kick panel area. You might need to gently pry open a small panel to the left of the steering column or near your left footrest. Again, ensure the ignition is off before attempting to access. This box protects circuits for interior lighting, infotainment, power accessories, and HVAC controls. While locating these, it is imperative to exercise caution around electrical components and wiring, especially when removing covers.
For ultimate precision and to account for any minor model-year variations or specific trim configurations, always consult your vehicle’s owner’s manual. This factory-issued document provides the most accurate and trusted location details, accompanied by specific instructions for safe access. Fact: The 2015 Nissan Altima’s IPDM E/R in the engine bay manages critical functions such as engine control, lighting, and cooling fans, representing a significant portion of the vehicle’s electrical load. Understanding these locations is the first crucial step in any electrical troubleshooting process, forming the foundation of this complete guide.
Detailed Diagram and Circuit Identification for the Engine Compartment Fuse Box (IPDM E/R)
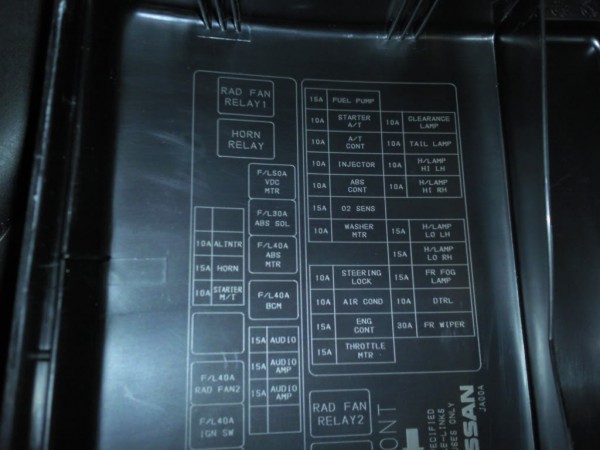
The engine compartment fuse box, integral to the IPDM E/R (Intelligent Power Distribution Module Engine Room) in your 2015 Nissan Altima, is the central command for many critical under-the-hood electrical systems. While an actual image isn’t possible here, envision a rectangular module with rows of numbered fuse slots, often accompanied by several larger relays. The cover itself typically has a diagram printed on its underside, showing the layout and numbering scheme (e.g., F1, F2, F3… or 1, 2, 3…). It is paramount to reference this specific diagram to accurately identify each circuit.
Common circuits protected by this robust fuse box include:
- Engine Control Unit (ECU): Essential for engine management, fuel injection, and emissions control. A blown fuse here often leads to a “no start” condition or significant engine performance issues.
- Fuel Pump: Critical for delivering fuel to the engine. If this fuse blows, the engine will crank but not start.
- Headlights (High and Low Beam): Individual fuses for each headlight or beam, e.g., Fuse #15 (20A) for the Headlamp (High Beam LH). A blown fuse leads to loss of illumination.
- Cooling Fans: For engine temperature regulation. A blown fuse can cause engine overheating.
- Anti-lock Braking System (ABS): Ensures safe braking. A blown fuse might disable ABS and trigger a warning light.
- Ignition System: Powers ignition coils and spark plugs.
- Starter Motor: The fuse or relay protecting the starter circuit, e.g., Fuse #30 (10A) for the ECM Relay, which often controls starter engagement.
Interpreting the diagram requires understanding its symbols and notations. Symbols often represent the component (e.g., a light bulb for headlights, an engine block for ECU). The numerical or alphanumeric designation corresponds to the slot in the fuse box. Always match the fuse’s amperage rating (e.g., 10A, 15A, 20A) with the diagram. If you experience a complete loss of power to a system like headlights or a no-start condition, your first expert step should be to consult this diagram to isolate the relevant fuse. A blown fuse in this area can lead to significant operational failures, making accurate identification and professional replacement critical. Fact: The IPDM E/R in the 2015 Altima integrates fuses and relays into a single unit, providing a centralized control point for many powertrain and exterior lighting functions, reducing complex wiring harnesses. This integrated design highlights the importance of precise diagram interpretation for reliable diagnostics.
Detailed Diagram and Circuit Identification for the Passenger Compartment Fuse Box
The passenger compartment fuse box, often referred to as the cabin fuse box, is responsible for protecting the myriad of electrical components that enhance comfort, convenience, and functionality within your 2015 Nissan Altima’s interior. Similar to the engine bay fuse box, this assembly typically presents as a block of fuses, each clearly numbered or lettered, with its specific function detailed on a diagram either on the cover itself or within the vehicle’s owner’s manual. Due to its location, accessing it might require removing a trim panel, but the process is generally straightforward.
This fuse box safeguards a wide array of circuits, which include but are not limited to:
- Interior Lighting: Dome lights, map lights, trunk light. A blown fuse here results in dark cabin spaces.
- Radio/Infotainment System: Powers the head unit, display, and potentially navigation. For instance, Fuse #7 (15A) for the Audio System. A blown fuse means no sound or a blank screen.
- Power Windows: Each window motor may have an individual fuse or a circuit breaker, e.g., Fuse #12 (20A) for the Power Window Motor (Driver’s Side). A common symptom of a blown fuse is a window that won’t move.
- Windshield Wipers and Washer System: Essential for visibility. A blown fuse can render wipers inoperative.
- Auxiliary Power Outlets (Cigarette Lighter/12V sockets): Used for charging devices. If these stop working, check their dedicated fuse.
- HVAC Controls: Powering the fan, temperature controls, and potentially the air conditioning compressor clutch.
- Power Seats: If equipped, motor functions are often fuse-protected.
- Door Locks and Remote Keyless Entry: Malfunctions here can sometimes be traced to a blown fuse.
When troubleshooting interior electrical issues, always cross-reference the diagram on the fuse box cover with your vehicle’s owner’s manual. The owner’s manual provides the most official and comprehensive circuit identification, often detailing not just the fuse number but also its exact amperage and the specific components it protects. This level of detail is crucial for reliable diagnosis. Fact: Modern vehicles like the 2015 Altima increasingly utilize multiplexing systems, meaning a single fuse might protect several seemingly unrelated components, making accurate diagram interpretation critical. This complexity underscores the value of an expert, detailed guide to ensure you replace the correct fuse, maintaining the integrity and quality of your vehicle’s electrical system.
Practical Guide to Checking and Replacing Fuses in Your 2015 Altima
📋
Step-by-Step Guide


Before touching any electrical components, always turn off the ignition. For engine compartment work, it’s a best practice to disconnect the negative battery terminal to eliminate any residual power, preventing accidental shorts. Utilize only insulated tools to minimize shock risk. Work in a well-lit area and avoid contact with hot engine components.
Once you’ve located the suspected fuse using the diagram, carefully pull it out. A visual inspection will often reveal a blown fuse: the thin metal filament inside will be visibly broken or charred. A good fuse will have an intact, continuous filament. For fuses where the filament isn’t visible (e.g., larger cartridge fuses) or if you’re unsure, use a fuse tester. Simply touch the tester’s probes to the two small metal test points on the top of the fuse. If the tester lights up, the fuse is good; no light indicates a blown fuse.
To remove a fuse, use the plastic fuse puller, often found clipped inside the fuse box cover or in the glove compartment. Grip the fuse firmly and pull straight out. When inserting the new fuse, ensure it slides fully into the terminals. Crucially, always replace a blown fuse with a new fuse of the exact same amperage rating and type. For example, if a 10A mini-blade fuse blew, replace it with another 10A mini-blade fuse. Never substitute a higher amperage fuse (e.g., replacing a 10A with a 20A) as this defeats the circuit’s protection and can lead to wiring damage or a fire.
Using an incorrect amperage fuse can lead to overheating of the circuit, which according to automotive electrical safety standards, is a significant fire risk if the fuse does not blow to protect the circuit. It can also cause irreversible damage to sensitive electronic components or the vehicle’s wiring harness, far exceeding the cost of a proper fuse.
Following these professional steps ensures a reliable and safe fuse replacement process. This diligent approach is a hallmark of quality maintenance and contributes to the overall longevity and trusted performance of your 2015 Nissan Altima.
Troubleshooting Common Electrical Issues and When to Seek Expert Help
Identifying a blown fuse is often the initial step in resolving an electrical problem. Common symptoms of a blown fuse are usually quite specific: a particular component ceases to function entirely. For example, if your power window stops working, the dedicated fuse for that window motor is a prime suspect. If multiple components fail simultaneously, such as your radio and interior lights both going out, it suggests a common fuse or circuit issue, potentially leading back to the passenger compartment fuse box. Logical deduction, combined with the comprehensive fuse box diagrams, allows for efficient narrowing down of the potential cause.
However, simply replacing a blown fuse doesn’t always solve the root problem. A fuse blows because too much current flowed through it, indicating an underlying issue. Frequent blowouts of the same fuse are a strong indicator of a persistent electrical fault. These underlying issues often include:
- Short Circuits: Where a live wire accidentally touches ground, causing a sudden surge of current.
- Overloaded Circuits: Too many accessories or a faulty component drawing more current than the circuit is designed to handle.
- Component Failures: A faulty motor, solenoid, or module can draw excessive current, causing the fuse to blow repeatedly.
- Wiring Degradation: Damaged or frayed wiring can intermittently short circuit.
If a fuse blows immediately after replacement, do NOT replace it again without investigating the underlying cause. Repeatedly installing new fuses into a shorted circuit can cause significant damage to the wiring harness or other critical components.
Deciding when to tackle a repair yourself versus seeking professional help is a critical judgment call. Replacing a clearly blown fuse for an isolated, non-critical component (like a single power outlet) is often a straightforward DIY task. However, if a fuse for a vital system (e.g., ABS, ECU) blows, if the same fuse blows repeatedly, or if you encounter multiple, seemingly unrelated electrical failures, it is safer and more reliable to consult a certified automotive technician. Professionals possess specialized diagnostic tools, such as multimeters, oscilloscopes, and factory scan tools, which can pinpoint complex electrical faults that are invisible to the naked eye. Their expert knowledge ensures not only the repair of the symptom but also the resolution of the root cause, guaranteeing the long-term safety, quality, and performance of your 2015 Nissan Altima.
By The Numbers
Recurring electrical issues due to underlying faults
Potential cost increase for unchecked electrical issues
Fact: A recurring blown fuse is a strong indicator of an underlying electrical fault, which, if left unaddressed, can lead to more significant and costly repairs. Statistics show that consistent electrical issues often stem from wiring degradation or faulty components, highlighting the need for a professional assessment.
Precisely locating and understanding your 2015 Nissan Altima’s fuse boxes (engine compartment and passenger cabin) is fundamental for effective electrical troubleshooting. Accurate interpretation of the fuse box diagrams, correlating fuse numbers to specific protected circuits, is crucial for reliable diagnosis and repair. Adhering to strict safety protocols and replacing blown fuses with identical amperage ratings are non-negotiable steps for maintaining vehicle integrity and preventing further damage. Knowing when to perform DIY fuse checks and when to seek expert professional automotive service for complex or recurring electrical faults ensures the long-term quality and safety of your vehicle. Empower yourself by keeping this detailed fuse box diagram guide accessible. For recurring or complex electrical issues, always consult a trusted, certified Nissan technician to ensure expert diagnosis and professional repair.
Frequently Asked Questions
What is the primary difference between the engine compartment and passenger compartment fuse boxes in a 2015 Nissan Altima?


The engine compartment fuse box (IPDM E/R) primarily houses fuses and relays for critical engine functions, exterior lighting, and powertrain components. The passenger compartment fuse box manages circuits for interior accessories like the radio, power windows, HVAC, and interior lights. Each serves distinct but interconnected systems, crucial for comprehensive vehicle operation and safety.
Can I use any fuse if it fits, or does the amperage rating matter significantly?
The amperage rating is critically important. You must always replace a blown fuse with one of the exact same amperage and type. Using a fuse with a higher amperage rating can prevent it from blowing when an overcurrent occurs, leading to potential wiring damage, component failure, or even a fire risk. Lower amperage fuses will simply blow prematurely.
My 2015 Altima’s owner’s manual fuse diagram differs slightly from what I see online. Which should I trust?
Always prioritize your vehicle’s owner’s manual for the most accurate and reliable information. Manufacturer-provided diagrams are specific to your exact model and trim level. Online diagrams, while often helpful, can sometimes be generic or from different model years, potentially leading to incorrect troubleshooting. Refer to the manual for quality, trusted data.
What tools do I need to safely check and replace fuses?
To safely check and replace fuses, you will primarily need a plastic fuse puller (often found in the fuse box itself or with the spare fuses), a set of replacement fuses of the correct types and amperages, and potentially a fuse tester for non-visual checks. Always wear appropriate safety gear, such as gloves, and ensure the vehicle is off.
What does it mean if a fuse keeps blowing even after replacement?
If a fuse repeatedly blows after replacement, it strongly indicates an underlying electrical problem, most commonly a short circuit within that specific circuit. This issue requires expert attention. It’s crucial to have a professional technician diagnose and repair the root cause to prevent potential wiring damage or more significant electrical system failures, ensuring your Altima remains reliable.