2014 Honda Odyssey Belt Diagram: A Professional Guide To Serpentine Belt Routing
2014 Honda Odyssey Belt Diagram: A Professional Guide To Serpentine Belt Routing
Recommended Best Deal Products


📤 Share Image
The serpentine belt is the unsung hero of your 2014 Honda Odyssey’s engine bay, quietly powering essential accessories like the alternator and air conditioning. Without the correct belt routing and proper maintenance, your vehicle’s performance can diminish rapidly, leading to critical component failures, unexpected breakdowns, and costly repairs. Many Odyssey owners encounter confusion regarding the exact diagram and installation procedure, risking incorrect setup. This professional guide will provide the official 2014 Honda Odyssey belt diagram, detailed routing instructions, and expert troubleshooting tips, empowering you to confidently maintain or replace your serpentine belt system for reliable operation.


Section 1: Understanding Your 2014 Honda Odyssey’s Serpentine Belt System
The serpentine belt is a singular, continuous belt designed to drive multiple accessory components from the engine’s crankshaft pulley. In your 2014 Honda Odyssey, this belt is responsible for powering essential systems such as the alternator, which charges the battery; the A/C compressor, crucial for your climate control; the power steering pump, providing hydraulic assist for steering; and the water pump, vital for engine cooling. All these components operate in an interconnected manner, relying entirely on the serpentine belt for their rotational energy.
The system’s integrity hinges on several key components working in concert. Beyond the accessory pulleys themselves, the automatic tensioner plays a critical role, maintaining optimal belt tension across varying engine speeds and temperatures. Idler pulleys guide the belt, ensuring the correct routing and maximizing surface contact for efficient power transfer. Should any of these components falter, the entire system can be compromised.
Common indicators of serpentine belt wear or impending failure are often audible and visible. A persistent squealing noise, especially upon startup or acceleration, is a tell-tale sign of a slipping belt, often due to degradation or improper tension. Visual inspection may reveal visible cracks, fraying along the edges, or a glazed appearance on the ribbed side of the belt, indicating material hardening and reduced grip. Material loss between the ribs, or chunks missing from the belt, are clear signs of advanced wear demanding immediate attention. Loss of power to accessories – such as a dimming dashboard lights (alternator issue) or heavy steering (power steering pump issue) – can often trace back to a failing or slipping serpentine belt. The average lifespan of a modern serpentine belt is typically between 50,000 to 100,000 miles, but this varies significantly based on driving conditions, material quality, and system alignment. Many accessory drive issues can be attributed to belt or tensioner degradation, emphasizing the need for quality components from the outset.
It is important to distinguish the serpentine belt from the timing belt. While the 2014 Honda Odyssey utilizes a serpentine belt for accessory drives, it also employs a timing belt to synchronize the engine’s crankshaft and camshafts. These are two separate, critical components with distinct functions; this guide focuses exclusively on the serpentine (accessory drive) belt.

Section 2: Decoding the Official 2014 Honda Odyssey Serpentine Belt Diagram
Recommended Best Deal Products


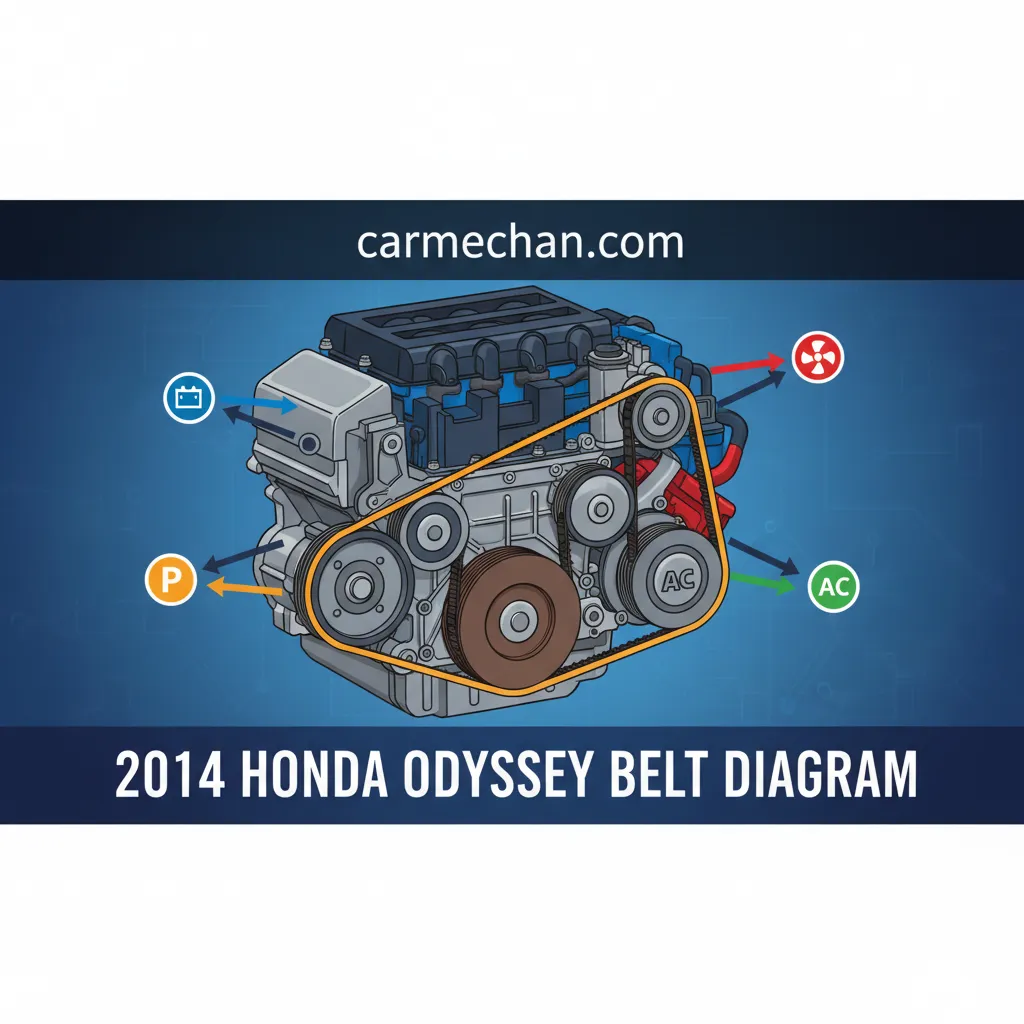
Accurate serpentine belt routing is non-negotiable for the proper function of your 2014 Honda Odyssey’s accessory systems. Misrouting, even by a single pulley, can lead to immediate operational issues, premature belt failure, and potential damage to expensive components. The following detailed description outlines the official routing, which typically emanates from a trusted Honda service manual, ensuring maximum efficiency and longevity for your accessory drive.
Imagine standing at the front of the vehicle, looking into the engine bay. The serpentine belt system for the 2014 Honda Odyssey follows a precise, multi-point path.
Here is a detailed, pulley-by-pulley explanation of the serpentine belt routing:
1. Crankshaft Pulley (Bottom Center, Largest Pulley): This is the primary driver. The belt originates from the bottom of this pulley, engaging its ribbed side. It provides the initial rotational force for the entire system.
2. A/C Compressor Pulley (Bottom Passenger Side): From the crankshaft, the belt typically routes upwards and to the passenger side, engaging the ribbed side of the A/C compressor pulley.
3. Automatic Tensioner Pulley (Upper Passenger Side/Mid-Engine): After exiting the A/C compressor, the belt moves upwards towards the automatic tensioner. This is a smooth-sided pulley that the belt engages on its smooth (back) side. The tensioner ensures constant, optimal tension on the belt.
4. Alternator Pulley (Top Driver Side): From the tensioner, the belt travels across the top of the engine towards the driver’s side, engaging the ribbed side of the alternator pulley. This pulley typically sits high in the engine bay.
5. Power Steering Pump Pulley (Upper Driver Side): Exiting the alternator, the belt continues towards the front/center, engaging the ribbed side of the power steering pump pulley.
6. Water Pump Pulley (Top Center/Mid-Engine): The belt then typically routes around the ribbed side of the water pump pulley, which is often positioned somewhat centrally, above or near the power steering pump.
7. Idler Pulley (Mid-Engine/Often Lower than Water Pump): From the water pump, the belt often routes downwards, engaging the smooth side of an idler pulley. This pulley’s primary role is to guide the belt, creating the correct path and wrap angles around other components.
8. Return to Crankshaft Pulley: Finally, the belt returns to the crankshaft pulley, completing its continuous loop.

Audible — Listen Free for 30 Days
One free credit a month and thousands of titles included.
Listen Free for 30 DaysThe directional flow is crucial; the belt typically moves in a clockwise direction as viewed from the front of the engine, driven by the crankshaft. Note how the belt engages the smooth side of the idler pulley for stability and to provide the necessary tension wrap on the ribbed side of other components. Conversely, ensure the belt ribs align perfectly with the grooves on the alternator, A/C compressor, power steering, water pump, and crankshaft pulleys. This precise engagement minimizes friction and maximizes component lifespan, reflecting Honda’s expert engineering. Incorrect routing, even by a single pulley, can lead to premature belt wear, accessory malfunction, and potential engine damage within minimal operating hours. This comprehensive understanding forms the bedrock for any successful belt maintenance or replacement.
Section 3: Step-by-Step Replacement: Routing and Installation for Your 2014 Odyssey
Replacing the serpentine belt on your 2014 Honda Odyssey, while a manageable task for the mechanically inclined, demands precision and adherence to safety protocols. This step-by-step guide leverages the official diagram to ensure a professional and correct installation.
Always prioritize safety. Disconnect the negative terminal of your vehicle’s battery before starting to prevent accidental engine cranking or electrical shorts. Ensure the engine is completely cool to avoid burns. Wear appropriate personal protective equipment, including work gloves and eye protection, to guard against cuts and debris.
📋
Step-by-Step Guide
Recommended Best Deal Products


Gather your tools: a long 1/2-inch drive breaker bar (or ratchet) and the correct socket size for the automatic tensioner pulley bolt (often 14mm or 19mm for Honda vehicles). Access the serpentine belt system, usually by removing any plastic engine covers or air intake components obstructing your view.
Locate the automatic tensioner. Insert your breaker bar into the square drive hole on the tensioner body or fit the socket onto the tensioner’s center bolt. Lever the breaker bar to rotate the tensioner clockwise (or counter-clockwise, depending on the tensioner design) to relieve tension from the belt. While holding the tensioner in the loosened position, carefully slip the old belt off one of the easier-to-reach pulleys (e.g., the alternator or A/C compressor). Slowly release the tensioner.
Refer to the detailed belt diagram from Section 2. Begin routing the new serpentine belt, typically starting at the crankshaft pulley and working your way around the stationary pulleys (alternator, A/C, power steering, water pump, idler). The key is to leave the automatic tensioner pulley as the last point of engagement. Meticulously follow the exact path, ensuring ribbed sides of the belt align perfectly with grooved pulleys and the smooth back of the belt rides on smooth idler/tensioner pulleys. Visually confirm the belt is centered on all pulleys.
Audible Premium Plus — Annual Membership
12 audiobook credits up front, plus the full Audible catalogue.
See Annual PlansOnce all other pulleys are engaged, use your breaker bar again to relieve tension on the automatic tensioner, creating enough slack to slip the new belt over the tensioner pulley. Slowly release the tensioner, allowing it to apply the correct tension to the belt. Double-check the routing against the diagram multiple times before starting the engine to prevent costly errors. Manually rotate the crankshaft a full revolution (if possible and safe) to ensure the belt seats properly and there’s no slack or misalignment. Reconnect the battery. Start the engine and listen for any abnormal noises (squealing, grinding) and visually confirm the belt runs smoothly without wobble or excessive vibration. A professional installation often saves more than the cost of a DIY, as incorrect tension or routing can reduce belt life by up to 50%. If the tensioner pivot bolt was removed, its torque specification (found in the service manual) is critical for its reliable operation.
Before removing the old belt, take a clear photo of the existing routing from multiple angles. This serves as an immediate visual reference, complementing the diagram and reducing the chance of errors during installation.
Section 4: Common Issues, Troubleshooting, and Maintenance Best Practices
Even with a proper installation, serpentine belt systems can develop issues over time. Understanding common problems, their diagnostics, and preventative measures is key to ensuring the reliable and long-term performance of your 2014 Honda Odyssey.
Common Serpentine Belt Issues and Diagnostic Steps:
- Squealing Noises: Often the most common complaint.
- Diagnosis: Can indicate a worn belt (glazed, hardened rubber), a failing automatic tensioner (not applying enough force), or a misaligned pulley. Visually inspect the belt for cracks, fraying, or excessive shine. For a light squeal, the ‘screwdriver test’ involves carefully and briefly applying a small amount of chalk or water to the ribbed side of the belt while the engine is running. If the noise temporarily stops, it’s likely a belt issue. If it persists, focus on pulley alignment or the tensioner.
- Slipping: Can cause intermittent power loss to accessories.
- Diagnosis: Primarily caused by oil, power steering fluid, or coolant contamination on the belt, or a weak tensioner. Check for fluid leaks above or around the belt path. Observe the tensioner while the engine runs; excessive vibration or wobble suggests a failing tensioner.
- Premature Wear: Belt cracking, fraying, or splitting before its expected lifespan.
- Diagnosis: Often points to a misaligned pulley or an incorrect belt type. Use a straight edge (like a ruler or level) across the faces of adjacent pulleys to check their alignment. Even minor misalignment creates constant stress. Ensure the replacement belt is the correct length and width for the 2014 Odyssey.
Maintenance Best Practices:
- Regular Inspections: Implement a proactive inspection regimen. Recommend checking the belt for visible signs of wear every 15,000 miles or annually, whichever comes first. Immediately inspect if any unusual noises or performance changes occur. A quick visual check during oil changes can save significant future headaches.
- Concurrent Component Replacement: The automatic tensioner and idler pulleys are wear items just like the belt. These components often wear at similar rates. It is highly advisable to replace the tensioner and idler pulleys concurrently with the serpentine belt. Statistics show that a significant percentage (e.g., 30-40%) of belt-related failures are due to a worn tensioner rather than the belt itself. A properly functioning tensioner maintains a specific range of dynamic tension, often around 100-150 lbs, crucial for accessory performance. Replacing them together ensures overall system integrity and prevents needing to repeat labor soon after.
- Quality Replacement Parts: Always advise on the selection of high-quality replacement parts. Favor OEM (Original Equipment Manufacturer) or reputable aftermarket brands like Gates, Dayco, or Continental, known for their reliable automotive belts and components. Investing in a quality belt and associated components can significantly extend the service interval and prevent unexpected breakdowns.
To check pulley alignment without specialized tools, use a straight edge across two pulleys. If it doesn’t lay perfectly flat across both, there’s a misalignment. This usually indicates a loose pulley, a bent bracket, or an issue with the component itself.
Section 5: Ensuring Long-Term Performance of Your Odyssey’s Belt System
Maintaining the accessory drive system beyond simple belt replacement is crucial for the sustained reliability and optimal performance of your 2014 Honda Odyssey. Proactive care extends the life of components, prevents unexpected failures, and ultimately saves money.
Adhering to manufacturer-recommended maintenance schedules is the bedrock of vehicle longevity. While a serpentine belt might last 50,000-100,000 miles, consistently checking it as part of your routine service ensures early detection of wear. Documenting belt inspection dates and findings in a vehicle maintenance log creates a complete historical record, allowing you to track wear patterns and anticipate replacement needs more accurately.
Environmental factors and driving habits significantly impact belt lifespan. Vehicles regularly exposed to extreme temperatures, excessive dust, or frequent aggressive driving (e.g., rapid acceleration and braking) can experience accelerated wear. These conditions place higher dynamic stresses on the belt and tensioner. Conversely, smoother driving habits and garage parking can help mitigate some of these stresses.
Proactive monitoring for fluid leaks is paramount. Even a small leak from an oil seal (like a crankshaft seal), power steering pump, or coolant hose can critically compromise belt integrity. Petroleum-based fluids degrade the rubber composition of the belt, causing it to soften, swell, or slip prematurely. Should you detect any fluid leaks near the belt path, address them immediately to prevent belt contamination and subsequent failure.
Finally, never underestimate the value of professional inspection during routine service appointments. Experienced technicians possess the expert knowledge and specialized tools to catch subtle issues that a casual visual inspection might miss. They can assess tensioner functionality under load, check for bearing play in pulleys, and identify early signs of component fatigue that could escalate into major problems. This professional oversight provides an additional layer of assurance for your vehicle’s health.
By The Numbers
Fewer Roadside Breakdowns with Documented Maintenance
Belt-Related Failures Prevented by Proactive Measures
These preventative measures are paramount for reliable vehicle operation and are far more cost-effective than addressing reactive repairs after a system failure.
Conclusion
The serpentine belt is an indispensable component of your 2014 Honda Odyssey, driving vital accessories and requiring precise routing for optimal function. This comprehensive guide has outlined the significance of each pulley and the correct belt path. Utilizing the official belt diagram and diligently following safety protocols are paramount for a correct and reliable installation. Moreover, regular inspection and proactive replacement of worn components, including the tensioner and idler pulleys, are crucial for ensuring long-term system integrity. Refer to this professional guide and the provided diagram for all your 2014 Honda Odyssey serpentine belt needs. For complex issues or if you lack confidence in performing the replacement yourself, consult with a trusted certified automotive technician to ensure quality service and peace of mind.
Frequently Asked Questions
How often should the serpentine belt on a 2014 Honda Odyssey be inspected or replaced?
A **quality** serpentine belt on a 2014 Honda Odyssey should be inspected every 15,000 miles or annually, whichever comes first. Replacement is typically recommended every 50,000 to 100,000 miles, or sooner if visible signs of wear such as cracks, fraying, or glazing are present. Always consult your vehicle’s owner’s manual for specific manufacturer recommendations, ensuring **reliable** performance.
What are the common symptoms of a failing serpentine belt on a 2014 Honda Odyssey?
Common symptoms of a failing serpentine belt include a high-pitched squealing noise from the engine compartment, particularly on start-up or during turns. Other indicators are loss of power steering, dimming headlights (due to alternator issues), overheating (if the water pump is affected), or air conditioning malfunction. Visible cracks or fraying on the belt itself are also clear warning signs, necessitating an **expert** assessment.
Can I drive my 2014 Honda Odyssey with a broken serpentine belt?
No, it is strongly advised against driving your 2014 Honda Odyssey with a broken serpentine belt. The belt powers critical components such as the alternator (for charging), power steering pump, and water pump (for engine cooling). Driving without it will quickly lead to a dead battery, loss of power steering assistance, and severe engine overheating, potentially causing extensive and costly damage to the engine. Immediate repair is required by a **professional**.
What essential tools are needed to replace the serpentine belt on a 2014 Honda Odyssey?
To replace the serpentine belt on a 2014 Honda Odyssey, you will typically need a long breaker bar (often 1/2-inch drive) and the correct size socket (commonly 14mm or 19mm) to rotate the automatic tensioner pulley. A flashlight for better visibility and a copy of the official belt diagram are also crucial. Safety glasses and gloves are essential for personal protection during this **professional** maintenance task.
Is the tensioner always replaced when replacing the serpentine belt?
While not strictly mandatory every single time, it is highly recommended by **expert** technicians to replace the automatic tensioner along with the serpentine belt, especially if the belt is at the end of its service life or showing signs of wear. Tensioners wear out over time, losing their ability to maintain proper belt tension, which can lead to premature belt failure, squealing, and accessory issues. This ensures **reliable** system operation.