How to Do a 3 Point Turn Safely: Expert Tips & Practice
Last Updated on September 1, 2026 by Ryan
Performing a 3-point turn safely requires precise control, keen observation, and understanding each step. It’s a critical maneuver for turning around in narrow spaces, ensuring you check for traffic and pedestrians at all times. Mastering this skill builds confidence and is vital for driving tests.
🎯 Key Takeaways
Recommended Best Deal Products


- Prioritize all-around observation before and during the turn.
- Steer fully and quickly to maximize turning efficiency.
- Use slow, controlled speeds for precision and safety.
- Practice in a safe, empty area to build confidence.
- Signal intentions clearly to alert other drivers.
Learning how to execute a 3-point turn is an essential driving skill, giving you the ability to safely reverse direction in tight spaces where a U-turn isn’t possible. This maneuver, often required during driving tests, builds confidence and ensures you can navigate dead-ends or narrow streets without unnecessary risk. Mastering it means you’ll always have a reliable way to turn your vehicle around, even when space is limited.

This guide provides step-by-step instructions, focusing on safety and precision. We will cover everything from initial positioning and crucial observations to the exact steering and gear changes needed. By understanding and practicing each phase, you will perform 3-point turns correctly and confidently every time.
Understanding the Purpose of a 3-Point Turn
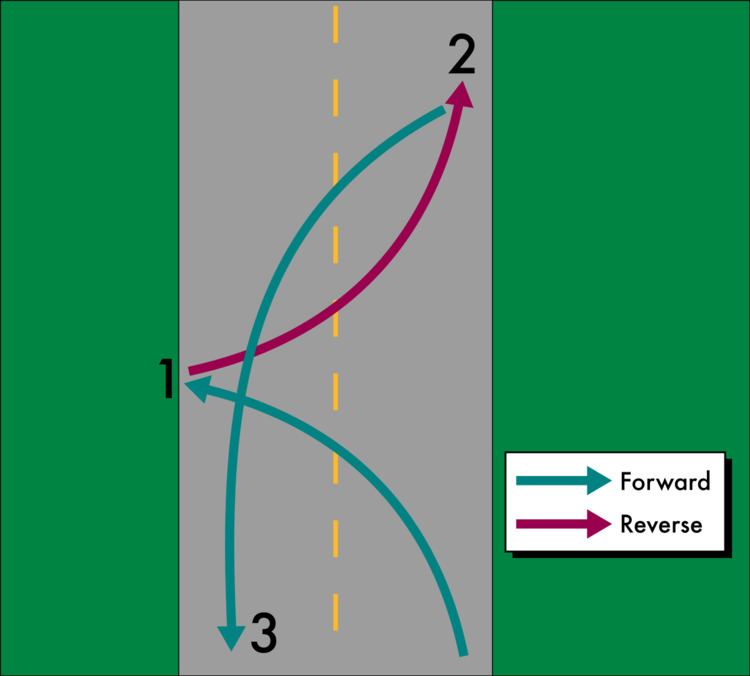
A 3-point turn is a specific driving maneuver designed to change your vehicle’s direction 180 degrees in a confined area. It’s used when the road is too narrow for a single U-turn, requiring a combination of forward and reverse movements. Think of it as a methodical way to pivot your car using the width of the street.
When to Use This Maneuver
- When you encounter a dead-end street with limited space.
- On narrow residential roads where a U-turn would be unsafe or impossible.
- During driving tests to assess your control and observation skills.
- To correct your direction if you’ve missed a turn and need to go the other way.
Key Differences from a U-Turn
While both maneuvers change your direction, their execution differs significantly. A U-turn is a single, continuous sweep, typically requiring a wider road and executed without stopping or shifting into reverse. A 3-point turn, conversely, involves three distinct movements (forward, reverse, then forward again) and typically requires you to stop and change gears at least twice. It’s your compact alternative when a U-turn is out of the question due to space constraints.
How to Do a 3-Point Turn Like a Pro: A Practical Walkthrough
Recommended Best Deal Products


A 3-point turn, also widely known as a K-turn, is a fundamental driving maneuver essential for safely changing direction in narrow spaces where a U-turn is simply not feasible. Mastering this technique demonstrates precise vehicle control and keen situational awareness, which are crucial skills for any driver, particularly when navigating quiet residential streets, cul-de-sacs, or crowded parking lots. This comprehensive guide will meticulously break down each phase of the 3-point turn into simple, actionable steps, ensuring you can execute a smooth, safe, and efficient maneuver every single time.
Step 1: Find Your Ideal Training Ground
What you need: A roadworthy vehicle, a valid driver’s license or learner’s permit, and a safe, quiet road with minimal traffic. Examples include a serene residential street, an empty section of a large parking lot, or a spacious cul-de-sac. Ensure the area is free from obstructions and has good visibility.
Instructions: Before you even begin the maneuver, take the time to scout for the perfect practice location. Look for a relatively wide, level street with no parked cars or other stationary obstructions on either side, and crucially, with little to no oncoming or following traffic. Avoid any areas on hills, busy intersections, or spots with poor visibility, such as blind corners. An optimal street width of at least two car lengths (approximately 12-15 feet or 3.6-4.5 meters) between curbs will provide ample maneuvering space. Practicing in a controlled, low-pressure environment is key to building confidence without the added stress of other vehicles.
Pro Tip: Choose a spot where you have clear, unobstructed visibility for at least 100-200 feet (approximately 30-60 meters) in both directions. This allows you to identify potential hazards early and minimizes any surprises during your turn, enabling you to focus solely on the technique.
Step 2: Initial Positioning and First Movement
What you need: Your vehicle in “Drive” (D) gear, mirrors properly adjusted, and your turn signal operational.
Instructions: Begin by driving slowly and deliberately to the right side of the road, positioning your vehicle close to the curb, much as you would when preparing to parallel park. Briefly signal right to indicate your intention to pull over, then immediately signal left to clearly show that you’re about to commence a turn. Before moving, meticulously check your mirrors (rearview and left side) and perform a thorough blind spot check over your left shoulder for any traffic, cyclists, or pedestrians. When the path is unequivocally clear, gently and smoothly steer the wheel all the way to the left (full lock) while moving very slowly forward, aiming towards the opposite curb. Maintain a very low speed, typically between 1-3 mph (1.6-4.8 km/h), using only minimal accelerator input or simply letting the car creep forward.
Pro Tip: Your initial speed is absolutely critical for control. Moving too fast risks overshooting the curb or losing precise control; conversely, moving too slowly can make the turn feel jerky and inefficient. Aim for a smooth, consistent, and controlled creep forward.
Step 3: Approaching the Opposite Curb and Stopping
What you need: Precise spatial awareness and a gentle touch on the brake pedal.
Instructions: Continue your slow, leftward movement, allowing the vehicle to arc smoothly until the very front of your vehicle is just a few feet (ideally about 1-2 feet or 30-60 cm) from the opposite curb. The goal is to get as close as safely possible without actually touching or mounting the curb. Use visual cues such as looking over your hood to accurately judge the remaining distance; a good mental image is to stop when the imaginary line from your front passenger wheel would just clear the curb. Once you’ve reached this critical point, apply the brake gently but firmly to bring the vehicle to a complete and stable stop. Keep the steering wheel fully turned to the left. This precise position signifies the successful completion of your first movement in the 3-point turn sequence.
Pro Tip: Consistently practice judging the distance to the curb without actually hitting it. Utilize reliable visual cues, such as the edge of your hood lining up with the curb, or observing the reflection of the curb in your side mirror as a crucial reference point. This precision will significantly improve your maneuver.
Step 4: Shifting to Reverse and Checking Again
What you need: Your vehicle in “Reverse” (R) gear, and heightened situational awareness.
Instructions: With your vehicle completely stopped and the steering wheel still fully turned to the left, shift the gear selector into “Reverse” (R). Before initiating any backward movement whatsoever, perform another comprehensive and meticulous check of your entire surroundings. Look through your rearview mirror, both side mirrors, and physically turn your head to check your blind spots to the rear and sides. Pay particular attention to the area directly behind your vehicle, as well as the broad path your front end will swing into as you reverse. Ensure there are absolutely no pedestrians, parked cars, or approaching vehicles that could interfere with or impede your next crucial move.
Pro Tip: Always prioritize safety above all else. Never assume the coast is clear just because it appeared to be a moment ago. A swift but exceptionally thorough 360-degree check (or at least 270 degrees covering your reverse path) is an absolute, non-negotiable step before commencing any backward movement.
Step 5: Backing Up and Turning the Wheel Right
What you need: Your vehicle in “Reverse” (R) gear, steering wheel turned fully to the right (full lock).
Instructions: Once you have confirmed that your environment is entirely clear, slowly and cautiously begin to reverse. As soon as you feel the vehicle just starting to move backward, quickly and smoothly turn your steering wheel all the way to the right (full lock). Maintain a very slow, highly controlled speed, allowing the front of your car to arc gracefully around while the rear of the vehicle moves towards the initial curb you started from. Continuously monitor your left side mirror and blind spot to ensure your vehicle’s front end clears any potential obstacles as it swings wide. Reverse only as far as is absolutely necessary to allow your vehicle to clear both curbs when moving forward in the final step.
Pro Tip: Avoid the common mistake of turning the wheel to the right before you start reversing; instead, wait until the car is just beginning to move. This precise timing provides a smoother steering input and significantly better control over the vehicle’s reverse arc. Stop backing up when your vehicle is approximately 1-2 feet (30-60 cm) from the original curb, ensuring your front wheels will have ample space to turn forward without hitting the opposite curb.
Step 6: Final Forward Movement and Straightening Out
What you need: Your vehicle in “Drive” (D) gear, and smooth steering coordination.
Instructions: With your vehicle completely stopped, the steering wheel still fully turned to the right, and your rear close to the original curb, shift the gear selector back into “Drive” (D). Perform one final, comprehensive check of your mirrors and blind spots to confirm that the road ahead is completely clear of any traffic. As you begin to move forward very slowly, smoothly and gradually unwind the steering wheel to straighten your tires. This typically involves turning the wheel about one and a half full turns to the left from its full right lock position. Continue driving forward in your intended direction, accelerating gently and progressively once your vehicle is fully straightened and safely aligned within your chosen lane. The maneuver is complete when your vehicle is moving forward in a straight line, fully within the lane.
Pro Tip: The ultimate goal is to seamlessly finish the maneuver with your vehicle completely straight in the lane, perfectly poised and ready to drive off. Practice coordinating your steering wheel return with your forward movement to achieve a perfectly seamless and fluid exit from the turn, making it look effortless.
✅ Final Checklist
- Vehicle completely stopped before shifting gears (between each point of the turn).
- Steering wheel fully turned (locked) in the correct direction for each phase of the turn.
- Comprehensive head checks and mirror checks performed meticulously before each movement (forward and reverse).
- No physical contact made with any curbs, static objects, or other vehicles at any point.
- Vehicle finishes straight and properly aligned in the intended lane of travel.
Important Notes:
- Safety considerations or warnings: Always perform thorough and vigilant checks for pedestrians, cyclists, and other vehicles immediately before and during each distinct segment of the 3-point turn. Never rush the maneuver; slow, deliberate, and controlled movements are absolutely paramount for safety and precision. Explicitly avoid attempting a 3-point turn on busy roads, blind curves, or steep hills where visibility is severely limited or where traffic flow is high.
- When to seek professional help: If you consistently struggle with accurately judging distances, coordinating simultaneous steering and pedal inputs, or performing smooth and seamless transitions between the different phases, it is highly advisable to consider booking a lesson with a certified driving instructor. They can provide invaluable personalized feedback, expert guidance, and targeted drills to refine your technique.
- Estimated time and cost range: Mastering a 3-point turn to a proficient level typically takes most new drivers between 30-60 minutes of dedicated, focused practice. There is no direct “cost” associated with practicing beyond fuel consumption and minimal vehicle wear and tear. However, investing in a professional driving lesson (which often ranges from $60-$100 per hour) can significantly reduce your overall practice time and help instill superior driving habits and confidence more quickly.
Crucial Safety Checks and Observations
Safety is paramount before and during any driving maneuver, especially one that involves multiple directional changes. Before you even begin the 3-point turn, a thorough assessment of your surroundings is non-negotiable. This isn’t just a suggestion; it’s a critical requirement to prevent accidents and ensure smooth execution.

Assessing Your Environment
Before you commit to a 3-point turn, find a safe, straight, and level section of road. Avoid hills, curves, or busy intersections. Look for clear visibility in all directions. You need enough space to maneuver without encroaching on driveways, blocking traffic, or hitting parked cars. Consider the road surface; wet or icy conditions will increase your stopping distance and reduce tire grip, making precise movements harder.
Continuous All-Around Awareness
Your eyes must be constantly scanning throughout the entire maneuver. This continuous observation prevents surprises and allows you to react to changing conditions. Here’s what to prioritize:
- Mirrors: Check your rearview and side mirrors frequently for approaching vehicles.
- Blind Spots: Perform quick shoulder checks before moving forward and reversing. This is crucial as mirrors don’t show everything.
- Pedestrians and Cyclists: Always assume they might appear unexpectedly. Yield to them immediately. Their safety is your top priority.
- Oncoming Traffic: Pay close attention to traffic approaching from both directions. Never start your turn if a vehicle is too close to allow you to complete the maneuver safely.
- Parked Cars and Obstacles: Be mindful of any obstacles on the curb or road that could impede your path.
Signaling Your Intentions
Clear communication is vital. Your turn signals inform other drivers and pedestrians of your planned movements. Signal right when pulling over to the curb, and then signal left before starting your first forward turn. While reversing, keep your emergency flashers on if conditions warrant, but rely more on direct observation. Once you are completing the turn into the new lane, signal in the direction you are heading.
Executing the 3-Point Turn: Step 1 – Position for Success
Recommended Best Deal Products

The success of your 3-point turn begins long before you touch the steering wheel. Proper initial positioning sets the stage for a smooth, controlled, and safe maneuver. This first step is about finding the right spot and getting your vehicle into the optimal starting position.
Finding the Ideal Starting Spot
Choose a location that is free from immediate hazards and offers good visibility. Look for a stretch of road that is relatively quiet, straight, and level. Avoid starting your 3-point turn near intersections, driveways, or any area with heavy foot or vehicle traffic. The more space you have and the fewer distractions present, the easier and safer your maneuver will be. Ideally, you want to use the full width of the road but without rushing or feeling pressured.
Pulling to the Right Curb
Once you’ve identified your ideal spot, prepare to pull over. This move ensures you maximize the road width for your turn. Here’s how:
-
Activate Right Turn Signal: Communicate your intention to move to the right side of the road.
-
Check Mirrors and Blind Spot: Before slowing down, quickly check your rearview mirror for following traffic and your right side mirror and blind spot for cyclists or pedestrians.
-
Slowly Approach the Curb: Gradually steer your vehicle towards the right-hand curb or edge of the road. Aim for a distance of approximately 6 to 12 inches from the curb. This precise distance is critical; too far and you lose turning radius, too close and you risk scraping your tires or wheels.
-
Come to a Complete Stop: Once positioned correctly, bring your vehicle to a full and complete stop. Engage the parking brake if you are on an incline, although ideally, you chose a level surface.
-
Shift to Neutral or Park: Briefly place your car in neutral or park. This allows you to fully assess your surroundings one last time before initiating the main turning sequence.
Common Mistakes and How to Avoid Them
Even seasoned drivers can occasionally fumble a 3-point turn if they’re not fully focused. Understanding common pitfalls is your first line of defense against making them yourself. The key is often patience and a heightened awareness of your surroundings and your vehicle’s capabilities.
Misjudging Space and Curb Awareness
One of the most frequent errors is underestimating the space needed, especially on narrower streets. This can lead to bumping a curb, or worse, having to execute an unplanned multi-point turn, which defeats the purpose of the 3-point maneuver. Remember, your car’s turning radius isn’t infinite!
- Look Ahead: Don’t just stare at your immediate bumper. Project your car’s path mentally. Where will your front wheels go? Where will your rear wheels track?
- Know Your Vehicle: Spend time getting familiar with your car’s dimensions in an open area. Practice visualizing its corners and wheels.
- Slow and Gentle: Approaching the curb slowly gives you more time to react. If you feel you’re getting too close, a gentle tap on the brake allows for minor corrections before impact.
- Use Your Mirrors: Your side mirrors are invaluable for judging proximity to curbs, especially on your blind side during the reverse portion.
Rushing and Forgetting Safety Checks
The 3-point turn involves multiple changes of direction, which means multiple opportunities for things to go wrong if you rush. Speed is the enemy of safety and precision here. Drivers sometimes get anxious and skip crucial safety checks, putting themselves and others at risk.
- Treat It as a Sequence: Instead of one big maneuver, think of it as three distinct mini-maneuvers. Each transition requires a fresh set of checks.
- Pause and Scan: Before shifting from forward to reverse, or reverse to forward, make it a habit to pause, look all around – through windows, mirrors, and over your shoulder. Are there pedestrians, cyclists, or other vehicles?
- Blind Spot Checks Are Critical: This cannot be overstated. A quick head turn to check your blind spots before any direction change is non-negotiable.
- Signal Your Intentions: While not strictly a safety check, signaling effectively communicates your plans to other road users, helping them anticipate your movements and stay clear.
Mastering the Maneuver: Practice and Refinement Tips
Like any driving skill, the 3-point turn transforms from a daunting task into second nature through consistent, smart practice. It’s not about endless repetitions but rather focused, deliberate efforts to improve specific aspects of the maneuver.
Starting Slow and Steady
Your practice sessions should begin in environments where you feel absolutely safe and unpressured. This allows you to concentrate on the mechanics and safety aspects without the added stress of traffic or onlookers.
- Choose Your Spot Wisely: An empty parking lot or a very quiet, wide residential street with minimal parked cars is ideal. Avoid busy areas or narrow streets initially.
- Focus on Smoothness, Not Speed: Your primary goal should be to execute each phase smoothly and deliberately. The speed will naturally increase as your confidence and skill grow.
- Clutch Control (Manual Cars): If you drive a manual, mastering clutch control at very low speeds is paramount. Use the biting point to crawl rather than accelerate.
- Brake Modulation (Automatic Cars): For automatics, practice gentle, precise brake control to maintain a slow, controlled crawl, especially during reversing.
Progressive Practice Scenarios
Once you’re comfortable with the basics, gradually introduce more realistic scenarios to hone your skills further. This progressive approach helps build resilience and adaptability, preparing you for real-world situations.
- Vary Street Widths: Start on wide streets, then move to moderately narrow ones. Pay attention to how the decreased space affects your steering and timing.
- Imagine Obstructions: In your practice area, visualize parked cars or other obstacles. How would you adjust your starting position or turning points to avoid them? This mental exercise is incredibly valuable.
- Focus on the “Why”: Instead of just doing, understand why you turn the wheel at a certain point, or why you check a specific mirror. This deeper understanding makes you a more competent and adaptable driver.
- Seek Feedback: If possible, practice with an experienced driver who can offer constructive feedback on your timing, space management, and safety checks.
Conclusion
The 3-point turn is far more than just a maneuver to get you facing the other way; it’s a critical demonstration of your spatial awareness, vehicle control, and commitment to safety on the road. While it might seem intimidating at first, remember that every accomplished driver once had to learn it too.
By understanding the proper technique, being mindful of common mistakes, and dedicating time to focused practice, you’ll not only master this essential skill but also become a more confident and safer driver overall. So, find a safe spot, take a deep breath, and start practicing. With patience and persistence, you’ll be executing perfect 3-point turns in no time!
❓ Frequently Asked Questions
What are the key safety checks I must perform before and during a 3-point turn?
Before starting, check mirrors and blind spots thoroughly for traffic and pedestrians. Throughout the maneuver, continuously scan all directions, especially as you reverse, ensuring your path remains clear and no new hazards appear.
How can I avoid hitting the curb while reversing during a 3-point turn?
To avoid hitting the curb, turn your steering wheel fully to the appropriate side (e.g., left if you started on the right) as you reverse slowly. Use your side mirrors and look over your shoulder to judge your distance, stopping before you get too close.
What’s the difference between a 3-point turn and a U-turn, and when should I use each?
A 3-point turn is used when the road is too narrow for a U-turn, requiring multiple forward and reverse movements to change direction. A U-turn completes the turn in one continuous motion, feasible on wider roads, and is generally quicker if conditions allow for safe execution.
How much space do I need to perform a 3-point turn safely?
You need enough space to comfortably complete three distinct movements: pulling to the curb, reversing partway across the road, and driving forward. While not requiring a wide road, ensure no immediate oncoming traffic or obstacles will impede your multi-step maneuver.
What are the common reasons people fail a 3-point turn on a driving test?
Common failures include insufficient observation (not checking blind spots or continuous scanning), poor vehicle control (hitting curbs, stalling), or taking too many movements. Inadequate signaling and performing the turn unsafely when traffic is present are also frequent errors.
What are some effective practice tips for mastering the 3-point turn?
Practice in a quiet, empty parking lot first, using cones to simulate curbs and potential obstacles. Focus on smooth steering, gentle braking, and constant head checks before moving to quiet residential streets. Regular repetition builds muscle memory and confidence.