2017 Nissan Rogue Fuse Box Diagram: Layout, Identification, And Troubleshooting
2017 Nissan Rogue Fuse Box Diagram: Layout, Identification, And Troubleshooting
The reliable operation of your 2017 Nissan Rogue hinges significantly on the integrity of its intricate electrical system. When an electrical component ceases to function—be it a headlight, power window, or infotainment system—the culprit is often a simple, yet overlooked, blown fuse. However, identifying and correctly replacing the specific fuse can be a daunting task without accurate and trusted information. This expert-crafted guide will provide a professional, authoritative, and reliable blueprint to your 2017 Nissan Rogue’s fuse box diagrams, empowering you with the knowledge to locate, interpret, and confidently troubleshoot common electrical issues, ensuring your vehicle remains in optimal working condition.

Understanding the Vital Role of Your 2017 Nissan Rogue’s Fuse System
Recommended Best Deal Products


📤 Share Image
In the sophisticated electrical architecture of your 2017 Nissan Rogue, fuses serve as the unsung heroes, functioning as critical circuit breakers that safeguard sensitive electrical components from debilitating overcurrent damage. Each fuse is meticulously designed to create a weak link in a specific circuit; should an electrical surge or short circuit occur, the fuse’s internal filament melts and breaks, interrupting the current flow before it can harm more expensive and complex modules.
The range of circuits protected by your Rogue’s fuse system is expansive, encompassing everything from essential safety features to convenience systems. Think of the Anti-lock Braking System (ABS), airbags, and engine control unit—these critical systems rely on dedicated fuse protection to ensure their flawless operation. Beyond safety, fuses also protect comfort and utility features such as the infotainment system, power windows, HVAC blower motor, and even the seemingly simple power outlets (cigarette lighter). For example, a short circuit within a headlight assembly, left unchecked, could easily send damaging current back to the Body Control Module (BCM), necessitating an expensive repair. A properly functioning fuse, however, sacrifices itself to prevent this catastrophic outcome.
A properly functioning fuse system is not merely a convenience; it is integral to the vehicle’s reliable operation and longevity. Preventing minor electrical faults from escalating into costly, widespread damage underscores the importance of a robust fuse system. An average modern vehicle like the 2017 Nissan Rogue can contain over 50 individual fuses across multiple fuse boxes, each tailored to protect a specific circuit. Understanding this comprehensive system is paramount for basic diagnostics and maintaining your vehicle’s overall electrical integrity. A single fuse costs pennies, but its failure to protect can lead to component replacement costs exceeding hundreds or even thousands of dollars. This guide provides the expert insights necessary to navigate this vital system with confidence.

Precise Locations of Fuse Boxes within Your 2017 Nissan Rogue
Accessing the fuse boxes in your 2017 Nissan Rogue is the first crucial step in any electrical diagnostic process. Nissan vehicles typically feature at least two primary fuse box locations, each designed to manage specific electrical loads and circuits. Locating them accurately is essential for any professional or DIY troubleshooting effort.
Engine Compartment Fuse Box
The primary fuse box is typically situated in the engine compartment. For the 2017 Nissan Rogue, you’ll generally find it on the passenger side, often near the battery or adjacent to the inner fender well. This main distribution box, sometimes labeled “IPDM E/R” (Intelligent Power Distribution Module Engine Room) or a similar designation, houses fuses and relays for high-current circuits crucial to vehicle operation. These include the main power supply, engine control unit (ECU), Electronic Power Steering (EPS), Anti-lock Braking System (ABS) pump, cooling fans, headlights, and other heavy-load components. These critical systems can draw anywhere from 20 to 60 amps, requiring robust protection.
To access it, ensure your vehicle is off. You’ll typically need to unclip or carefully pry open a plastic cover. Look for distinct labels or markings on the cover itself to assist with identification. A flashlight can be immensely helpful in illuminating the often-cramped space.
Passenger Compartment Fuse Box
A secondary fuse box is located within the passenger compartment, primarily responsible for safeguarding interior electronics and accessories. In the 2017 Nissan Rogue, this fuse box is commonly found on the driver’s side dashboard, behind a small trim panel. You might need to gently pry open a designated access panel using a non-marring trim removal tool to avoid damaging the interior plastics. This fuse box typically manages smaller loads, protecting circuits for cabin amenities such as the radio, power windows, interior lights, power outlets, heater/AC controls, and various sensors, often utilizing 5-20 amp fuses.
Auxiliary Fuse Locations
While less common for primary systems, some 2017 Nissan Rogue configurations, particularly those with specific optional features, may have auxiliary fuse locations. These could be found under seats, within the cargo area, or integrated into specific component housings for systems like trailer hitches, panoramic sunroofs, or advanced driver-assistance features. Always consult your vehicle’s owner’s manual for a complete guide to all fuse locations relevant to your specific trim level, as it provides the most comprehensive and trusted information.

Audible — Listen Free for 30 Days
One free credit a month and thousands of titles included.
Listen Free for 30 DaysAlways use appropriate tools, such as plastic trim removal tools, when accessing interior fuse boxes to prevent cosmetic damage to your vehicle’s dashboard or paneling. A good quality LED flashlight will greatly aid visibility in dark areas.
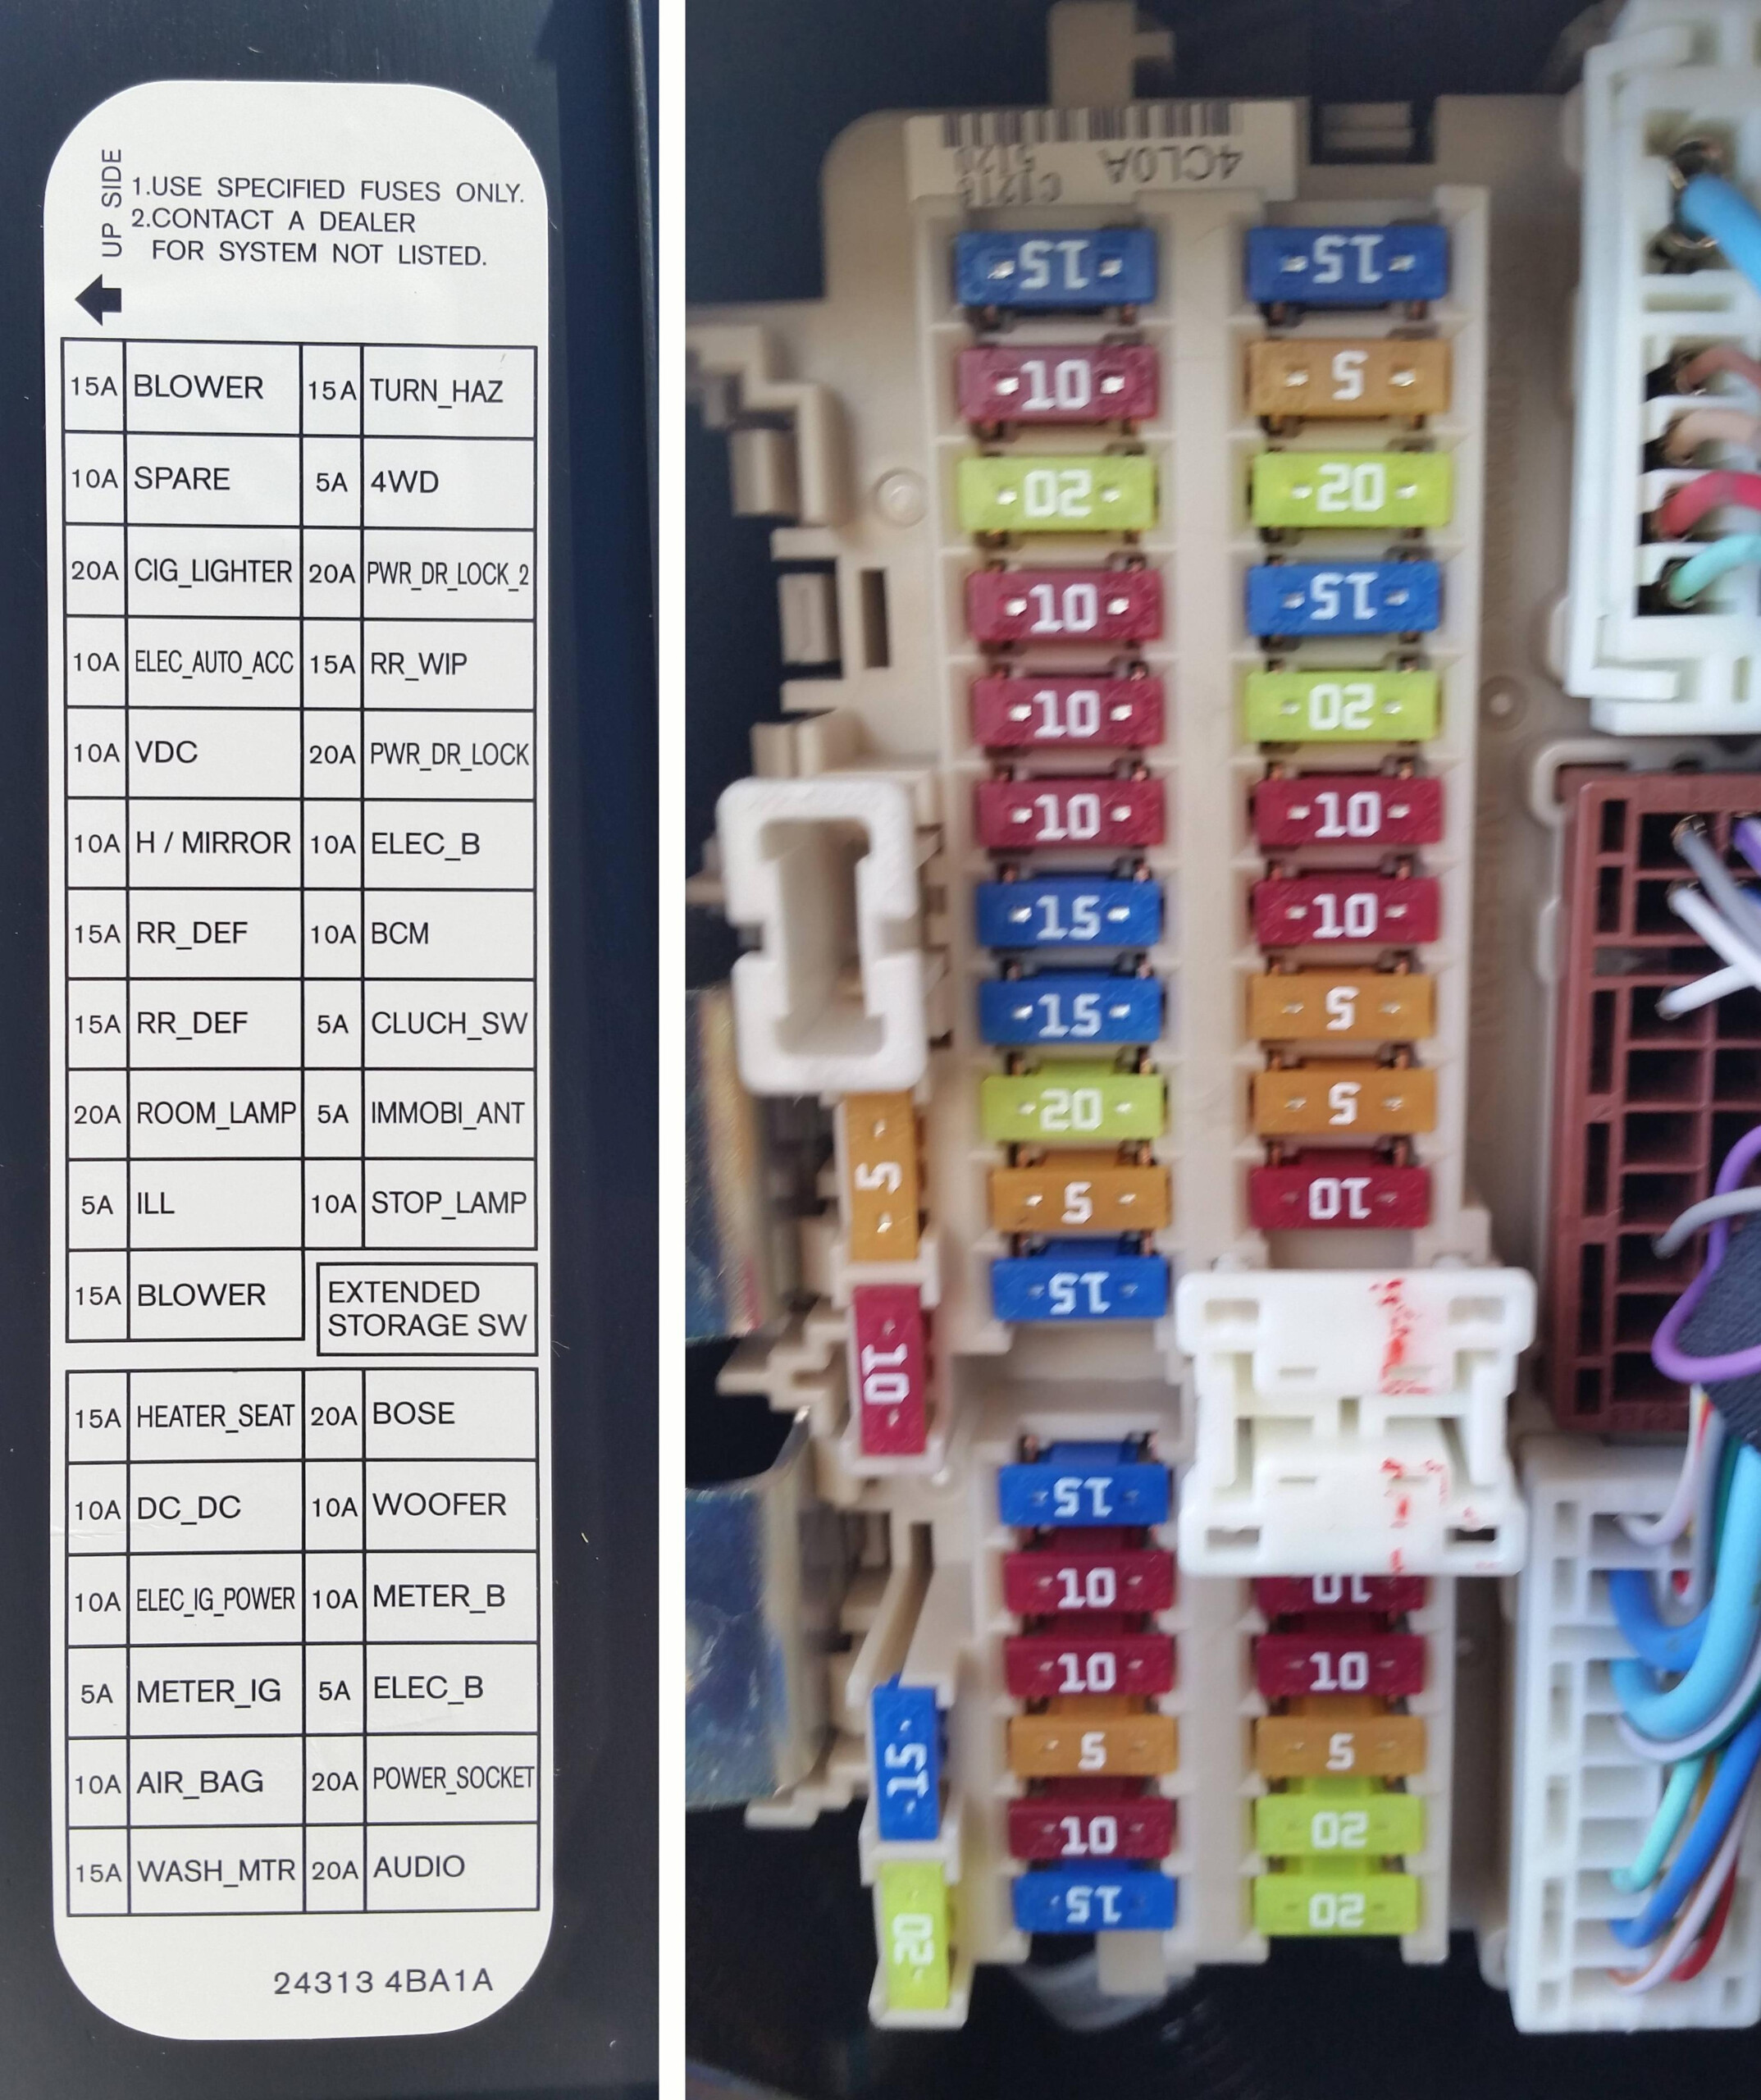
Mastering the 2017 Nissan Rogue Fuse Box Diagram: Symbols and Amperage
Recommended Best Deal Products


Interpreting your 2017 Nissan Rogue’s fuse box diagram accurately is a professional skill that transforms guesswork into precise diagnostics. These diagrams, typically found on the inside of the fuse box cover, in the owner’s manual, or in service manuals, utilize a standardized language of symbols, abbreviations, and numerical codes to represent each circuit and its corresponding fuse. A comprehensive understanding of this “electrical map” is crucial for any expert troubleshooting.
Demystifying Symbols and Abbreviations
Nissan fuse diagrams employ common abbreviations that, once understood, make identification straightforward. Key examples include:
- IGN: Ignition-related circuits, active when the ignition is on.
- ACC: Accessory circuits, powered when the ignition is in the accessory position (e.g., radio).
- TAIL: Taillights, often encompassing license plate lights and sometimes dashboard illumination.
- HORN: The vehicle’s horn circuit.
- DRL: Daytime Running Lights.
- FAN: Cooling fan or HVAC blower fan circuits.
- P/W: Power Windows.
- WIPER: Windshield wipers.
- ABS: Anti-lock Braking System.
Numerical codes often represent specific components within a system, which can be cross-referenced with your owner’s manual for precise identification. The diagram’s layout typically mirrors the physical arrangement of fuses in the box, providing a reliable visual guide.
Understanding Amperage Ratings and Fuse Types
The amperage rating (e.g., 10A, 15A, 20A) is arguably the most critical piece of information on a fuse diagram. It indicates the maximum current a fuse can safely carry before blowing. This rating directly corresponds to a standardized color code, making visual identification straightforward:
- Brown: 7.5A
- Red: 10A
- Blue: 15A
- Yellow: 20A
- Green: 30A
- Clear/Gray: 25A (often for mini fuses)
The 2017 Nissan Rogue primarily utilizes ATM mini blade fuses for most low-current circuits (e.g., interior lights, radio) and ATO regular blade fuses for moderate currents (e.g., power outlets, wipers). For high-current applications like main power distribution, starter, or cooling fans, you’ll find larger MAXI fuses or cartridge fuses. Relays, which are essentially electrically operated switches, are also present in the fuse boxes and control higher current loads, often with ratings exceeding 30A. It is paramount to never substitute a fuse with one of an incorrect amperage rating or type, as this bypasses the intended protection and can lead to severe wiring damage or even fire.
For instance, if your audio system ceases to function, you would consult the passenger compartment fuse diagram. Locate the symbol or abbreviation for “AUDIO” or “RADIO.” The diagram would then point you to a specific fuse number and its amperage, perhaps FUSE No. 12, 10A (Red). This precise identification, supported by a comprehensive guide, fosters a professional and trusted diagnostic approach.
📋
Step-by-Step Procedure for Safely Replacing a Blown Fuse in Your 2017 Nissan Rogue
Replacing a blown fuse is a fundamental electrical repair that any vehicle owner can perform with confidence, provided they follow a structured, safety-first approach. This expert guide outlines the necessary steps to ensure a safe and reliable repair.
Always begin by ensuring your vehicle’s ignition is completely off. For critical circuits or if you’re uncomfortable, consider disconnecting the negative battery terminal to eliminate any risk of accidental short circuits. Wear appropriate protective gear, such as gloves and eye protection. Gather your tools: a flashlight, the fuse puller (often found clipped inside the fuse box cover), and a selection of new fuses with correct amperage ratings.
Audible Premium Plus — Annual Membership
12 audiobook credits up front, plus the full Audible catalogue.
See Annual Plans
Using your 2017 Nissan Rogue fuse box diagram, pinpoint the specific fuse corresponding to the non-functional component. For example, if your power outlet (cigarette lighter) isn’t working, consult the passenger compartment fuse box diagram to find its fuse, perhaps labeled “POWER OUTLET” or “ACC,” commonly FUSE No. 15, 15A (Blue). Visually inspect the suspected fuse for a broken or charred filament. For a more definitive and quality diagnosis, use a fuse tester. A good fuse will show continuity, while a blown fuse will not.
Use the fuse puller provided with your vehicle. Grasp the top of the suspected fuse firmly and pull it straight out. Avoid twisting or applying excessive force, which can damage the fuse block terminals. If a puller isn’t available, small needle-nose pliers can be used, but extreme care is necessary to avoid shorting adjacent terminals or damaging the fuse block.
Select a new fuse that precisely matches the amperage rating AND type (e.g., mini blade, regular blade) of the original blown fuse. Never install a fuse with a higher amperage rating, as this can lead to serious electrical damage or vehicle fires by bypassing critical safety mechanisms. Nissan’s Owner’s Manual specifically advises against using non-specified fuses to maintain vehicle safety and electrical integrity. Gently push the new fuse firmly into the empty slot until it is fully seated. Reconnect the battery if it was disconnected, then turn on the ignition and test the component that was previously non-functional. Approximately 75% of minor electrical issues can be resolved by correctly replacing a blown fuse.
Never use aluminum foil, wire, or a fuse with a higher amperage rating as a temporary or permanent replacement for a blown fuse. This can lead to severe overheating, melting of wiring, and potentially a vehicle fire, compromising your safety and the integrity of your Rogue’s electrical system.
Advanced Diagnostics: Common Electrical Faults and Preventative Maintenance for Your Rogue’s Fuses
Recommended Best Deal Products


While a simple fuse replacement often resolves an electrical issue, an expert understanding involves recognizing when a blown fuse is merely a symptom of a deeper, more complex problem. True professional diagnostics extend beyond the visual inspection of a fuse, delving into the underlying causes of recurrent electrical failures.
When Fuses Repeatedly Blow: A Deeper Dive
If a fuse repeatedly blows after replacement, it unequivocally indicates an electrical short circuit or an excessive current draw (overload) within that specific circuit. This is a crucial diagnostic signal not to be ignored. Approximately 15-20% of ‘blown fuse’ incidents are symptoms of underlying electrical shorts or component failures rather than isolated incidents. Initial diagnostic steps should include:
- Component Inspection: Thoroughly inspect the component the fuse protects. For instance, if the 10A fuse for the dome light (often Red) repeatedly blows, check the dome light fixture itself for corrosion, loose wires, or internal damage.
- Wiring Harness Examination: Trace the wiring harness leading to the component for any signs of chafing, pinching, or exposed wires that could be contacting the vehicle’s metal frame (a direct short to ground). Damaged wiring due to vibrations or inadequate insulation is a common cause of shorts, especially in older vehicles or those exposed to harsh conditions.
- Current Draw Test: With a multimeter set to amperage, test the current draw of the circuit. This requires a bit more expertise and may involve back-probing or inserting the meter in series with the circuit. An excessively high current draw, even without a direct short, can indicate a failing component (e.g., a motor binding up) that is attempting to draw more power than its circuit is designed for.
Leveraging a Multimeter for Advanced Diagnostics
For elusive faults, a digital multimeter is an indispensable tool. It allows you to check for:
- Continuity: To verify if a wire or component has a complete circuit.
- Voltage Drops: To identify excessive resistance in a circuit, which can cause components to underperform.
- Resistance (Ohms): To check for proper resistance values in components or for short circuits (near zero ohms) or open circuits (infinite ohms).
Preventative Maintenance for Electrical Health
Maintaining the overall health of your 2017 Nissan Rogue’s electrical system extends beyond reactive fuse replacement. Proactive measures can prevent future issues:
- Regular Visual Inspection: Periodically open your fuse boxes and visually inspect the fuses and terminals for signs of corrosion, discoloration, or loose connections. Corrosion can increase resistance, leading to overheating and premature fuse failure.
- Dielectric Grease: In environments prone to moisture or corrosion (e.g., engine bay), applying a thin coat of dielectric grease to fuse terminals can help prevent corrosion and maintain quality electrical contact.
- Proper Seating: Ensure all fuses and relays are properly seated in their respective slots. Loose connections can lead to intermittent operation or increased resistance.
If you encounter a continuously blowing fuse or are uncertain about using a multimeter, it is always best to seek professional automotive technician assistance. Complex electrical issues require specialized tools and expert knowledge to diagnose accurately and prevent further system damage. The average cost of professional electrical diagnostic can range from $100-$200, but can save significant repair costs in the long run.
By integrating these advanced diagnostic techniques and preventative maintenance practices, you contribute significantly to the overall electrical reliability and longevity of your 2017 Nissan Rogue, ensuring a trusted and worry-free driving experience.
Conclusion
This comprehensive guide has illuminated the often-overlooked yet critical aspect of your 2017 Nissan Rogue’s electrical system: its fuse boxes. Understanding your 2017 Nissan Rogue’s fuse system is crucial for diagnosing and resolving common electrical issues. Properly locating and interpreting fuse box diagrams ensures correct fuse identification and replacement, maintaining vehicle integrity. Following expert guidelines for fuse replacement and preventative maintenance contributes to a reliable and safe driving experience.
Empower yourself with this complete knowledge. Regularly inspect your fuse boxes, and utilize the provided diagrams for informed diagnostics. For persistent or complex electrical faults, consult a trusted, certified automotive professional to ensure your Nissan Rogue receives expert care and maintains its optimal electrical health for years to come.
Frequently Asked Questions
Where are the primary fuse boxes located in a 2017 Nissan Rogue?
In the 2017 Nissan Rogue, there are typically two primary fuse boxes. The main one is found in the engine compartment, usually near the battery or inner fender, covering high-current circuits. A secondary fuse box is located within the passenger compartment, often behind a panel on the driver’s side dashboard, managing interior electrical accessories. Consult your owner’s manual for precise diagrams.
How can I tell if a fuse is blown without a tester?
You can often identify a blown fuse by visual inspection. Most blade fuses have a small wire filament visible through a clear plastic body. If this filament is broken or charred, the fuse is blown. For opaque fuses or uncertainty, a fuse tester or multimeter is recommended for a professional, reliable diagnosis. Always compare it to a new fuse.
Can I use a higher amperage fuse if I don’t have the correct one?
No, it is critically important to only use fuses with the exact specified amperage rating. Using a fuse with a higher amperage can prevent it from blowing when an overload or short occurs, potentially leading to overheating, wiring damage, or even a vehicle fire. This compromises the vehicle’s inherent electrical safety design and should be avoided for trusted operation.
What tools do I need to replace a fuse in my 2017 Nissan Rogue?
For a quality fuse replacement, you will typically need a fuse puller (often found in one of the fuse boxes or tool kit), a flashlight for visibility, and a set of new fuses with the correct amperage ratings. A multimeter can be beneficial for advanced troubleshooting. Always ensure the vehicle is off and safety precautions are followed.
My new fuse keeps blowing; what could be the problem?
If a newly installed fuse repeatedly blows, it indicates an underlying electrical issue such as a short circuit in the wiring, a faulty component (e.g., a motor or solenoid drawing excessive current), or an overloaded circuit. This requires a professional diagnosis, often with specialized equipment like a multimeter, to identify and rectify the root cause safely and effectively.