2012 Honda Odyssey Serpentine Belt Diagram And Replacement Procedures
The serpentine belt is an often-overlooked yet critically vital component within your 2012 Honda Odyssey’s engine system. This single, continuous belt drives multiple essential accessories, making its proper function indispensable for your vehicle’s operation. Without a clear understanding of its function and, crucially, its correct routing diagram, diagnosing issues or performing a replacement can be a daunting and error-prone task for even experienced DIY enthusiasts. This expert guide provides a professional and authoritative breakdown of the 2012 Honda Odyssey serpentine belt diagram, offering detailed insights into its components, diagnostic procedures, and a reliable, step-by-step replacement methodology.

Understanding the 2012 Honda Odyssey Serpentine Belt System
Recommended Best Deal Products




📤 Share Image
Within the intricate mechanics of your 2012 Honda Odyssey, the serpentine belt serves as a vital component, a single, continuous belt responsible for transferring rotational power from the crankshaft to various critical accessory components. Without this crucial connection, essential systems that contribute to your vehicle’s safety, comfort, and operational capability would cease to function. This robust power transfer mechanism ensures everything from your lights to your climate control remains operational.
Core Function and Key Components
The primary function of the serpentine belt is to drive a suite of accessories crucial for the Odyssey’s operation. These include the alternator, which recharges the vehicle’s battery and powers electrical systems; the power steering pump, essential for hydraulic power steering assist; the A/C compressor, which enables the air conditioning system; and the water pump, vital for circulating coolant and preventing engine overheating. Each of these components is critical, and their combined reliance on a single belt underscores the importance of proper belt maintenance.
The serpentine belt system in the 2012 Honda Odyssey’s 3.5L V6 engine (whether the J35Z8 or J35A7 variant) is composed of several key elements:
- The Serpentine Belt Itself: A multi-ribbed belt designed for flexibility and durability.
- Crankshaft Pulley: The main driving pulley, directly connected to the engine’s crankshaft.
- Automatic Tensioner Pulley: A spring-loaded mechanism that maintains consistent tension on the belt, accommodating minor belt stretch and ensuring optimal grip across all pulleys.
- Idler Pulleys: Smooth, unpowered pulleys that guide the belt and adjust its path to ensure proper wrap around accessory pulleys.
- Accessory Pulleys: Individual pulleys on the alternator, power steering pump, A/C compressor, and water pump, each designed to receive power from the belt.
Engineering and Durability
Honda’s engineering for the 2012 Odyssey’s 3.5L V6 emphasizes efficiency and reliability. The design of the belt routing and the strategic placement of the automatic tensioner are optimized to minimize slip and reduce parasitic drag on the engine. Modern serpentine belts are typically constructed from advanced ethylene propylene diene monomer (EPDM) rubber, offering superior heat resistance, flexibility, and longevity compared to older neoprene belts. This material choice is crucial for durability, as the belt operates under constant tension and experiences significant temperature fluctuations.
Despite their robust construction, these belts are wear items. A typical serpentine belt is designed to last between 60,000 to 100,000 miles or 5-7 years, though it’s always critical to consult your vehicle’s specific maintenance schedule as provided by Honda. Failure to adhere to these replacement intervals can lead to sudden, immediate system failures. Imagine driving and suddenly losing power steering assist, followed by the A/C failing and the engine temperature gauge rapidly climbing due to a non-functional water pump – all direct consequences of a broken serpentine belt. This single component is a lynchpin in the overall operational quality of your Odyssey.

Decoding the 2012 Honda Odyssey Serpentine Belt Diagram for Accurate Routing
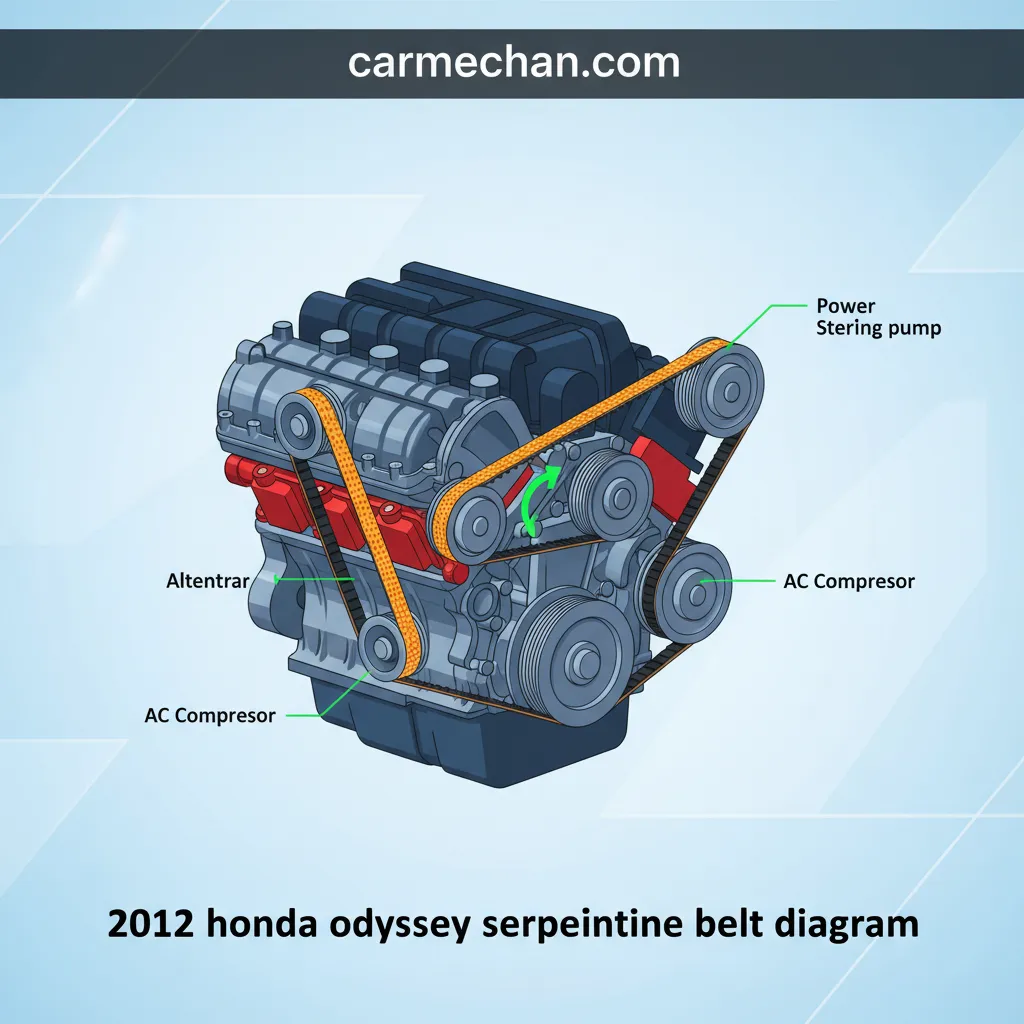
Accurate serpentine belt routing is absolutely paramount. An improperly routed belt can lead to immediate operational issues, accelerated wear, or even catastrophic failure. Understanding the 2012 Honda Odyssey serpentine belt diagram is not just helpful; it’s a critical skill for any owner or technician undertaking this service. These diagrams, often found on a sticker under the hood, near the radiator support, or within the service manual, serve as your definitive guide.
Interpreting the Diagram
A typical serpentine belt diagram for the 2012 Honda Odyssey’s 3.5L V6 engine will depict a top-down or front-facing view of the engine’s accessory side. You’ll observe various circles representing the pulleys, interconnected by a line representing the belt. Each pulley is usually labeled with its corresponding component (e.g., ALT for alternator, PS for power steering, A/C for air conditioning, WP for water pump, CRK for crankshaft). Arrows often indicate the direction of belt travel or engine rotation.
For the 2012 Odyssey, the system typically involves 6 to 8 pulleys, including the crankshaft, alternator, power steering pump, A/C compressor, water pump, automatic tensioner, and one or more idler pulleys. The crankshaft pulley is generally located at the lowest point, providing the main driving force. The alternator is often positioned higher up, while the power steering pump and A/C compressor might be on either side or below, depending on the specific engine layout.

Audible — Listen Free for 30 Days
One free credit a month and thousands of titles included.
Listen Free for 30 DaysPrecise Routing Path and the Automatic Tensioner
The belt’s path involves wrapping around the different pulleys, utilizing both the ribbed and smooth sides of the belt as needed. The ribbed side always engages with ribbed pulleys (like the crankshaft, alternator, etc.), while the smooth back side engages with smooth idler pulleys or the smooth face of the automatic tensioner. The automatic tensioner pulley is distinguished by its spring-loaded arm, clearly indicated on the diagram as a pivot point for applying tension.
For instance, a common routing path might begin at the crankshaft, snake up to the alternator, then down around the power steering pump, across an idler, around the A/C compressor, then back up around the water pump, and finally past the tensioner before returning to the crankshaft. The tensioner’s role is critical; its position on the diagram typically shows it pushing into the belt to maintain constant tension. This consistent tension ensures there’s no slippage, allowing for efficient power transfer to all accessories.
Common Routing Pitfalls
One of the most frequent errors during serpentine belt replacement is incorrect routing, particularly misplacing the belt on an idler pulley or around the wrong side of an accessory. For example, if you incorrectly route the belt over the smooth back of an idler pulley instead of its ribbed face (or vice versa, depending on design), the belt will either slip, wear prematurely, or potentially derail altogether. This misplacement immediately compromises the system’s integrity, leading to noise, rapid belt degradation, and eventual failure. Always double-check your routing against the diagram multiple times before starting the engine.
Before removing the old belt, take a clear photo of its current routing. This provides an invaluable secondary reference point in addition to the official diagram, especially if the diagram is hard to read or you encounter unexpected variations.

Diagnosing Serpentine Belt Issues in Your 2012 Odyssey: Signs and Symptoms
Recommended Best Deal Products


Proactive diagnosis of serpentine belt issues can save you significant time, money, and hassle. Ignoring early warning signs can escalate a simple belt replacement into a complex repair, potentially involving other damaged engine components. As a trusted expert, I advocate for immediate attention to any indicators of belt wear or malfunction.
Audible Indicators of Failure
The most common and unmistakable sign of a failing serpentine belt is noise. Listen for:
- Squealing: A high-pitched squeal, especially noticeable during cold starts, acceleration, or when turning the steering wheel sharply (increasing power steering load), indicates belt slip. This often occurs when the belt is glazed, contaminated with fluids, or has lost tension. A common scenario involves a loud squealing sound upon cold start which gradually subsides as the engine warms up, a classic sign of a stiff or marginally slipping belt.
- Chirping: A more intermittent, bird-like sound that suggests minor slippage or misalignment.
- Grinding or Growling: This sound usually doesn’t come from the belt itself but from a failing pulley bearing (tensioner, idler, or accessory pulley) that the belt runs over. A failing bearing can cause the belt to wear unevenly and will eventually seize, causing immediate belt failure.
Visual Inspection Techniques
A thorough visual inspection provides invaluable insights into the belt’s condition. With the engine off and cool, examine the belt across its entire length. Look for:
- Cracks and Fraying: Small, superficial cracks perpendicular to the belt’s ribs are normal with age. However, deep cracks, chunks missing, or fraying along the edges are clear signs of advanced wear and necessitate immediate replacement. A belt with visible cracks spanning more than half its depth, or one losing 10-20% of its material thickness, is typically indicative of needing replacement.
- Glazing: A shiny, hardened appearance on the ribbed surface indicates the rubber has lost its elasticity and grip, leading to slippage.
- Missing Ribs: Any missing sections of the multi-ribbed surface significantly reduce the belt’s contact area and strength.
- Fluid Contamination: Oil, coolant, or power steering fluid on the belt causes rapid degradation of the rubber, leading to softening, stretching, and eventually, failure. Address any leaks promptly.
Operational Symptoms and Catastrophic Failure
Beyond noise and visual cues, a failing belt can manifest through direct operational symptoms:
- Loss of Power Steering Assist: The steering wheel becomes significantly harder to turn, especially at low speeds.
- HVAC Issues: The A/C system stops blowing cold air because the compressor isn’t being driven.
- Battery Warning Light: Illuminates on the dashboard, indicating the alternator isn’t charging the battery effectively.
- Engine Overheating: The engine temperature gauge rises rapidly because the water pump isn’t circulating coolant.
Ignoring a worn serpentine belt invites catastrophic failure. A snapped belt instantly disables critical systems, potentially leaving you stranded, especially in unsafe locations. Worse, a flailing, broken belt can whip around, damaging radiator hoses, electrical wiring, or even entangling with timing components if it’s a front-mounted engine, leading to far more expensive and complex repairs. Timely intervention is a mark of a responsible vehicle owner and a sound maintenance strategy.
Audible Premium Plus — Annual Membership
12 audiobook credits up front, plus the full Audible catalogue.
See Annual PlansBy The Numbers
Miles for Belt Replacement
Years for Belt Replacement
Hours Labor for Professional Replacement
Step-by-Step 2012 Honda Odyssey Serpentine Belt Replacement Procedures
Replacing the serpentine belt on your 2012 Honda Odyssey is a manageable task for an experienced DIY mechanic, but it requires precision and adherence to safety protocols. This complete guide provides a professional methodology to ensure a quality and reliable replacement.
📋
Step-by-Step Guide
Recommended Best Deal Products


Ensure the vehicle is off, cooled down, and parked on a level surface with the parking brake engaged. Disconnect the negative battery terminal. Gather necessary tools: a ratchet or breaker bar (typically 1/2″ drive or 3/8″ drive, depending on tensioner design), an appropriate socket for the tensioner bolt (often 14mm or 19mm for Honda), a new serpentine belt (confirm the correct OEM part number or a reputable aftermarket equivalent like Gates or Dayco for the 2012 Odyssey 3.5L V6), gloves, eye protection, and potentially a jack and jack stands for better access from below if needed. Remember to have the belt routing diagram handy.
Locate the automatic tensioner pulley. It will have a square hole or a bolt head designed for your ratchet/breaker bar. Attach the appropriate tool to the tensioner. For most Honda Odyssey models, you will rotate the tensioner arm clockwise (counter-clockwise for some specific configurations) to relieve tension. Once tension is released, the belt will be slack enough to remove it from the pulleys. Carefully slip the old belt off all pulleys, ensuring you note or photograph the routing one last time.
Carefully route the new belt onto all pulleys according to the diagram. This is the most critical step. Start by placing the belt on the pulleys that are hardest to reach or lack flexibility (e.g., crankshaft and tight corners). Leave the tensioner pulley for last. While holding the tensioner in its relaxed (slack) position with your tool, slip the final section of the belt over the tensioner pulley. Double-check that the belt is perfectly seated in all grooves on every ribbed pulley and correctly positioned on any smooth idlers.
Slowly and gently release the tensioner arm, allowing it to apply full tension to the new belt. Remove your tool. Perform a final visual inspection to confirm the belt is correctly aligned on all pulleys and not twisted or caught. Reconnect the negative battery terminal. Start the engine and listen for any abnormal noises (squealing, chirping). Let it run for a few minutes, turning the steering wheel lock-to-lock a few times, and observe for smooth operation. Professional shops typically allocate 1-2 hours of labor for this comprehensive procedure, emphasizing the need for meticulous work.
Maintaining Your 2012 Honda Odyssey’s Drive Belt System for Longevity
Beyond replacement, effective maintenance of your 2012 Honda Odyssey’s drive belt system is crucial for maximizing its lifespan and ensuring continuous, reliable performance. A proactive approach to belt care prevents premature failure and protects your investment in quality components.
Recommended Inspection Intervals
Establish a regular inspection routine. It is highly recommended to perform a comprehensive visual and tactile check of your serpentine belt at least every 15,000 to 30,000 miles, or annually, typically during routine oil changes. This simple but critical step allows you to catch early signs of wear before they escalate. Pay close attention to the visual cues discussed earlier: cracks, fraying, glazing, and contamination. Feel the belt for excessive stiffness or unusual texture changes.
Factors Accelerating Belt Wear
Several factors can significantly shorten a serpentine belt’s life. Being aware of these can help you mitigate their impact:
- Fluid Leaks: Oil, power steering fluid, or coolant drips onto the belt can cause rapid deterioration of the EPDM rubber. A small oil leak from a valve cover gasket, for instance, can contaminate the belt, making it soft and sticky, leading to accelerated degradation and noise. Address all fluid leaks promptly to protect the belt and other components.
- Extreme Temperatures: Frequent exposure to very high or low temperatures can stress the belt material, making it brittle or overly flexible.
- Frequent Heavy Loads: Consistent heavy loads on the engine (e.g., frequent towing, aggressive driving) increase the demands on the belt system, potentially leading to faster wear.
- Misaligned Pulleys: Even slight misalignment of any pulley can cause uneven belt wear and tracking issues.
Ancillary Maintenance and Preventative Measures
Maintenance extends beyond just the belt. Periodically check the associated components:
- Pulley Bearings: With the belt removed, spin each pulley by hand. Listen for grinding, squealing, or rumbling noises, and feel for excessive play or rough rotation, which indicate failing bearings.
- Tensioner Operation: Ensure the automatic tensioner arm moves smoothly and provides adequate, consistent tension. A weak or seized tensioner will lead to belt slippage or excessive slack.
- Avoid Belt Dressings: While seemingly helpful, most belt dressings offer only temporary relief for squealing and can actually attract dirt and accelerate belt degradation. Address the root cause of the noise instead.
Enhanced Reliability
Consistent maintenance drastically reduces the risk of unexpected breakdowns, ensuring your Odyssey is always ready for the road.
Cost Savings
Preventative measures avoid costly towing fees and secondary damage to more expensive engine components caused by a snapped belt.
Optimal Performance
A healthy drive belt system ensures all accessories function at peak efficiency, maintaining power steering, A/C, and charging system integrity.
By integrating these regular inspections and preventative measures into your maintenance schedule, you can significantly extend the life of your serpentine belt system. This commitment to routine care demonstrates an expert approach to vehicle ownership and ensures your 2012 Honda Odyssey remains a truly reliable and trusted family vehicle for years to come.
The serpentine belt in your 2012 Honda Odyssey is integral to the proper function of multiple essential engine accessories. This comprehensive guide has detailed its critical role, the components it connects, and the precise routing required for the 3.5L V6 engine. Accurate interpretation of the serpentine belt diagram is paramount for correct routing and system integrity, preventing common errors that lead to premature wear or immediate failure. Regular inspection and timely replacement, as outlined in our step-by-step procedures, are critical preventative maintenance measures to ensure reliable vehicle operation and to avoid more significant, costlier repairs down the road.
Ensure the enduring performance and reliability of your 2012 Honda Odyssey by routinely inspecting your serpentine belt and consulting this detailed guide or a trusted professional for any necessary service. Prioritize quality components and expert procedures for optimal results and peace of mind on every journey.
Frequently Asked Questions
What are the common symptoms of a failing serpentine belt on a 2012 Honda Odyssey?
A failing serpentine belt on a 2012 Honda Odyssey often manifests through distinct symptoms. These include persistent squealing or chirping noises, especially during cold starts or sharp turns. Visual indicators like cracks, fraying, or glazing on the belt’s surface are critical. Additionally, loss of power steering, an illuminated battery light, or issues with air conditioning function can signal belt degradation or impending failure.
How often should the serpentine belt be replaced on a 2012 Honda Odyssey?
Honda generally recommends inspecting the serpentine belt every 30,000 miles or 2 years, and replacement typically falls within the 60,000 to 100,000-mile range or every 5-7 years, whichever comes first. However, driving conditions and environmental factors can influence its lifespan. Always refer to your Odyssey’s owner’s manual for precise manufacturer-specific intervals and perform visual inspections regularly for signs of wear.
Is a special tool required to replace the serpentine belt on a 2012 Honda Odyssey?
Yes, while not proprietary, a specific tool is highly recommended for safely replacing the serpentine belt on a 2012 Honda Odyssey. You’ll typically need a long-handle ratchet or breaker bar with the correct sized socket (often 14mm or 19mm) to rotate the automatic tensioner pulley and release the belt tension. Some tensioners may also benefit from a tensioner tool for easier manipulation or to secure it in the released position.
What happens if the serpentine belt breaks while driving a 2012 Honda Odyssey?
If the serpentine belt breaks on your 2012 Honda Odyssey while driving, several critical systems will immediately cease to function. You will lose power steering assist, making the steering wheel very heavy. The battery warning light will illuminate as the alternator stops charging, eventually leading to a dead battery. The air conditioning will stop working, and critically, the engine may overheat rapidly due to the water pump ceasing to circulate coolant. It is unsafe to continue driving.
Can I drive my 2012 Odyssey with a squealing serpentine belt?
While it might be possible to drive briefly with a squealing serpentine belt, it is strongly advised against. A squealing belt indicates slippage, often due to wear, improper tension, or contamination. This slippage reduces the efficiency of powered accessories and generates heat, accelerating belt degradation. Driving with a squealing belt increases the risk of complete belt failure, which can lead to rapid loss of critical vehicle functions and potentially leave you stranded.