2012 Honda Civic Serpentine Belt Diagram And Replacement Guide
2012 Honda Civic Serpentine Belt Diagram And Replacement Guide
The serpentine belt is the unsung hero under the hood of your 2012 Honda Civic, a critical component that orchestrates the function of multiple essential engine accessories. Understanding its complex routing, diagnostic indicators of wear, and the proper replacement procedure is paramount for any Civic owner to ensure their vehicle’s continued performance and reliability. This expert guide will provide a precise blueprint of the 2012 Honda Civic serpentine belt diagram, walk you through identifying common issues, and detail a professional replacement methodology, empowering you with the knowledge for quality vehicle maintenance.

Prime for Young Adults — 6 Months Free
Students and 18–24s get six months of Prime free, then half price.
Start 6 Months FreeUnderstanding the 2012 Honda Civic Serpentine Belt System Components
Recommended Best Deal Products


📤 Share Image
The serpentine belt is not merely a rubber band; it is a sophisticated, single multi-ribbed belt tasked with transmitting power from the engine’s crankshaft to several peripheral accessories. Unlike older vehicle designs that relied on multiple V-belts, modern systems, including your 2012 Honda Civic, utilize a single serpentine belt to enhance efficiency, reduce complexity, and optimize under-hood space. This integration ensures a streamlined and reliable operational framework for key engine accessories.
In a typical 2012 Honda Civic (both the 1.8L R18A1 and 2.4L K24Z7 Si engines), the serpentine belt orchestrates the function of critical components:
- Alternator: This device is crucial for generating electrical power to run the vehicle’s electrical systems and recharge the 12-volt battery. A failing belt leading to a non-functional alternator will quickly result in a dead battery and complete vehicle shutdown.
- A/C Compressor: Essential for cabin climate control, the compressor circulates refrigerant through the air conditioning system. Without a functioning belt, your A/C system becomes inoperative.
- Water Pump: The water pump is responsible for circulating coolant throughout the engine, a vital function for maintaining optimal engine temperature and preventing catastrophic overheating.
- Crankshaft Pulley: This is the drive pulley, directly connected to the engine’s crankshaft, which provides the rotational energy for the entire belt system.
Beyond these driven components, the system relies on two crucial elements: the automatic belt tensioner and idler pulleys. The tensioner, typically spring-loaded, maintains consistent tension on the belt, preventing slippage and ensuring optimal power transfer under varying engine loads. Idler pulleys, on the other hand, guide the belt along its specific path, ensuring correct routing and preventing interference. Both are pivotal for optimal system performance and belt longevity.
A serpentine belt failure is not a minor inconvenience; it presents immediate and severe consequences. The sudden loss of functions like battery charging (leading to vehicle immobilization), air conditioning, and most critically, engine cooling (from the water pump), can quickly lead to engine overheating and significant internal damage. This highlights the critical safety and mechanical implications of a compromised belt system. A properly functioning serpentine belt system ensures a trusted operational framework for key engine accessories.
While the core components remain consistent, it’s worth noting the minor engine variations. The 2012 Honda Civic 1.8L (R18A1) and the 2.4L Si (K24Z7) both utilize Electric Power Steering (EPS), meaning there is no hydraulic power steering pump driven by the serpentine belt. This simplifies the belt routing compared to older generations or other models that included a hydraulic pump.
By The Numbers
Miles (Average Belt Lifespan)
Accessory Function Reliance on Belt

Interpreting the 2012 Honda Civic Serpentine Belt Diagram
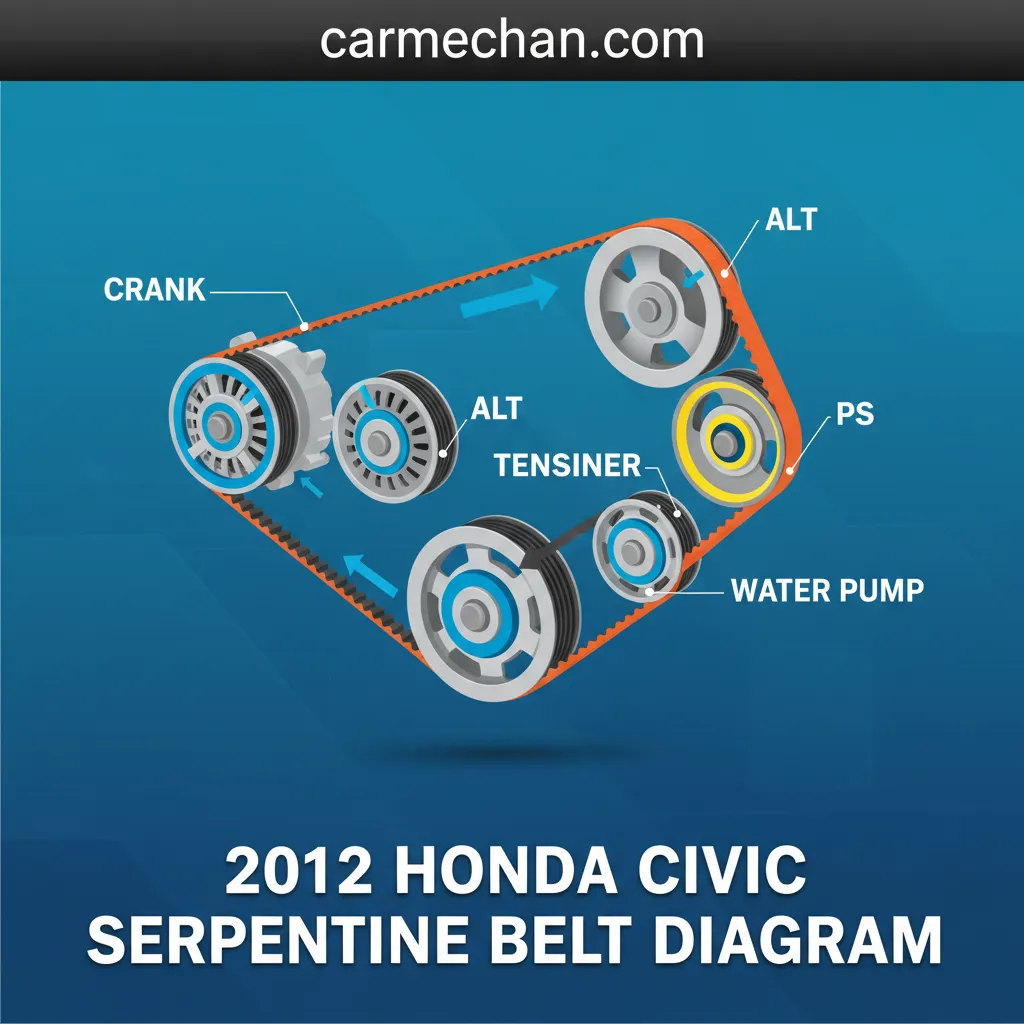
Accurately interpreting the serpentine belt diagram is a foundational skill for any expert or DIY enthusiast working on a 2012 Honda Civic. This diagram, essentially a schematic map of the belt’s journey, dictates the precise path the belt must follow to correctly drive all accessories. Incorrect routing is a leading cause of premature belt wear, excessive noise, and accessory malfunction.
Typical serpentine belt diagrams employ a standardized set of conventions. You’ll observe arrows indicating the direction of rotation, labels for each pulley (Crank, ALT, A/C, WP, IDLER, TENS for Crankshaft, Alternator, Air Conditioning, Water Pump, Idler, and Tensioner, respectively), and distinct lines illustrating the belt’s routing. The diagram differentiates between the ribbed inner surface of the belt engaging grooved pulleys and the smooth outer surface contacting flat idler or tensioner pulleys.

Audible — Listen Free for 30 Days
One free credit a month and thousands of titles included.
Listen Free for 30 DaysFor the 2012 Honda Civic, regardless of the 1.8L (R18A1) or 2.4L Si (K24Z7) engine, the routing principles are similar. Generally, the belt originates from the large crankshaft pulley, which provides the motive force. From there, it typically travels:
- Over or under an idler pulley to guide it towards the automatic belt tensioner.
- Around the tensioner pulley, which ensures consistent pressure. The tensioner usually contacts the smooth side of the belt.
- To the alternator pulley, engaging the ribbed side.
- Around the A/C compressor pulley, also engaging the ribbed side.
- Finally, to the water pump pulley, engaging the ribbed side, before returning to the crankshaft.
A common point of confusion is ensuring the correct side of the belt contacts each pulley. Grooved pulleys (crank, alternator, A/C compressor, water pump) must engage the ribbed side of the belt. Flat pulleys (tensioner, idlers) typically contact the smooth back side of the belt. Failing to adhere to this can lead to improper tension, rapid belt wear, and squealing noises, undermining the quality of your repair.
It is paramount to consult the vehicle’s service manual or the diagram often affixed under the hood for the exact, expert-verified routing specific to your engine configuration. Honda’s factory diagrams are precision-engineered for optimal belt tension and component drive efficiency. This diagram is not only invaluable during the initial installation of a new belt but also serves as a critical reference for diagnosing issues such as incorrect routing (post-maintenance errors) or localized belt slippage caused by a misaligned or seized pulley.
Always check the under-hood sticker or your Civic’s owner’s manual for the precise serpentine belt diagram. Even slight year-to-year or trim-level variations can alter routing. A quick photo of the old belt’s path before removal is also a reliable reference.

Diagnosing Common Serpentine Belt Issues and Symptoms in the 2012 Civic
Recommended Best Deal Products


Proactive diagnosis is key to avoiding sudden breakdowns and costly repairs. For 2012 Honda Civic owners, understanding the common signs of serpentine belt wear or failure allows for timely intervention, ensuring your vehicle remains reliable. As a professional technician with years of hands-on experience, I can attest that these symptoms are often clear indicators.
Auditory Symptoms: What Noises Mean
- Squealing or Chirping: This is the most common symptom. A loud squeal, particularly on cold starts, during acceleration, or when turning the steering wheel (if the vehicle had a hydraulic pump, not applicable to 2012 Civic’s EPS) often indicates a glazed (hardened, shiny surface) belt, a slightly loose belt, or contamination (oil, coolant). A persistent chirping can point to minor misalignment or a worn idler/tensioner pulley bearing.
- Grinding or Growling: These more ominous sounds typically suggest a severely worn bearing in one of the belt-driven accessories or the tensioner/idler pulleys. This requires immediate attention, as a seized pulley can cause the belt to snap.
Consider this scenario: “My 2012 Civic makes a loud squealing noise only on cold starts but goes away after a few minutes.” This is often a sign of a glazed or slightly loose belt that hasn’t warmed up and gained full grip yet. While seemingly minor, it’s an early warning sign that should not be ignored.
Visual Inspection Techniques
A thorough visual inspection of the belt itself can reveal much about its condition:
- Cracks and Fraying: Look for small cracks across the ribbed surface, especially at bends. A belt with 3-4 visible cracks per inch or noticeable fraying along the edges is a prime candidate for replacement.
- Glazing: A shiny, smooth appearance on the ribbed side of the belt, or on the smooth back side, indicates the rubber has hardened and lost its grip, leading to slippage.
- Missing Ribs or Uneven Wear: Any missing sections of ribs or uneven wear across the belt’s width is a critical sign of impending failure, often caused by a misaligned pulley.
Inspecting the Automatic Belt Tensioner
The tensioner itself can wear out. Look for:
- Excessive Vibration: While running, the tensioner arm should be relatively stable. Excessive bouncing or vibration indicates a worn spring or dampener.
- End of Travel: If the tensioner arm is fully extended or collapsed against its stop, it means the belt is excessively stretched, or the tensioner mechanism itself is faulty and no longer providing adequate tension.
- Play in the Pulley: With the engine off and belt removed, check for side-to-side play or roughness when rotating the tensioner pulley by hand.
Symptoms of Accessory Failure
When the belt fails, the accessories it drives stop working. This can manifest as:
Audible Premium Plus — Annual Membership
12 audiobook credits up front, plus the full Audible catalogue.
See Annual Plans- Dimming Headlights/Warning Lights: A sign of a failing alternator, which means the battery isn’t charging.
- Decreased A/C Effectiveness: The compressor isn’t running, or isn’t running efficiently.
- Engine Overheating: The water pump isn’t circulating coolant. This is a critical symptom requiring immediate shutdown.
Distinguishing between minor belt noise and critical failure indicators is crucial. A light squeal on a cold, damp morning might only require observation, but persistent grinding, visible fraying, or any loss of accessory function warrants immediate attention. Early diagnosis ensures a quality repair.
By The Numbers
Accessory Drive Failures (Belt/Tensioner Related)
Cracks per Inch (Replacement Indicator)
Step-by-Step 2012 Honda Civic Serpentine Belt Replacement Procedure
Replacing the serpentine belt on your 2012 Honda Civic is a manageable task for the mechanically inclined, provided you adhere to safety protocols and follow a precise methodology. This complete guide details the steps for a professional and reliable repair.
📋
Step-by-Step Guide
Recommended Best Deal Products


Ensure the engine is completely cool to avoid burns. Disconnect the negative battery terminal using a 10mm wrench to prevent accidental electrical issues. Gather necessary tools: a ratchet (typically a 14mm or 19mm socket/wrench for the tensioner bolt, depending on engine/model), a serpentine belt tool (for leverage on stubborn tensioners), and a torque wrench. Wear gloves and eye protection.
Locate the automatic belt tensioner. You’ll find a square drive hole or a specific bolt head (often 19mm for the R18 engine) on the tensioner arm. Attach your ratchet or serpentine belt tool to this point. For the 2012 Civic R18 engine, you typically pull the tensioner arm clockwise to relieve tension. For the K24Z7 Si, consult the manual, but it’s often similar. Apply steady, controlled force to rotate the tensioner, compressing its spring, which slackens the belt.
While holding the tensioner in the loosened position, carefully slip the old belt off one of the easier-to-access pulleys (e.g., the alternator or an idler pulley). Once disengaged from one pulley, you can release the tensioner slowly. Then, completely remove the old serpentine belt from all pulleys. Take this opportunity to visually compare the old belt to the new one for length and rib count.
Refer to your 2012 Honda Civic’s serpentine belt diagram (under the hood or in the service manual). Start by routing the belt around the crankshaft pulley and the most difficult-to-reach pulleys first. Methodically work your way around, ensuring the ribbed side of the belt engages grooved pulleys and the smooth side contacts flat pulleys. Leave the tensioner pulley for last, as it’s the easiest point to slip the belt onto once tension is relieved.
Once the new belt is properly routed over all pulleys except the tensioner, apply force to the tensioner arm again (clockwise for the R18) to create slack. Slip the belt onto the tensioner pulley. Slowly release the tensioner tool, allowing the tensioner to apply pressure to the belt. Double-check that the belt is perfectly seated in all grooves on every pulley. There should be no overlap or exposed ribs.
Reconnect the negative battery terminal. Start the engine and listen carefully for any abnormal noises (squealing, chirping). Observe the belt’s operation; it should run smoothly without wobbling or jumping. Confirm that all belt-driven accessories (A/C, charging system via voltmeter if available) are functioning correctly. A typical DIY serpentine belt replacement on a 2012 Honda Civic can take an experienced individual 30-60 minutes, ensuring a reliable outcome.
Never attempt to relieve tension or remove the belt while the engine is running. Always ensure the vehicle is stable, the engine is off and cool, and the battery is disconnected before starting work. Improper tool usage can cause injury or damage components. If you’re unsure at any step, consult a certified mechanic.
Maintaining Serpentine Belt Longevity and Preventing Future Issues for Your 2012 Civic
Extending the life of your serpentine belt and the associated components in your 2012 Honda Civic requires more than just replacing it when it fails. Proactive maintenance and informed choices are paramount for long-term reliability and cost savings. As an expert in vehicle maintenance, I emphasize these practices.
Routine Inspection Schedule
Establish a recommended schedule for routine serpentine belt inspection, ideally every 15,000 miles or with every oil change. This proactive approach allows you to identify early signs of wear (cracks, glazing, fraying) before they escalate into critical failures. The benefits of proactive maintenance far outweigh reactive repairs.
Extended Component Life
Regular checks prevent minor issues from becoming major failures, extending the lifespan of your belt, tensioner, and pulleys.
Cost Savings
Catching problems early prevents cascading failures that could damage expensive accessories like alternators or A/C compressors.
Enhanced Reliability
Proactive maintenance significantly reduces the risk of unexpected breakdowns, keeping your Civic dependable on the road.
Selection of Replacement Belts
When replacing your serpentine belt, choosing between OEM (Original Equipment Manufacturer) and reputable aftermarket options is crucial. OEM belts are designed to Honda’s exact specifications, guaranteeing optimal fitment and material quality. Reputable aftermarket brands, such as Gates, Dayco, or Continental, often offer comparable quality and durability, sometimes at a lower price point. Using quality OEM or reputable aftermarket belts can extend component life significantly, providing a reliable outcome. Avoid generic, no-name belts, as their material composition and construction may not meet the demands of your Civic’s engine.
Inspecting and Replacing Pulleys and Tensioners
It’s a best practice to inspect and, if necessary, replace idler and tensioner pulleys concurrently with the belt. Worn bearings in these components can cause premature belt wear, contribute to noise, or even seize, leading to catastrophic belt failure. When the belt is off, manually spin each pulley and check for any rough rotation, excessive play, or grinding noises. A smooth, silent spin indicates a healthy bearing. The tensioner itself should also be evaluated for proper spring tension and damper function.
Addressing Fluid Leaks
Fluid leaks (oil, coolant, power steering fluid, if applicable to older systems) are detrimental to belt longevity. Automotive fluids can degrade the rubber compounds of the belt, causing it to soften, swell, or glaze, significantly reducing its lifespan. Promptly addressing any leaks, no matter how minor, is essential to prevent belt contamination and damage. The lifespan of a serpentine belt can be reduced by as much as 30% if exposed to automotive fluids like oil or coolant.
Professional Diagnostic Services
For persistent belt noise or performance issues that go beyond a simple belt replacement, it’s advisable to seek professional diagnostic services. Underlying accessory component failures (e.g., a failing alternator bearing or A/C compressor clutch) may be present, which a new belt alone cannot resolve. A trusted automotive professional can accurately diagnose these complex issues, ensuring a complete and lasting repair. Regular, professional maintenance checks are proven to reduce unexpected vehicle breakdowns by up to 25%.
By adhering to these maintenance practices, you’re not just prolonging the life of a single component; you’re contributing to the overall quality and longevity of your 2012 Honda Civic, securing its reliable performance for years to come.
Conclusion
This comprehensive guide underscores the critical role of the serpentine belt in your 2012 Honda Civic, driving essential accessory functions like the alternator, A/C compressor, and water pump. Accurate diagram interpretation and regular visual and auditory inspections are not just recommended; they are key to preventative maintenance, enabling early diagnosis of wear or failure. Proper replacement procedures, meticulously following the diagram and concurrently inspecting associated pulleys and tensioners, are vital for ensuring system longevity and vehicle reliability. Neglecting this crucial component can lead to immediate accessory failure and potential engine damage.
Regularly inspect your 2012 Honda Civic’s serpentine belt and associated components. For any uncertainty regarding diagnosis or replacement, or if you encounter persistent issues, consult a certified automotive professional. Investing in expert service ensures a reliable and quality repair, keeping your Civic performing optimally on the road.
Frequently Asked Questions
How often should the serpentine belt on a 2012 Honda Civic be replaced?
For optimal reliability, the serpentine belt on a 2012 Honda Civic should typically be inspected every 15,000 to 30,000 miles and replaced every 50,000 to 100,000 miles, or sooner if visual inspection reveals significant cracks, fraying, or glazing. Always refer to your Civic’s owner’s manual for precise manufacturer recommendations, ensuring a quality maintenance schedule.
What are the warning signs of a failing serpentine belt?
Key warning signs include loud squealing or chirping noises, especially during cold starts or when turning the steering wheel. Visual cues like visible cracks, fraying, or a shiny, glazed appearance on the belt’s surface also indicate wear. Loss of power steering, diminished air conditioning, or a battery warning light can signal a complete belt failure.
Can I drive my 2012 Honda Civic with a broken serpentine belt?
Driving a 2012 Honda Civic with a broken serpentine belt is highly unadvisable. Without the belt, critical components like the alternator, power steering pump (if applicable), and water pump cease to function. This can quickly lead to a dead battery, loss of steering control, and severe engine overheating, potentially causing extensive and costly damage.
Is it difficult to replace the serpentine belt on a 2012 Honda Civic myself?
Replacing the serpentine belt on a 2012 Honda Civic is a moderately challenging DIY task. It requires specific tools, careful adherence to the belt diagram, and a basic understanding of mechanical processes. While achievable for those with some experience, proper safety precautions and torque specifications are crucial. If unsure, seeking professional assistance is a trusted choice.
What tools are needed for a 2012 Honda Civic serpentine belt replacement?
For a 2012 Honda Civic serpentine belt replacement, you will typically need a 1/2-inch drive ratchet with a long handle or a serpentine belt tensioner tool, along with a 14mm or 19mm socket (depending on the engine variant and tensioner design). Eye protection and work gloves are also essential safety gear for this professional-level task.