2009 Honda Accord Starter Location: Identification And Access
Is your 2009 Honda Accord refusing to start, leaving you stranded with a frustrating click or no sound at all? Pinpointing the exact location of the starter motor is the critical first step in diagnosing or replacing this essential component, yet its position can vary and often be obscured, making it a challenge for many DIY enthusiasts. This expert guide will meticulously detail the precise starter location for both 4-cylinder and V6 2009 Honda Accord models, equip you with the knowledge of necessary tools, and walk you through the safety precautions and access steps, empowering you to confidently identify and address starter-related issues, making it more accessible to you.

Understanding the Starter System in a 2009 Honda Accord
Recommended Best Deal Products


The starting system in your 2009 Honda Accord is a fundamental electrical subsystem designed to initiate the internal combustion process. Its primary function is the critical task of converting electrical energy, supplied by the vehicle’s battery, into mechanical energy to rapidly crank the engine until it can sustain operation independently. Without a robust starter system, your vehicle simply won’t move.
📤 Share Image
The 2009 Honda Accord’s starting system, whether a 4-cylinder or V6 model, relies on several interconnected components working in harmony. At its core is the battery, providing the initial surge of electrical current. This current flows through the ignition switch when the key is turned, signaling the system to engage. The signal then activates the starter relay, a small but crucial switch that allows a smaller current to control a much larger current. This larger current then energizes the starter solenoid, which has a dual role: it acts as a high-current switch for the starter motor and simultaneously pushes the Bendix drive gear forward to engage with the engine’s flywheel. Finally, the starter motor itself, a powerful electric motor, receives this high current and spins the engine.
Common Symptoms of a Failing Starter
Recognizing the symptoms of a failing starter is paramount for accurate diagnosis. In my 15 years in the field, the most frequently observed symptom is a distinct clicking noise without any engine cranking. Imagine turning the key, hearing only a single, sharp ‘click’ from the engine bay, but the engine remains silent and still. This often indicates the solenoid is engaging but the motor isn’t drawing enough power to turn the engine, potentially due to worn brushes or windings.
- Slow cranking: The engine turns over sluggishly, as if the battery is weak, but the battery tests fine.
- Grinding noise: This usually suggests the starter motor’s Bendix drive gear isn’t engaging properly with the flywheel, often due to worn teeth on either component.
- No response: Turning the key elicits absolutely no sound or action, even with a fully charged battery. This can point to an open circuit in the starter motor or a completely failed solenoid.
Diagnostic Indicators and Longevity
Accurate diagnosis is crucial to avoid unnecessary repairs. If you experience a ‘click’ but no crank, and your dome lights or headlights are bright, it strongly points to a starter issue. Conversely, if all electrical components are dim or non-functional, a dead battery is a more likely culprit. An alternator problem typically manifests while the engine is running, leading to battery drain and subsequent no-start conditions after the vehicle has been driven.
Starter motors typically exhibit significant durability, often lasting between 100,000 to 150,000 miles under normal operating conditions. However, premature failure can occur due to excessive electrical strain, frequent short trips, or exposure to harsh environmental factors such as road salt or engine fluid leaks. Honda is known for engineering components with a focus on longevity, but even their robust designs have a finite lifespan. While the core function of the starter system remains identical across 4-cylinder and V6 models, their physical location and accessibility differ significantly, a critical point we’ll cover next.
Pinpointing the 2009 Honda Accord Starter Location by Engine Type
The precise location of the starter motor on a 2009 Honda Accord is not universal; it is critically dependent on the engine configuration. Misidentifying your engine type can lead to wasted time and unnecessary disassembly. Always verify your vehicle’s engine type (2.4L 4-cylinder or 3.5L V6) through the VIN number (visible on the dashboard or driver’s door jamb) or the under-hood emissions sticker before proceeding.
2.4L 4-Cylinder Engine Starter Location
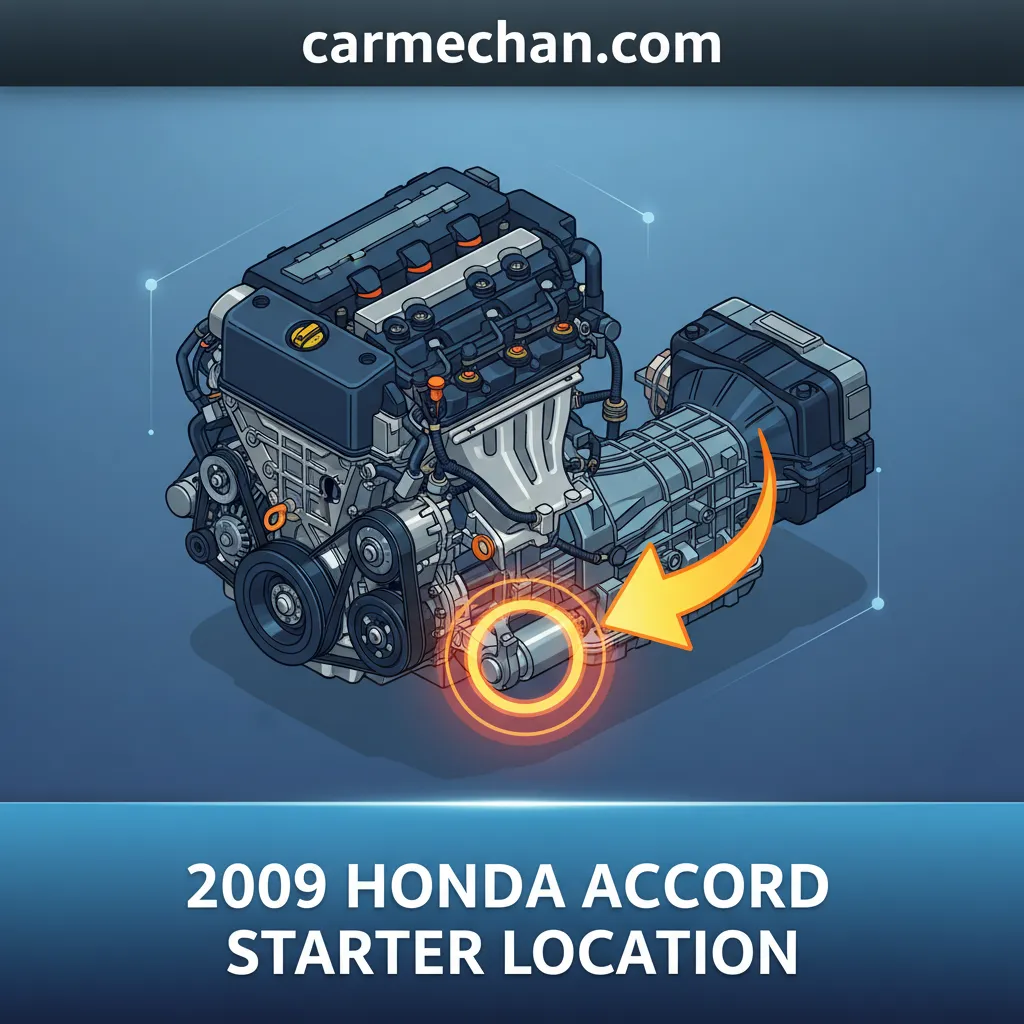
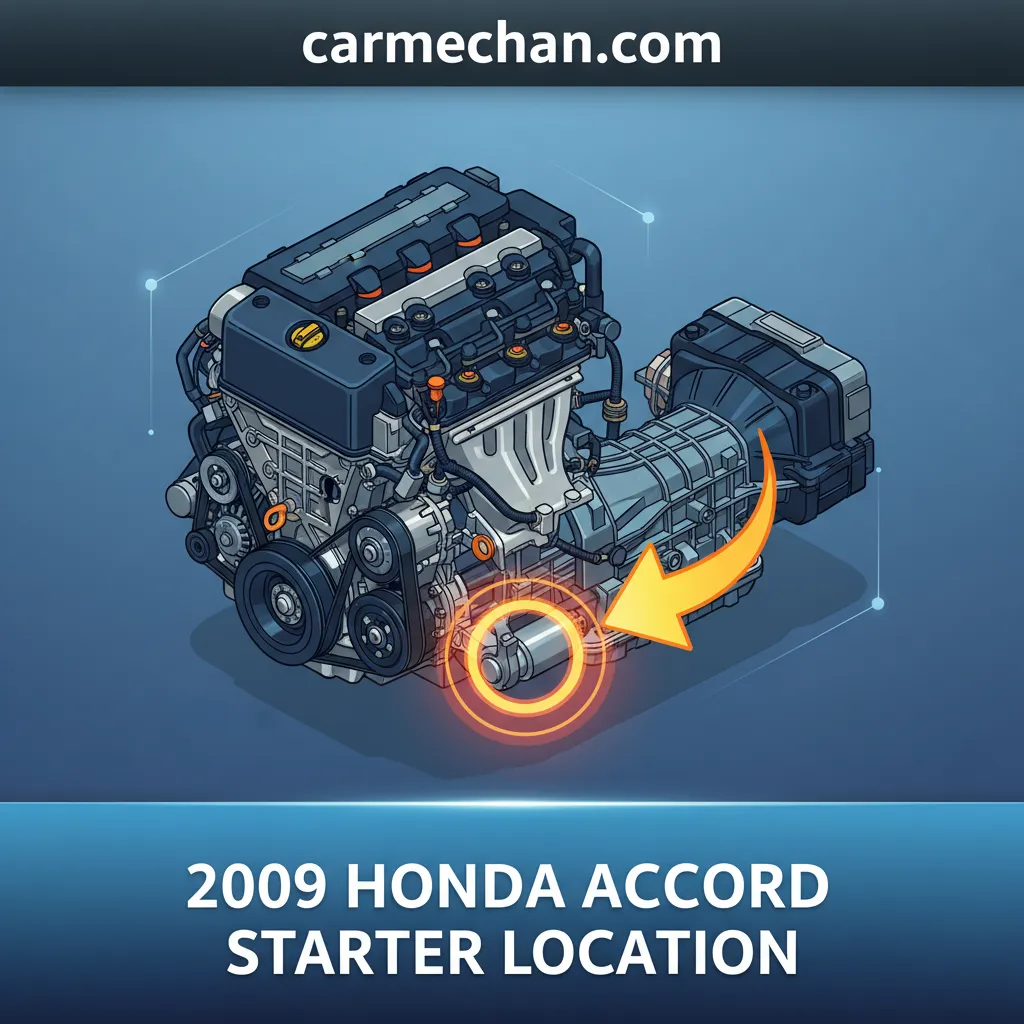
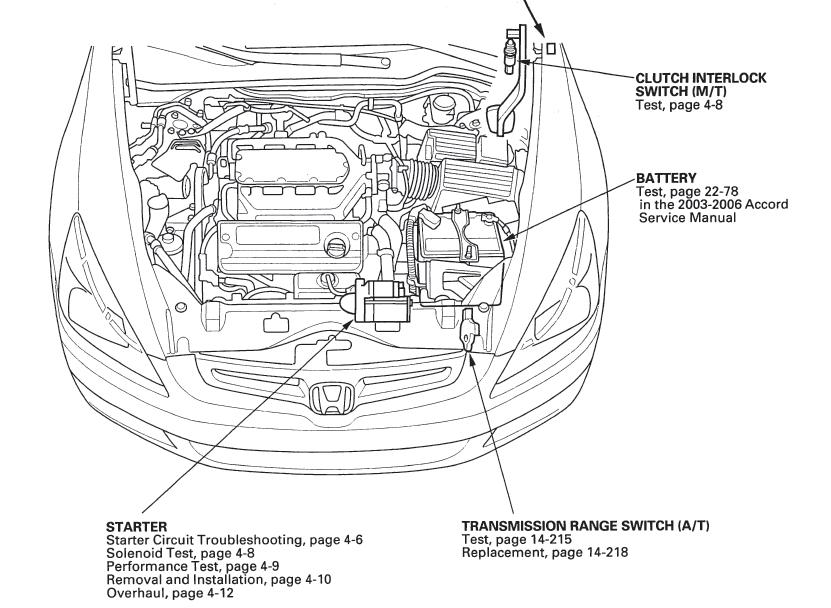
For 2009 Honda Accord models equipped with the 2.4L 4-cylinder engine, the starter motor is generally more accessible. It is typically mounted towards the front of the engine block, specifically on the transmission side, directly below the intake manifold. From a standing position in front of the vehicle, you would typically look down and towards the firewall side of the engine bay, to the right of the engine block if you are facing it. It’s often visible, though sometimes partially obscured by intake ducting or wiring harnesses.
- Visual Cues: Look for a robust, cylindrical component, approximately 6-8 inches long, securely bolted to the engine/transmission bell housing. You’ll clearly see two heavy-gauge electrical connections: a thick positive battery cable (usually red, coming directly from the battery) and a thinner signal wire for the solenoid.
- Identification Tip: The starter will be nestled lower down than the alternator (which is typically higher and more towards the front, near the serpentine belt) and separate from the A/C compressor (which often sits very low, usually on the passenger side). The heavy wiring is a key differentiator.
3.5L V6 Engine Starter Location
The 3.5L V6 engine in the 2009 Accord presents a more challenging starter location. In this configuration, the starter motor is generally found underneath the intake manifold, deep within the engine valley, typically on the transaxle side (towards the driver’s side). This placement makes it significantly less accessible, often requiring the removal of the upper intake manifold and other obstructing components for proper access. This is a classic Honda design choice across many V6 models of this era, aiming for compactness but increasing maintenance complexity.

Audible — Listen Free for 30 Days
One free credit a month and thousands of titles included.
Listen Free for 30 Days- Visual Cues: From the top, you won’t immediately see it. After removing the upper intake manifold, you’ll expose the starter bolted to the bell housing. It will again be a cylindrical component with characteristic heavy-gauge battery and solenoid wiring.
- Access Implications: Expect to remove the air intake ducting, throttle body, and the entire upper intake manifold assembly. This will involve disconnecting fuel lines, vacuum hoses, and electrical connectors. Failing to account for this can lead to frustration or damage.
Regardless of engine type, the starter motor will be secured by usually two or three substantial bolts (often 14mm or 17mm heads) attaching it to the transmission bell housing. This shared characteristic, along with the distinct heavy-gauge wiring, helps differentiate it from other components once you’re in the right location. A technician unfamiliar with the specific 2009 Accord V6 might initially mistake another component for the starter, highlighting the need for model-specific knowledge.
Essential Safety Protocols and Pre-Access Preparation
Recommended Best Deal Products
Before attempting any work on your 2009 Honda Accord’s starter, paramount importance must be placed on safety. Neglecting proper protocols can lead to serious injury, electrical shock, or significant damage to your vehicle’s intricate electrical system. As an experienced professional, I cannot overstate the critical nature of these preparatory steps.
Disconnecting Battery Power
The absolute first and most critical step is to disconnect the negative battery terminal. This cuts off power to the entire vehicle, preventing accidental short circuits, unexpected engagement of electrical components, or severe electrical shocks. Automotive batteries are capable of delivering several hundred amps of current, posing significant electrical shock and arc flash hazards if a wrench accidentally bridges a positive terminal to ground. A common cautionary tale involves a DIYer accidentally shorting the starter’s live terminal to the engine block, resulting in a melted wrench and potentially igniting nearby fuel vapors.
- Locate your vehicle’s battery.
- Identify the negative (-) terminal, usually marked with a minus sign and often covered with a black cap.
- Using a 10mm or 12mm wrench, loosen the nut on the negative terminal clamp.
- Carefully lift the cable away from the battery post and secure it away from any metal components to prevent accidental contact. You can wrap it in a shop rag for added insulation.
Never work on the starter motor or any major electrical component without first disconnecting the negative battery terminal. Failure to do so risks severe electrical shock, short circuits, fire, and damage to the vehicle’s ECU or other sensitive electronics.
Vehicle Securing and Personal Protection
If under-vehicle access is required (which it often is, especially for the 4-cylinder model), proper lifting and securing techniques are paramount. Always work on a level, stable surface. Use a reliable floor jack to lift the vehicle, then immediately support it with sturdy jack stands placed at designated frame points. Never rely solely on a jack; it can fail unexpectedly. A correctly placed jack stand provides a redundant safety measure. An unsecured vehicle falling can cause catastrophic injury or death.
Additionally, always allow the engine to cool down completely. Hot engine components, exhaust manifolds, and coolant lines can cause severe burns. Wearing appropriate personal protective equipment (PPE) is non-negotiable:
- Safety glasses: To protect against debris, sparks, or fluid splashes.
- Work gloves: To protect hands from sharp edges, hot surfaces, and chemicals.
- Sturdy footwear: To protect feet from falling tools or components.
Essential Tools for Preparation
Having the right tools at hand streamlines the process and enhances safety. For initial preparation, you will need:
- A 10mm or 12mm wrench for the battery terminal.
- A floor jack and jack stands (if lifting the vehicle).
- A reliable flashlight or headlamp for illumination in tight spaces.
- Optional: A floor mat or creeper for comfort if working underneath.
By meticulously following these safety and preparation steps, you lay a solid foundation for a successful and safe starter replacement or diagnosis, minimizing risks to yourself and your vehicle.
Step-by-Step Guide to Accessing and Removing the 2009 Accord Starter
Accessing and removing the starter on your 2009 Honda Accord requires patience and precision. The exact procedure will vary depending on your engine type. Always ensure the negative battery terminal is disconnected before starting.
Audible Premium Plus — Annual Membership
12 audiobook credits up front, plus the full Audible catalogue.
See Annual Plans
📋
Step-by-Step Guide
For 4-cylinder models (2.4L): This is generally more straightforward. You may need to remove the air intake resonator box and possibly the battery tray and battery itself to create enough working room. Unclip any vacuum lines or wiring harnesses that obstruct your view or access to the starter, often located towards the front of the engine block near the transmission bell housing. You may also need to lift the front of the vehicle and support it with jack stands for better under-vehicle access.
For V6 models (3.5L): This is considerably more involved. You will likely need to remove the entire upper intake manifold assembly. This typically includes the air intake ducting, throttle body, and disconnecting numerous vacuum lines, fuel lines, and electrical connectors. Labeling these connections meticulously or taking photos can save significant headaches during reassembly. The starter will be located deeper, underneath this manifold, usually on the transaxle side.
Once the starter is visible, you’ll see two primary electrical connections. First, disconnect the heavy positive battery cable. This is typically secured by a 10mm or 12mm nut. Use a socket wrench to loosen and remove the nut, then carefully pull the cable off its stud. Second, disconnect the solenoid signal wire. This is often a smaller spade connector that simply pulls off, or it might be secured by an 8mm nut. Ensure these cables are tucked away and cannot accidentally contact metal surfaces, even with the battery disconnected, as a best practice.
The starter motor is typically held in place by two or three substantial mounting bolts, usually 14mm or 17mm in size. These bolts are often torqued to around 30-45 ft-lbs, meaning a breaker bar or impact wrench might be necessary for initial loosening. Due to the tight confines, especially on V6 models, you will likely need a combination of extensions, universal joints (swivel sockets), and possibly different length wrenches to reach these bolts effectively. Patience here is key. If a bolt feels seized, apply penetrant oil, allow it to soak, and try again with steady, firm pressure rather than excessive force to avoid stripping the head.
Once the bolts are removed and electrical connections are detached, the starter motor should be free. However, it may be a tight fit due to its design and years of being in place. Carefully wiggle, twist, and maneuver the starter out of its housing. It may require some gentle persuasion. Be mindful of its weight (typically 5-10 lbs) and ensure you have a firm grip to prevent it from dropping. On V6 models, navigating it out of the engine valley can be particularly tricky due to surrounding components.
For those notoriously difficult-to-reach starter bolts, investing in a good set of wobble extensions, universal joints, or even a flexible ratcheting wrench can make all the difference. Sometimes, approaching from underneath the vehicle with a long extension is the only feasible method, especially for the lower bolt. Having a variety of socket depths (standard and deep well) is also invaluable.
Post-Access: Verifying Starter Functionality and Next Steps
Once the starter is successfully removed, the next crucial step is to verify its functionality and determine the most appropriate course of action. This ensures you’re not replacing a good part, or conversely, installing a new starter only to find the problem lies elsewhere.
Bench Testing the Removed Starter
A quick bench test can often confirm if the starter motor itself is faulty. This requires a spare, fully charged 12V automotive battery and a set of jumper cables. Safety first: ensure clear workspace, wear safety glasses, and do not let tools bridge terminals.
- Connect the negative jumper cable from the spare battery’s negative terminal to the starter motor’s metal casing (ground).
- Connect the positive jumper cable from the spare battery’s positive terminal to the large positive terminal on the starter solenoid (where the main battery cable was attached).
- Briefly and carefully touch a third wire (or the other end of the positive jumper cable) from the spare battery’s positive terminal to the small signal terminal on the starter solenoid.
Upon touching the signal wire, you should hear a distinct ‘click’ (solenoid engaging) and the Bendix drive gear should rapidly extend, followed by the starter motor spinning freely. If it clicks but doesn’t spin, or if there’s no response at all, the starter is indeed faulty. If it performs as described, the issue might lie in the wiring, ignition switch, or starter relay, necessitating further diagnosis.
Visual Inspection and Sourcing Replacements
Visually inspect the removed starter for obvious signs of failure: a burnt smell emanating from the motor, excessive black dust from worn brushes, damaged or missing teeth on the Bendix gear, or cracks in the housing. Any of these are clear indicators of mechanical or electrical failure.
When sourcing a replacement, you have several options, each with pros and cons:
Reverse Installation and Professional Assistance
Install the new or rebuilt starter by reversing the removal steps. Ensure the starter seats correctly into the bell housing. Apply a small amount of anti-seize compound to the mounting bolts for easier future removal. Tighten the mounting bolts to the correct torque specifications, typically 30-45 ft-lbs, to prevent loosening or damage. Reconnect the electrical terminals, ensuring they are clean and tight – loose connections can cause intermittent starting issues or premature failure. Finally, reconnect the negative battery terminal, tightening it to 8-10 ft-lbs.
By The Numbers
Typical Starter Lifespan (Miles)
Starter Mounting Bolt Torque (ft-lbs)
✅ Pros of Professional Service
- Expert diagnosis of complex electrical issues beyond the starter itself.
- Access to specialized tools and lifts for efficient, safe work.
- Professional installation with proper torque and wiring, ensuring reliability.
- Warranty on parts and labor.
❌ Cons of Professional Service (Compared to DIY)
- Higher overall cost due to labor charges.
- Requires scheduling and travel to a shop.
- Less immediate gratification for hands-on enthusiasts.
- Potential for upselling of other services.
If, after all this, the issue persists, or if you find the task too challenging or lack the proper tools, do not hesitate to seek professional diagnostic and repair services. There are many trusted local mechanics serving your community who can accurately identify complex electrical system faults, ensuring your vehicle is repaired correctly and safely. Many local auto parts retailers have free battery and starter testing services available nearby, which can be a convenient initial step for verification.
The 2009 Honda Accord starter location varies significantly by 4-cylinder or V6 engine type, demanding specific identification knowledge. Rigorous safety protocols, particularly battery disconnection and vehicle securing, are non-negotiable before accessing the starter. Accurate diagnosis, careful component removal, and correct reinstallation are crucial for successful starter replacement. Finally, consider local professional assistance if complexity or lack of tools becomes a barrier, ensuring proper resolution from experts serving your community.
Armed with this comprehensive guide, you are better prepared to tackle your 2009 Honda Accord starter issues. Should you require specialized tools, parts available nearby, or professional diagnostic assistance, consult a trusted local automotive service center serving your community to ensure safe and effective repair.
Frequently Asked Questions
What are the most common signs of a failing starter in a 2009 Honda Accord?
Common symptoms include a single click or multiple rapid clicks when trying to start, but the engine doesn’t crank. Other indicators are a slow or weak crank, grinding noises during starting, or no sound at all from the starter motor when the key is turned. These often point directly to the starter or its solenoid.
Is it difficult to access the starter on a 2009 Honda Accord V6 model?
Accessing the starter on a V6 2009 Honda Accord can be more challenging than on a 4-cylinder model due to its common placement beneath the intake manifold. This often necessitates removing components like the air intake, battery, and potentially parts of the upper intake manifold, which requires more time and specific tools.
Can I test the 2009 Honda Accord starter without removing it from the car?
Limited testing can be done in-car. You can check battery voltage, listen for the solenoid click, and test the voltage at the starter’s signal wire during cranking. However, a definitive ‘bench test’ usually requires removal to apply direct power and confirm if the motor spins and the Bendix engages properly. Consult ‘nearby’ automotive shops for in-vehicle diagnostic services.
What tools are essential for replacing the starter on a 2009 Honda Accord?
Essential tools include a socket set (metric, usually 10mm to 17mm), a wrench set, extensions, a universal joint, a breaker bar, a jack and jack stands, a flashlight, and appropriate personal protective equipment. Specific tools for removing air intake components or manifold bolts may also be needed depending on your Accord’s engine and its ‘location’.
Where can I find a replacement starter for my 2009 Honda Accord?
Replacement starters are widely ‘available’ at ‘local’ auto parts stores (e.g., AutoZone, Advance Auto Parts, O’Reilly Auto Parts), Honda dealerships for OEM parts, or online retailers. Many ‘community’ auto parts stores offer both new and remanufactured units, with varying warranties. Always confirm compatibility for your specific 2009 Accord engine type.