Proper Way to Jump a Car Step-by-Step Guide for 2026
The proper way to jump a car involves a critical sequence of actions to safely transfer electrical power from a healthy battery to a dead one. Failing to follow the correct procedure can lead to battery damage, vehicle electrical system issues, or even serious personal injury.
Understanding proper cable connection order, essential safety precautions like wearing gloves and eye protection, and verifying vehicle compatibility are crucial steps. Here is what you need to know about the proper way to jump a car.

Prime for Young Adults — 6 Months Free
Students and 18–24s get six months of Prime free, then half price.
Start 6 Months Free7 Essential Safety Tips For Jump Starting A Car
Recommended Best Deal Products



- Always prioritize safety with gloves and eye protection.
- Connect red to positive, black to negative in sequence.
- Ensure vehicles are off before connecting cables.
- Allow battery to charge for several minutes.
- Disconnect cables in reverse order for safety.
What Essential Gear Do You Need
Having the correct equipment makes all the difference when executing the proper way to jump a car. Quality gear not only ensures efficiency but also significantly boosts safety.
High-Quality Jumper Cables
Your jumper cables are the primary tool. Look for a heavy gauge, typically 6 or 8 gauge, as these can handle more current and are less prone to overheating. Thicker cables, such as 4-gauge, are even better for larger vehicles or colder climates. They should also be long enough, ideally 16 to 20 feet, to connect two cars comfortably without repositioning them too closely.
For standard passenger vehicles, a minimum of 6-gauge copper cables is recommended for optimal current transfer, safely delivering the high amperage required to jump-start most dead batteries .
Personal Safety Equipment
Safety is paramount during any auto repair. Always wear heavy-duty work gloves to protect your hands from heat, sparks, and battery acid. Eye protection, such as safety glasses or goggles, is also crucial to shield your eyes from potential splashes or sparks.
Reliable Donor Vehicle
The donor vehicle must have a fully charged 12-volt battery and be of comparable voltage to the dead vehicle. For most modern cars, this is straightforward. Ensure the donor car is in good working order and has enough power to spare without draining its own battery excessively. A strong battery in the donor car makes the jump-starting process more efficient.
With your essential gear ready, the next step involves preparing both vehicles for the jump-starting process.
How to Prepare Both Vehicles in 3 Steps
Recommended Best Deal Products


Proper vehicle preparation is a crucial part of the proper way to jump a car, ensuring safety and efficiency. Taking a few moments to set up correctly can prevent frustration and potential damage.
Positioning Vehicles Correctly
First, position the donor vehicle close enough to the disabled car so the jumper cables can easily reach both batteries. Ideally, park the donor vehicle nose-to-nose or side-by-side. Ensure both vehicles are on a level surface, and engage the parking brakes on both. Turn off both vehicles’ engines and remove the keys from the ignition of the dead car.

Audible — Listen Free for 30 Days
One free credit a month and thousands of titles included.
Listen Free for 30 DaysThis prevents accidental starting or electrical surges.
Shutting Off All Electronics
Before connecting anything, turn off all electrical accessories in both vehicles. This includes headlights, interior lights, radio, air conditioning, and even automatic wipers. These components can draw power, making it harder for the dead battery to receive a charge and potentially causing damage during the jump-start.
Performing Quick Safety Checks
Visually inspect the dead battery for any signs of damage. Look for cracks, leaks, or corrosion around the terminals. If the battery appears swollen, is leaking fluid, or has a strong sulfur smell, do not attempt to jump-start it. This could indicate a severely damaged battery that is a fire or explosion risk.
Also, ensure the battery terminals are clean and free of excessive corrosion for the best connection.
Once both vehicles are optimally prepared, you are ready to proceed with connecting the jumper cables carefully. With both vehicles correctly prepared, the next step involves safely connecting the jumper cables.
7 Steps for Connecting Jumper Cables Safely
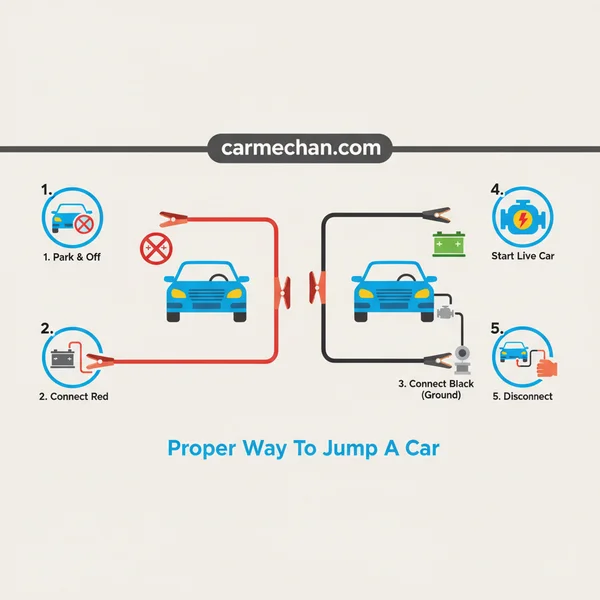
Connecting jumper cables in the correct order is central to the proper way to jump a car and prevents potential hazards. Each step must be followed precisely.
1. Connect Red to Dead Positive
Take one of the red (positive) clamps and securely attach it to the positive (+) terminal of the dead battery. This terminal is usually larger and marked with a plus sign. Ensure the clamp has a firm, metal-to-metal connection.
2. Connect Red to Donor Positive
Take the other end of the red (positive) cable and attach that clamp to the positive (+) terminal of the donor vehicle’s battery. Again, confirm a solid connection to prevent arcing or poor power transfer.
3. Connect Black to Donor Negative
Now, take one of the black (negative) clamps and connect it to the negative (-) terminal of the donor vehicle’s battery. This terminal is typically smaller and marked with a minus sign.
Audible Premium Plus — Annual Membership
12 audiobook credits up front, plus the full Audible catalogue.
See Annual Plans4. Connect Black to Engine Ground
This is a critical safety step. Connect the remaining black (negative) clamp to an unpainted, heavy metal part of the dead car’s engine block or frame. Choose a spot away from the battery, moving parts, and fuel lines. This creates a ground connection and minimizes the risk of sparks near the battery, which could ignite hydrogen gas.
5. Allow Brief Charging Time
Once all cables are securely connected, allow the donor vehicle to run for five to ten minutes. This gives the dead battery a preliminary charge. Running the donor car at a slightly increased RPM can sometimes help deliver more power.
6. Attempt Starting the Car
After the brief charging period, attempt to start the dead vehicle. If it does not start immediately, give it a few more minutes to charge, then try again. Avoid cranking for more than 5-10 seconds at a time to prevent overheating the starter motor.
7. Check for Engine Function
If the car starts, let it run for a few minutes while the cables are still connected. This further stabilizes the battery charge. Check for any warning lights or unusual noises. If everything seems normal, you are ready for the next phase: disconnecting the cables.
After successfully connecting the cables, the next phase involves starting your vehicle and then safely disconnecting the power source.
How to Start Your Vehicle After Jumping
Once cables are connected, knowing how to start your vehicle after jumping and then disconnect them properly completes the proper way to jump a car. This final sequence ensures a successful outcome.
Starting the Engine Successfully
After the donor vehicle has charged the dead battery for several minutes, try starting the dead car. If it cranks slowly but eventually starts, great. If it only clicks or does not crank, double-check all cable connections. If they are secure, give it a few more minutes of charging before attempting again.
If after several attempts it still won’t start, there may be a deeper electrical issue or the battery is beyond saving by a simple jump.
Removing Cables in Reverse
Once the disabled car is running, it’s time to remove the cables in the exact reverse order of connection to prevent dangerous sparks or short circuits:
- Disconnect the black cable from the engine block/frame of the now-running car.
- Disconnect the black cable from the negative terminal of the donor car.
- Disconnect the red cable from the positive terminal of the donor car.
- Finally, disconnect the red cable from the positive terminal of the now-running car.
Be careful not to let the clamps touch each other or any metal surfaces on the vehicles while disconnecting.
Running the Car Afterwards
Once the cables are removed, keep the newly started car running. Drive it for at least 20 to 30 minutes, or longer, to allow the alternator to sufficiently recharge the battery. Avoiding short trips immediately after a jump start is crucial. Automotive experts recommend driving for at least 30 to 60 minutes at consistent highway speeds for a substantial battery recharge (https://carxplorer.com/how-long-to-drive-car-after-jump-start/).
This duration allows the alternator to effectively replenish the battery. This extended drive helps ensure the battery has enough charge to start the car again on its own. If the car dies shortly after, or fails to start again soon, the battery may need replacement, or there could be an issue with the charging system.
While jumping a car is often straightforward, specific situations call for alternative solutions or professional help rather than attempting a jump. While most jump starts succeed, certain situations make it unsafe to proceed.
When Should You Not Jump a Car
Sometimes, the proper way to jump a car is to recognize when a jump start is not the right solution or could even be dangerous. Knowing these limits can prevent further damage or injury.
Visible Battery Damage Signs
Never attempt to jump-start a battery that shows signs of physical damage. This includes a cracked or leaking battery casing, a bulging battery, or corrosion that appears excessive or unusual. These indicators suggest internal damage that could lead to an explosion or leakage of corrosive acid during a jump, posing severe risks.
A strong, rotten-egg smell also signifies a damaged battery that should not be jump-started.
Persistent Electrical Problems
If your car has a history of electrical issues beyond just a dead battery, a jump start might only be a temporary fix or could exacerbate the problem. For instance, if the starter clicks repeatedly or there’s a strong burning smell from under the hood, these could indicate problems with the starter motor, alternator, or a significant short circuit.
Attempting a jump in such cases might overload the system or cause more expensive damage to electrical components in either vehicle.
Unfamiliar Vehicle Types
Certain modern vehicles, especially hybrids or electric cars, have complex electrical systems that are not designed for traditional jump-starting. Some vehicles may also have specific jump-starting points that are not the main battery terminals, or they might require a professional power source. Always consult your vehicle’s owner’s manual before attempting to jump-start an unfamiliar make or model.
For vehicles where the car battery is located outside the engine compartment, designated jump-start terminals are often present under the hood. In such cases, or if you are uncertain, always consult your owner’s manual for the correct jump-start procedure (https://www.cartalk.com/sites/default/files/features/jumpstart/images/jumpstart.pdf). Failing to do so could lead to costly repairs or damage to sensitive electronics.
Understanding these critical distinctions ensures your safety and prevents further vehicle damage. Assuming a safe and successful jump start, there are still crucial steps to follow afterward.
What to Do After Your Successful Jump Start
Successfully jumping a car is a rewarding skill that gives you confidence on the road. the proper way to jump a car always emphasizes safety, correct equipment, and a precise sequence of actions. Ensuring you have high-quality cables and wear protective gear protects you from potential hazards.
Following the steps for connecting and disconnecting cables in the right order safeguards both vehicles from electrical damage.
Equally important is knowing when not to attempt a jump. Recognizing signs of battery damage or deeper electrical issues can save you from dangerous situations and costly repairs. When in doubt, seeking professional assistance is always the wisest course of action. This knowledge empowers you to handle battery issues effectively for your car in 2026, keeping you safe and mobile.
To prevent future breakdowns, understanding optimal battery health and replacement is key.
5 Common Questions About Jumping a Car
What Is the Proper Way to Connect Jumper Cables?
The proper connection sequence is: red cable to positive (+) terminal of dead battery, then red to positive (+) terminal of donor battery. Next, black cable to negative (-) terminal of donor battery, and finally, black to an unpainted metal surface on the dead car’s engine block, away from the battery. This ensures a safe ground.
How Long Should I Wait After Connecting Jumper Cables?
After connecting the jumper cables, allow the donor car to run for five to ten minutes before attempting to start the dead vehicle. This duration provides enough time for the dead battery to receive a preliminary charge, increasing the chances of a successful start.
What Do I Do If My Car Won’t Start After a Jump?
If your car does not start after a jump attempt, first recheck all cable connections for looseness or corrosion. If connections are solid, the battery might be completely dead, or there could be a deeper issue with the starter or alternator. Seek professional vehicle diagnostics in this scenario.
Can Jumping a Car Damage the Other Car?
Improperly jumping a car can indeed damage either vehicle’s electrical system, including the alternator or sensitive electronic components. Incorrect cable polarity or a short circuit can cause costly repairs. Always follow the correct sequence and safety precautions meticulously to prevent harm.
How Long Should I Drive My Car After Jumping It?
After successfully jumping your car, drive it for at least 20 to 30 minutes, or longer if possible. This allows your alternator sufficient time to recharge the battery fully. Avoid making short trips immediately after a jump start.