2008 Honda Civic Starter Location: Identification And Access Guide
Experiencing a daunting ‘click’ instead of a roar from your 2008 Honda Civic’s engine? A malfunctioning starter motor is a common culprit behind a vehicle’s refusal to start, yet precisely locating this critical component in a 2008 Civic can be a significant challenge for owners and DIY enthusiasts alike due to its often obscured position. This expert guide will provide you with the definitive location of the 2008 Honda Civic starter motor, offer comprehensive steps for accessing it, and detail key diagnostic insights, empowering you to confidently address starting issues, whether through DIY or professional local service.
Understanding the 2008 Honda Civic Starting System Architecture
Recommended Best Deal Products


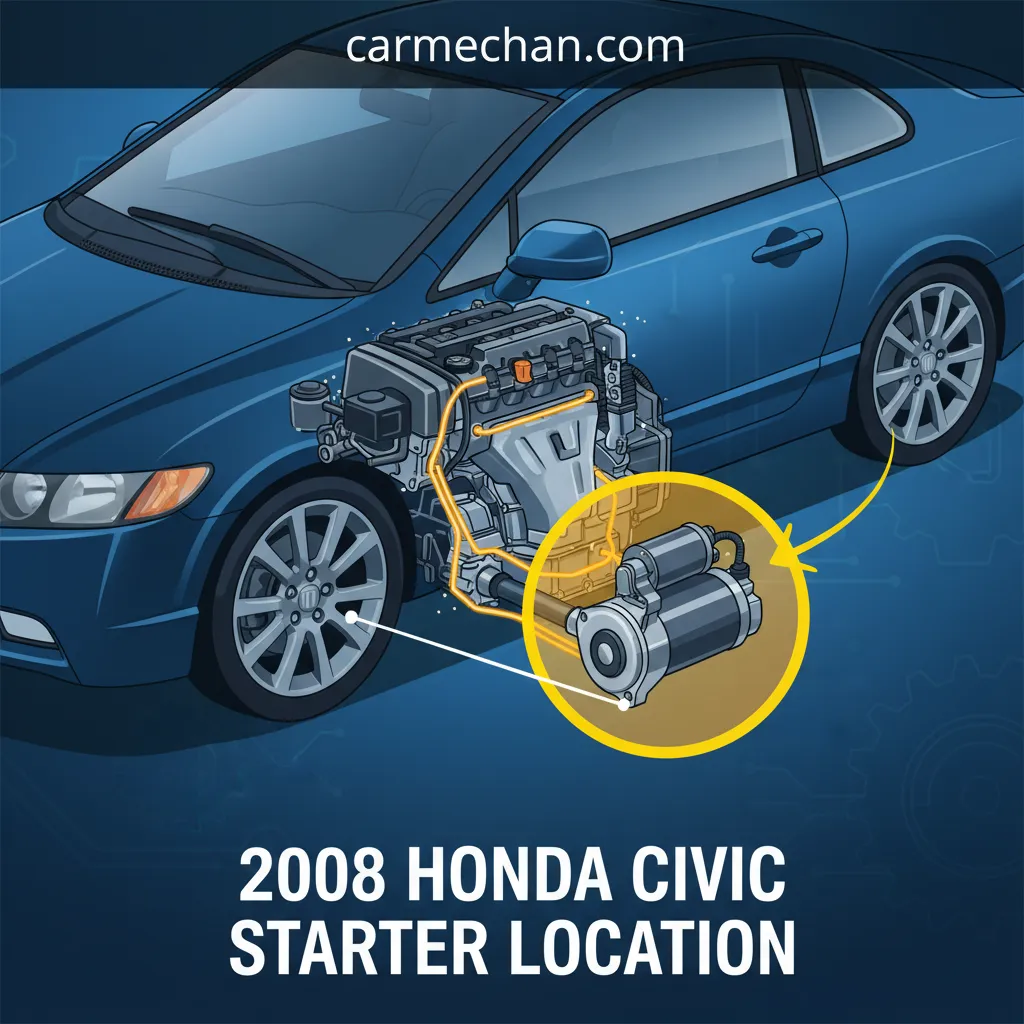
The intricate dance of components that brings your 2008 Honda Civic to life is orchestrated by its starting system. At its core, this system converts electrical energy into mechanical rotation to initiate the engine’s combustion cycle. Understanding this architecture is paramount for accurate diagnosis and successful repairs.
📤 Share Image
The essential components involved include the battery, which provides the initial electrical power; the ignition switch, which acts as the driver’s command input; the starter relay, a crucial intermediary switch; and finally, the starter motor itself, the powerhouse responsible for turning the engine. The starter motor engages with the engine’s flywheel (or flexplate in automatics), which is directly connected to the crankshaft, initiating its rotation.
Electrical Flow from Ignition to Cranking
When the ignition key is turned to the “START” position, a low-amperage signal travels from the ignition switch to the starter relay. This relay, typically located in the under-hood fuse/relay box, then closes a higher-amperage circuit, allowing a substantial flow of current directly from the battery to the starter motor’s solenoid. The solenoid serves a dual purpose: it pushes the starter’s Bendix gear forward to engage the flywheel and simultaneously closes a heavy-duty contact to supply full battery power to the starter motor windings. This surge of power causes the starter motor to spin, turning the flywheel and cranking the engine.
It’s crucial to differentiate between a failure of an auxiliary component, such as the starter relay, and a complete starter motor failure. For instance, a faulty relay might produce no click or only a faint one, failing to send power to the starter. A weak battery, conversely, might result in slow cranking, whereas a completely failed starter motor often produces a distinct “click-no-start” scenario without any engine rotation. The 2008 Honda Civic (8th generation) typically utilizes a 12-volt starting system, with the starter motor drawing significant amperage, often 200-300+ amps, during engine cranking. This substantial draw underscores the importance of a robust starting system for overall vehicle reliability and consistent operation.
A simplified schematic diagram illustrating the primary electrical path for the starter motor would show the battery -> fuse -> ignition switch -> starter relay -> starter motor -> ground connection. Understanding this circuit is fundamental before attempting any diagnosis or repair related to the starter motor’s location or function.

Pinpointing the 2008 Honda Civic Starter Motor: Precise Location by Engine Type
Accurately identifying the starter motor’s location is the first critical step in addressing any starting issues. In the 2008 Honda Civic, its placement is consistent across the most common engine variants, though specific access points and surrounding components may differ slightly.
R18A1 1.8L SOHC Engine (Most Common)
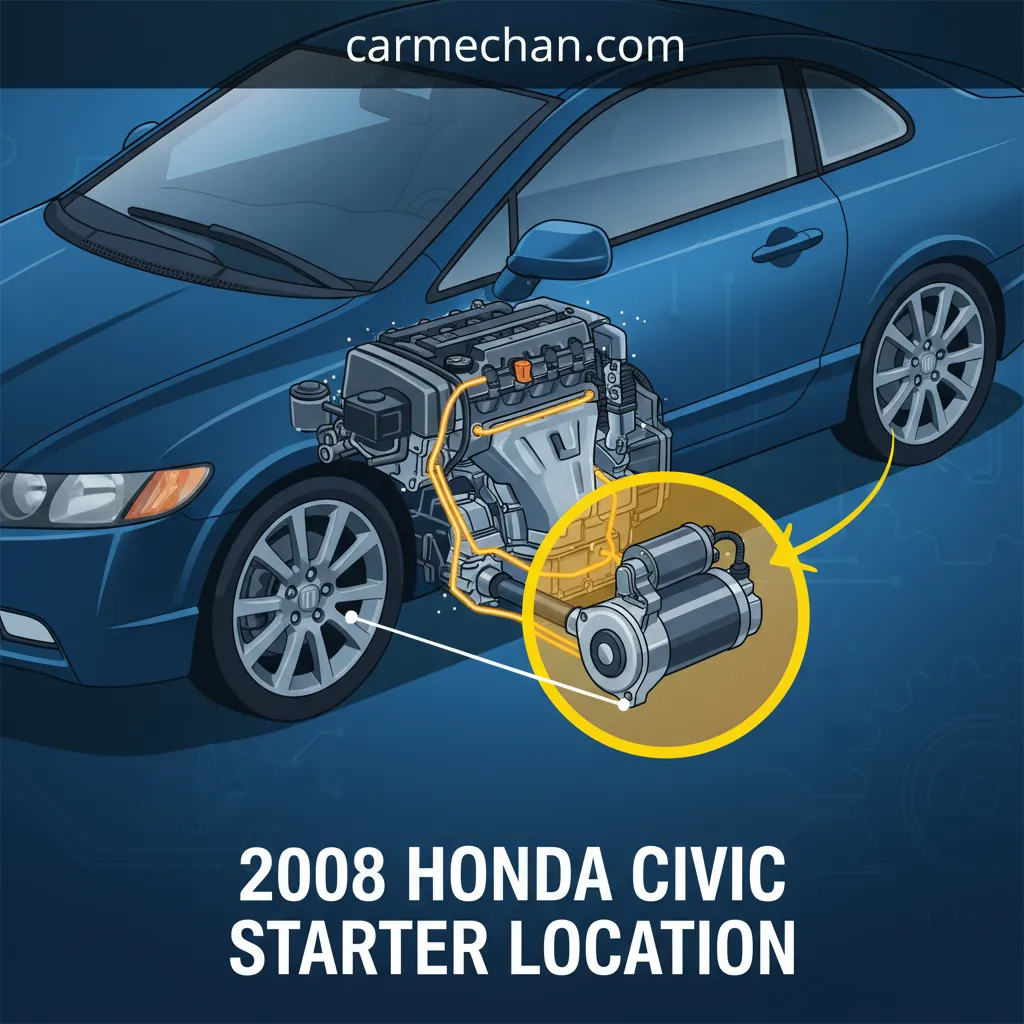
For the widely prevalent R18A1 1.8L SOHC engine, found in most DX, LX, EX, and VP models, the starter motor is located on the firewall side of the engine. It is mounted low on the transaxle housing, specifically integrated into the bellhousing where the engine and transmission meet. Crucially, it sits underneath the intake manifold. This position means it’s often obscured from a direct top-down view, necessitating examination from both above and below the vehicle.
K20Z2 2.0L DOHC Engine (Si Model)
For the performance-oriented K20Z2 2.0L DOHC engine found in the Civic Si models, the starter’s location principle remains the same. It is also situated on the firewall side, integrated with the transaxle assembly. While the general area is identical, access might be slightly different due to variations in the intake manifold design, exhaust heat shields, or other engine bay components specific to the K-series engine. Regardless, its robust cylindrical form, coupled with heavy gauge power cables, will be your primary visual identification cue.
Visual Confirmation and Accessibility
To confirm its presence, use a bright flashlight. From the top, look down behind the engine block towards the transmission. You may need to peer around various hoses and wiring looms. From the underside, after safely lifting and securing the vehicle, look up into the area where the engine meets the transmission. The starter will appear as a cylindrical, robust electrical component with a main thick battery cable (B+ terminal) and a smaller signal wire (S-terminal) attached to it. Specific visual landmarks nearby might include transmission lines, the subframe, or sections of the exhaust system. The starter motor on the 2008 Honda Civic is designed to engage with the flywheel’s ring gear, initiating engine rotation at approximately 150-250 RPM for ignition. The typical weight of a starter motor for this vehicle ranges from 5-7 lbs, making it a manageable component to handle once unbolted.
Identifying its precise location is crucial for any repair, whether you’re performing the work yourself or directing a trusted local mechanic. A clear understanding of its placement within the engine bay makes the repair process more convenient and accessible.

Essential Preparatory Steps and Tools for 2008 Civic Starter Access
Recommended Best Deal Products


Before attempting to access or service the starter motor on your 2008 Honda Civic, prioritizing safety and assembling the correct tools are non-negotiable. Skipping these crucial preparatory steps can lead to severe injury, vehicle damage, or unnecessary complications during the repair process.
Prioritizing Safety
The most critical safety measure is to disconnect the battery’s negative terminal. This prevents electrical shorts, accidental cranking of the engine while working on the starter, and potential damage to sensitive electronic components. Use a 10mm wrench for the negative terminal bolt. The battery’s negative terminal should be disconnected for a minimum of 5-10 minutes to allow residual power to dissipate, especially in modern vehicles with complex electronics.
Never work on the starter motor with the battery connected. Failure to disconnect the battery can result in severe electrical shock, sparks, short circuits, burns, or catastrophic damage to your vehicle’s electrical system. Always verify the battery is disconnected before proceeding.
If working from underneath the vehicle, proper vehicle elevation and stabilization are paramount. Use a hydraulic jack to lift the front of the Civic, then immediately place sturdy jack stands under the designated jack points (typically near the control arm mounts or frame rails). Never rely solely on a jack. Additionally, use wheel chocks on the rear wheels to prevent any inadvertent movement. Improper vehicle lifting accounts for a significant percentage of DIY automotive injuries.
Required Tools and Protective Gear
A comprehensive toolkit is essential. For the 2008 Civic starter, you will typically need:
- Socket Set: Including 10mm, 12mm, 14mm, and 17mm sockets (both standard and deep well).
- Ratchet: 3/8-inch drive and 1/2-inch drive (for larger bolts if present).
- Extensions: Various lengths (e.g., 6-inch, 10-inch, 18-inch) are often crucial due to tight clearances around the intake manifold.
- Universal Joint/Swivel Socket: Invaluable for reaching angled bolts.
- Combination Wrenches: Matching the socket sizes (10mm, 12mm, 14mm, 17mm).
- Torque Wrench: Essential for proper installation of bolts to manufacturer specifications.
- Wire Brush / Terminal Cleaner: For cleaning electrical connections.
- Flashlight or Headlamp: For illuminating the confined workspace.
Always wear protective gloves to prevent cuts and scrapes, and safety glasses to shield your eyes from debris or fluids. Work in a well-lit, ventilated area, preferably on a level, solid surface. This meticulous preparation ensures a safer and more efficient repair, preventing unnecessary trips for tools or additional injury risks.
Detailed Procedure for 2008 Honda Civic Starter Removal and Installation
Replacing the starter motor on a 2008 Honda Civic, while challenging due to its location, is a manageable task for an experienced DIY mechanic armed with the right tools and a systematic approach. This detailed guide ensures a safe and effective replacement.
📋
Step-by-Step Guide
Recommended Best Deal Products


Ensure the vehicle is on a level surface, parking brake engaged. Safely lift the front end and secure it on jack stands. Place wheel chocks at the rear. Crucially, disconnect the negative battery terminal (10mm wrench), then the positive terminal, and set them aside to prevent accidental contact. Allow a few minutes for residual power to dissipate.
Locate the starter motor on the firewall side of the engine, low on the transaxle housing. You may need to remove air intake components or other minor obstructions for better access. Disconnect the main battery cable (B+ terminal) using typically a 12mm or 14mm socket/wrench. Next, disconnect the smaller solenoid signal wire (S-terminal), usually a 10mm nut or a spade connector. Note their specific fasteners and routing.
Identify and loosen the two main mounting bolts that secure the starter motor to the transaxle housing. These are typically 14mm or 17mm hex head bolts. Due to their location and the tight access, you will likely need a combination of extensions and possibly a universal joint. Honda often utilizes specific bolt types that are designed for robust attachment in high-vibration environments. Be patient with corroded bolts; apply penetrating oil if necessary and allow it to work.
Once the bolts are removed, the starter motor might be snug. Carefully maneuver it out from its confined position. This may require slight rotation, wiggling, or gentle prying with a pry bar. Take care not to damage surrounding wires, hoses, or components. The weight of the starter (5-7 lbs) is manageable but be prepared for it.
Clean the mounting surface on the transaxle housing to ensure a flush fit. Inspect the new starter’s Bendix gear for any debris. Carefully position the new starter motor into place, aligning it with the bolt holes. Start the mounting bolts by hand to avoid cross-threading, then tighten them to the specified torque: typically 33 ft-lbs / 45 Nm. The proper torque application is critical to prevent future loosening or damage to the starter or transaxle housing.
Reconnect the solenoid signal wire and the main battery cable to the starter, ensuring proper cable routing away from hot or moving parts. Tighten electrical terminals to approximately 7 ft-lbs / 9.5 Nm to prevent overtightening damage. Reconnect the battery terminals, positive first, then negative. Double-check all connections and removed components before lowering the vehicle. Test the starter by attempting to start the engine. Listen for smooth cranking and immediate ignition.
Diagnosing Common Malfunctions: Is Your 2008 Honda Civic Starter Failing?
Identifying whether your 2008 Honda Civic’s starting issue stems from the starter motor or another component requires a systematic diagnostic approach. While many symptoms overlap, distinct signs often point directly to starter failure.
Characteristic ‘Click-No-Start’ Symptom
This is perhaps the most iconic symptom of a failing starter motor. You turn the key, hear a distinct, single “click” from the engine bay, but the engine does not crank at all. This click is the starter solenoid engaging, attempting to push the Bendix gear forward and close the main electrical contacts. When the motor itself fails to spin, often due to worn brushes, internal shorts, or open circuits, the engine remains motionless. The solenoid does its job, but the motor unit does not.
Slow Cranking or Grinding Noise
If your engine cranks sluggishly, much slower than usual, or produces a noticeable grinding noise during cranking, the starter motor might be failing. Slow cranking suggests the starter motor isn’t receiving or efficiently using adequate power to turn the engine at its normal rate. Grinding indicates issues with the Bendix gear properly engaging the flywheel’s ring gear, often due to wear on either component. This can also be caused by a misaligned starter motor, though less common.
Intermittent Starting Problems
A failing starter might work sometimes but not others. This can be particularly frustrating and often makes diagnosis difficult. Sometimes it starts flawlessly, other times it fails completely or struggles. This intermittency is often exacerbated by engine heat, where the starter might fail after a short drive but start fine when cold. This typically points to internal component wear that is sensitive to thermal expansion.
Distinguishing Battery Issues from Starter Problems
It’s crucial to rule out a weak or dead battery before condemning the starter. Simple tests include checking headlight brightness (dim or no lights suggest a weak battery) or using a voltmeter to check battery voltage (should be 12.6V or above when off, dropping no lower than 9.6V during cranking). If the battery tests good and fully charged, the focus shifts to the starter or its circuit. Industry data suggests that approximately 60% of ‘no-start’ conditions are battery-related, while 20-30% are attributable to the starter motor.
By The Numbers
No-Starts Due to Battery
Average Starter Lifespan
Symptoms Pointing to Other Components
A “no-start” can also be caused by an issue with the ignition switch, preventing the signal from reaching the starter relay; a faulty starter relay itself; or damaged wiring in the starter circuit. A voltage drop test across the starter motor could confirm its failure by revealing insufficient voltage reaching the motor, even if the battery is fully charged. The average lifespan of a starter motor is 100,000 to 150,000 miles, or 7-10 years, though environmental factors and usage patterns can significantly impact this.
Accessing Local Professional Assistance for 2008 Honda Civic Starter Service
While a DIY starter replacement on a 2008 Honda Civic is achievable for some, there are situations where seeking professional assistance is not only advisable but often the most prudent course of action. This ensures quality work, proper diagnosis, and peace of mind.
When Professional Intervention is Advisable
You should consider professional intervention if you encounter complex diagnostics beyond a simple battery check, lack the specialized tools (like a torque wrench or specific extensions) required, have time constraints, or harbor safety concerns about working underneath a vehicle. The intricate nature of modern vehicle electrical systems and the physical demands of accessing the Civic’s starter can be daunting without sufficient experience.
Benefits of Certified Automotive Technicians
Choosing a certified automotive technician offers significant advantages:
Advanced Diagnostics
Technicians have access to sophisticated diagnostic equipment that can pinpoint issues beyond the starter, such as wiring faults, PCM issues, or intricate parasitic draws.
Genuine OEM Parts
Reputable shops typically offer genuine OEM or high-quality aftermarket parts, ensuring longevity and proper fitment, often backed by manufacturer warranties.
Warranty on Labor & Parts
Professional service often includes a warranty on both parts and labor, providing recourse should any issues arise post-repair. This offers significant peace of mind.
Specialized Training
Certified technicians (e.g., ASE certified) possess specialized training specific to vehicle makes and models, ensuring repairs are performed correctly the first time.
Finding Reputable Local Service Centers
To find a trustworthy ‘nearby’ mechanic, leverage ‘community’ reviews and recommendations. Online platforms (Google, Yelp, specialized auto repair sites) are valuable resources. Look for shops with consistently high ratings and positive comments regarding Honda service. When seeking quotes, inquire about specifics like parts cost (OEM vs. aftermarket), estimated labor hours (the average professional labor time for a 2008 Honda Civic starter replacement typically ranges from 1.5 to 2.5 hours, excluding diagnostic time), and any potential additional diagnostic fees. Choosing a local, certified repair facility can reduce future breakdown risks by up to 30% compared to unqualified service.
Ensuring quality and reliability means asking key questions: “Do you specialize in Honda models?” “What warranty do you offer on starter replacements?” “Are your technicians ASE certified?” Opt for a shop that demonstrates a clear understanding of your 2008 Civic’s specific needs and has a track record of ‘serving’ Honda owners in your ‘available’ area. A reputable shop will offer transparent pricing and clear communication, making the repair process convenient and accessible, providing a trusted local solution.
Conclusion
Navigating a ‘no-start’ condition in your 2008 Honda Civic doesn’t have to be a blind guessing game. This guide has illuminated that the starter motor is typically situated on the firewall side of the engine, mounted low on the transaxle housing, requiring careful access from both above and below. We’ve underscored that safe practices, correct tools, and specific torque specifications are paramount for both DIY removal/installation and avoiding damage, while accurate diagnosis involves understanding specific symptoms and differentiating starter failure from battery or other electrical issues.
Armed with this precise knowledge, you can approach your 2008 Civic’s starting system with confidence. Should the task prove beyond your capabilities or comfort, do not hesitate to consult a reputable, local automotive service professional for expert assistance, ensuring your Civic returns to reliable operation quickly and safely.
Frequently Asked Questions
What are the most common symptoms of a failing starter in a 2008 Honda Civic?
The most common symptoms include a distinct ‘click’ sound when turning the key without the engine cranking, slow or sluggish engine cranking, a grinding noise during ignition, or intermittent starting problems where the car starts sometimes but not others. These often point to internal wear or electrical issues within the starter motor.
How can I differentiate between a bad battery and a bad starter in my 2008 Civic?
If the headlights and dashboard lights are dim or non-existent, and the car makes no sound when trying to start, it’s often a dead battery. If lights are bright, but you hear a distinct click, or the engine cranks slowly, it’s more likely a starter issue. A voltage test of the battery is a definitive diagnostic step.
Is replacing the starter on a 2008 Honda Civic a feasible DIY project?
Replacing the starter can be a feasible DIY project for individuals with intermediate mechanical skills, the correct tools, and a commitment to safety. Access can be challenging due to its location, often requiring the vehicle to be lifted and secured. Patience and adherence to a detailed guide are crucial.
What specific tools are essential for accessing and replacing the 2008 Civic starter?
Essential tools include a full socket set (especially 10mm, 12mm, 14mm, 17mm), ratchets, various extensions, and potentially a universal joint for tight spaces. You’ll also need a torque wrench for proper reassembly, a floor jack, and sturdy jack stands for safe vehicle elevation.
How long does a professional starter replacement typically take for a 2008 Honda Civic?
For a professional technician, a 2008 Honda Civic starter replacement typically takes between 1.5 to 2.5 labor hours, not including diagnostic time. This timeframe accounts for safe vehicle elevation, precise component removal, and correct reinstallation, ensuring adherence to factory specifications.