Turn On High Beams: A Driver’s Guide to Better Night Visibility
Activating high beams primarily involves manipulating the turn signal stalk on your steering column. This action significantly brightens the road ahead, improving visibility in dark conditions while requiring careful consideration of other drivers’ safety.
🎯 Key Takeaways
- Locate the left steering column stalk.
- Push or pull stalk to activate high beams.
- Look for the blue high beam indicator light.
- Dip high beams for oncoming traffic.
- Modern cars may feature automatic high beams.


The most common way to turn on your high beams is by pushing the left-hand steering column stalk, which also controls your turn signals, forward, away from you. In some vehicles, you might pull it towards you, or press a dedicated button. Activating your high beams significantly extends your visible range on dark roads, revealing hazards much sooner than standard low beams.

This enhanced visibility is crucial for safer night driving outside of urban areas. Knowing exactly how to engage them ensures you can quickly adapt to changing light conditions, improving your reaction time to obstacles, wildlife, or unlit turns ahead. Let’s explore the exact physical controls you need to master for optimal nighttime vision.
Understanding High Beam Controls Across Vehicle Types
Your vehicle’s high beam control is almost universally located on the left-hand steering column stalk. This stalk typically manages your turn signals and often your windshield wipers as well. While the location is consistent, the exact action to activate high beams can vary slightly, primarily falling into two categories: push/pull the stalk or press a dedicated button. Identifying your specific vehicle’s method is key to utilizing this vital safety feature effectively.
Stalk Control: Push or Pull for Activation
For the vast majority of modern vehicles, turning on your high beams involves a specific movement of the left-hand stalk.
- Push Away to Engage: The most common method requires you to push the entire stalk forward, away from your body, until it clicks and locks into place. This action will illuminate your high beams continuously. To turn them off, simply pull the stalk back towards you to its original neutral position. This push-to-activate, pull-to-deactivate mechanism is prevalent in many makes and models, including most Honda, Toyota, Ford, and Chevrolet vehicles.
- Pull Towards to Engage: Less common for continuous high beam use, but found in some European models (e.g., BMW, Mercedes-Benz, older VWs) or certain Subaru models, is pulling the stalk towards you to engage the high beams persistently. For these vehicles, you would pull the stalk until it clicks and stays. Pulling it again would deactivate them. This action is also universally used for the “flash-to-pass” function, where you momentarily pull the stalk and release it to flash your high beams without locking them on.
Always ensure your low beams or daytime running lights are already active for high beams to function, as high beams usually cannot be turned on independently from your main headlights. If your headlights are off, pushing or pulling the stalk typically won’t result in high beam activation.
Button Control: A Dedicated Approach
While less common than stalk controls, some vehicles, particularly newer models with advanced lighting systems or certain luxury brands, incorporate a dedicated button for high beam activation.
- Locating the Button: This button is typically found either on the end of the left-hand steering column stalk itself, on the dashboard near the main headlight switch, or sometimes on the steering wheel. It will invariably be marked with the universal high beam symbol: a blue “D” shape with three horizontal lines radiating from the flat side, representing light beams.
- Press to Activate/Deactivate: For vehicles with a button, a simple press will turn the high beams on, and another press will turn them off. This method offers a distinct tactile feedback separate from other stalk functions. Ensure your headlights are already on for the high beam button to function.
Familiarize yourself with your vehicle’s owner’s manual if you are unsure of the exact high beam activation method. A quick check will confirm whether you push, pull, or press.
How to Turn on High Beams Like a Pro: A Practical Walkthrough
Turning on your vehicle’s high beams, also known as “brights,” is a simple yet crucial skill for enhancing visibility during nighttime driving, especially on unlit roads. This comprehensive guide will walk you through the precise steps to activate and deactivate your high beams safely and effectively, ensuring you illuminate the path ahead without dazzling other drivers. Mastering this function will significantly improve your driving confidence and safety in low-light conditions, while also adhering to important road etiquette.
Step 1: Understand When to Use High Beams
What you need: A clear understanding of safe driving practices and the legal regulations in your region regarding high beam usage.
Instructions: Before even touching your vehicle’s controls, it’s paramount to know when to use high beams. High beams are designed for driving at night on unlit roads where there is no oncoming traffic and no vehicles directly ahead of you. They project a more intense and farther-reaching light pattern than low beams, significantly improving your ability to spot hazards like deer or potholes. Generally, avoid using them in urban areas, in fog, heavy rain, or snow, as the light can reflect back and reduce visibility. Always prioritize the safety and comfort of other drivers by dimming your lights appropriately.
Pro Tip: Most traffic laws mandate dimming your high beams when an oncoming vehicle is within approximately 500 feet (about two city blocks) or when following another vehicle within 200-300 feet. Familiarize yourself with your local Department of Motor Vehicles (DMV) or equivalent authority’s guidelines to ensure legal compliance.
Step 2: Locate Your Vehicle’s Headlight Control
What you need: Your parked vehicle (engine off or on, depending on practice preference) and a general awareness of your car’s dashboard and steering column layout.
Instructions: The primary control for your headlights, including high beams, is typically found in one of two main locations. Most commonly, it’s integrated into a stalk extending from the left side of your steering column, which also controls turn signals and sometimes wipers. Alternatively, it might be a rotary dial located on the dashboard, usually to the left of the steering wheel. This control manages your parking lights, low beams, and often the automatic headlight setting. Familiarize yourself with its exact position and initial settings while the vehicle is stationary and safely parked. Newer vehicles might also incorporate high beam activation with a dedicated button or through touchscreen menus for automatic systems.
Pro Tip: Consult your vehicle’s owner’s manual if you’re unsure about the exact location or function of your headlight controls. It provides model-specific diagrams and detailed instructions that are invaluable for understanding your car’s unique features and optimal usage.
Step 3: Ensure Your Low Beams Are Already On
What you need: Your vehicle’s engine running, and the headlight control engaged to the “On” or “Auto” position in dark conditions.
Instructions: High beams are almost universally an extension of your low beam headlights. This means your low beams must be active before you can turn on your high beams. If your vehicle has a rotary dial, turn it to the “headlights on” position (often marked with a headlight icon or “ON”). If you have a stalk, twist its end to the “ON” or “Auto” position. In “Auto,” your car will automatically turn on low beams when it detects low light conditions. You’ll typically see a green indicator light (often a D-shaped headlight icon with horizontal lines pointing straight) on your dashboard confirming low beam activation. Without low beams active, the high beam function will not engage.
Pro Tip: Never attempt to turn on high beams when your headlights are completely off or only your parking lights are active. This is a common oversight and will not work. Always ensure your standard headlights are illuminated and functional first, particularly when driving in conditions requiring enhanced visibility.
Step 4: Activate High Beams (Stalk-Type Control – Push/Pull Method)
What you need: Your vehicle’s low beams active, and a steering column stalk control for headlights.
Instructions: For the vast majority of vehicles with a traditional stalk control on the left side of the steering wheel, activating high beams involves either pushing the stalk away from you (towards the dashboard) or pulling it towards you. In many American and Asian vehicles, pushing the stalk forward will engage the high beams, and pulling it back towards you will turn them off or momentarily flash them. Conversely, some European models might require pulling the stalk towards you to activate and pushing it away to deactivate. When high beams are successfully activated, a distinct blue indicator light (often a D-shaped headlight icon with vertical lines pointing upward) will illuminate on your dashboard, signaling their operation.
Pro Tip: A quick, momentary pull of the stalk (without locking it forward or back) often serves as a “flash-to-pass” or “courtesy flash” function. This temporarily activates high beams, even if your low beams are off, and is useful for warning oncoming traffic of hazards, signaling your presence, or briefly illuminating a turn before committing.
Step 5: Activate High Beams (Button-Type, Rotary Dial, or Automatic Systems)


What you need: Vehicles with alternative high beam controls (e.g., dedicated buttons, adaptive systems) and the low beams already on.
Instructions: While the stalk method is most common, some vehicles, especially those with advanced driver-assistance systems (ADAS) or certain luxury models, may employ different high beam activation methods. You might find a dedicated button labeled with the high beam icon located on the end of the turn signal stalk, on the dashboard, or even integrated into the infotainment system. Pressing this button will typically toggle high beams on or off. Furthermore, many modern cars feature “Automatic High Beams” or “Adaptive Driving Beam” technology. If your car has this, you might activate it via a specific button or a setting in the infotainment system; once engaged, the car automatically switches between high and low beams based on sensors detecting oncoming traffic, ambient light, or streetlights.
Pro Tip: When using automatic high beams, remain vigilant. While highly effective in most scenarios, these systems are not infallible. Be prepared to manually override the system by pressing the high beam button again or manipulating the stalk if it fails to dim for other drivers or struggles in adverse weather conditions like heavy fog or snow, ensuring you maintain control and road safety.
Step 6: Confirm High Beam Activation and Adjust Accordingly
What you need: Your vehicle’s dashboard, the road ahead, and an understanding of the high beam indicator light.
Instructions: Once you’ve performed the activation action (pushing the stalk, pressing the button, etc.), immediately check your vehicle’s dashboard. A blue indicator light, typically shaped like a headlight icon with rays shining straight forward, should illuminate. This is your visual confirmation that your high beams are active. Simultaneously, observe the road ahead; you should notice a significant increase in illumination and a longer, brighter throw of light compared to your low beams, illuminating objects much farther down the road. If you don’t see the blue light or perceive a clear increase in illumination, re-check your low beam status and carefully repeat the activation step. Do not proceed with driving on high beams if you are unsure they are active.
Pro Tip: If you find that your high beams don’t seem to project light far enough, appear misaligned, or seem to illuminate trees more than the road, it might be an indication of improperly aimed headlights. This is a safety issue for both you and other drivers and should be inspected and adjusted by a qualified mechanic to ensure optimal performance and compliance.
Step 7: Know When and How to Turn High Beams Off
What you need: Awareness of your surroundings (oncoming traffic, vehicles ahead, environmental conditions) and your vehicle’s headlight controls.
Instructions: Just as important as turning them on is knowing precisely when and how to turn high beams off. As soon as you see an oncoming vehicle, are following another vehicle closely (within 200-300 feet), enter a well-lit area, or encounter adverse weather (fog, heavy rain, snow), immediately deactivate your high beams. If you pushed the stalk forward to activate, pull it back towards you. If you pulled it towards you, push it forward. If you used a button, press it again. The blue high beam indicator on your dashboard will extinguish, and your headlights will revert to low beam mode. This critical action demonstrates courtesy, prevents temporarily blinding other drivers (a major safety hazard), and ensures proper visibility for all road users.
Pro Tip: Make it a reflex to dim your high beams whenever another vehicle approaches, even if they are still some distance away. Practice anticipating when you’ll need to switch, rather than waiting until the last moment. This proactive approach shows excellent driving etiquette, helps maintain safe road conditions for everyone, and prevents potential accidents caused by glare.
✅ Final Checklist
- Did you ensure low beams were active before attempting to turn on high beams?
- Is the blue high beam indicator light illuminated on your dashboard when high beams are desired?
- Does the road ahead show significantly increased, clear illumination compared to low beams?
- Are you immediately dimming your high beams for oncoming traffic or when following another vehicle?
- Are you avoiding high beam usage in well-lit urban areas or adverse weather conditions like fog, heavy rain, or snow?
Important Notes:
- Safety considerations or warnings: Never use high beams in foggy, heavily rainy, or snowy conditions as the light will reflect off the moisture/snow particles, creating severe glare that significantly reduces your own visibility and can make driving more dangerous. Always be courteous and mindful of other drivers; blinding them with your high beams is not only illegal in most places but also a severe safety hazard.
- When to seek professional help: If your high beams are not activating at all, the blue indicator light isn’t working, or they seem improperly aimed (e.g., too high, dazzling others, or too low, not illuminating far enough), it’s best to have your vehicle’s electrical system and headlight assembly inspected by a certified mechanic. Do not attempt complex electrical repairs yourself unless you are professionally qualified, as this could lead to further damage or safety issues.
- Estimated time and cost range: Learning to activate high beams takes only a few seconds once you know your car’s controls. Familiarization with your specific vehicle’s controls might take 5-10 minutes of practice in a safe, parked environment. There is no direct cost associated with operating this standard feature, assuming your vehicle’s headlights are fully functional.
Identifying Your Vehicle’s High Beam Indicator
Once you’ve activated your high beams, your vehicle provides a clear visual confirmation on your dashboard. This indicator light is a crucial signal that your high beams are active, reminding you to dim them when necessary to avoid blinding other drivers. Recognizing this symbol and its placement is fundamental to responsible high beam usage.
The Universal High Beam Symbol
The high beam indicator light is standardized across all vehicle manufacturers. It appears as a small, blue light shaped like a capital letter “D” on its side, with three horizontal lines extending from the flat side (the curved part of the “D” points to the left). These lines represent the powerful, forward-projecting beams of light. The blue color is specific to high beams, distinguishing it from other headlight indicators, which are typically green or amber.
Where to Find the Indicator on Your Dashboard
The high beam indicator light is almost always located within your primary instrument cluster, directly in front of you.
- Central Location: Often, you’ll find it centrally positioned near your speedometer or tachometer, making it highly visible without requiring you to divert your gaze significantly from the road.
- Digital Displays: In vehicles with digital instrument clusters, the symbol will illuminate electronically, often accompanied by a clear, crisp blue icon.
- Analog Gauges: For cars with analog gauges, the small blue light will appear in a dedicated spot, usually within the top half of the cluster.
If you activate your high beams and do not see this blue indicator light, it means your high beams are not successfully engaged. Double-check your stalk or button action, and ensure your main headlights are already on. The absence of this blue light is a critical cue that your vehicle is still running on low beams.
When and Where to Safely Employ High Beams
While the ability to turn on high beams is straightforward, knowing when and where to use them safely is equally important. High beams offer a powerful advantage, significantly extending your vision range at night, but improper use can create hazards for other drivers.
Maximizing Visibility on Unlit Roads
High beams are your best friend on dark, unlit roads. Think rural highways, country lanes, or areas without any streetlights. This is where they truly shine, extending your visible range significantly. You’ll be able to spot pedestrians, cyclists, animals, and road hazards much earlier, giving you crucial extra time to react. Imagine driving through a remote forest road at night; high beams can transform your confidence and safety.
- Rural Highways: Far from city lights, high beams illuminate the path ahead.
- Unfamiliar Terrain: Essential for seeing curves, dips, and potential obstacles.
- Wildlife Areas: Increases your chances of spotting animals on or near the road.
The Golden Rule: Dim for Others
While high beams offer superior visibility, their power means they can temporarily blind other drivers. This is why knowing when to dim them is paramount for road safety and courtesy. As a general rule, you should switch to low beams when you see an oncoming vehicle or when you are following another vehicle. Most driving guides suggest dimming your lights within 500 feet of an oncoming car and within 200-300 feet when following another vehicle. Modern vehicles with automatic high beams will often do this for you, but it’s always good to understand the principle.
- Oncoming Traffic: Dim well before they are close enough to be affected.
- Following Vehicles: Avoid dazzling the driver ahead through their mirrors.
- Well-Lit Areas: High beams are unnecessary and often annoying in urban environments.
Variations in High Beam Activation Systems
Just as cars come in countless models, the specific mechanisms for controlling high beams can vary. While the fundamental purpose remains the same, the user interface might differ between vehicles, especially between older and newer models, or different manufacturers.
Common Controls Across Vehicles
Not every car turns on high beams the exact same way, though there are definitely common themes. The most frequent method involves a stalk or lever on your steering column. You might push it forward, pull it back, or perhaps a combination depending on whether you want a persistent high beam or just a brief “flash” to signal. Some older or specific vehicle models might have a button on the dashboard or even a foot-operated switch near the pedals. Always remember to check your vehicle’s specific controls to familiarize yourself.
- Steering Column Stalk: Often a push/pull action to engage.
- Dashboard Button: Less common, but seen on some models for activation.
- Foot-Operated Switch: A classic design found in older cars.
The Rise of Automatic and Adaptive High Beams
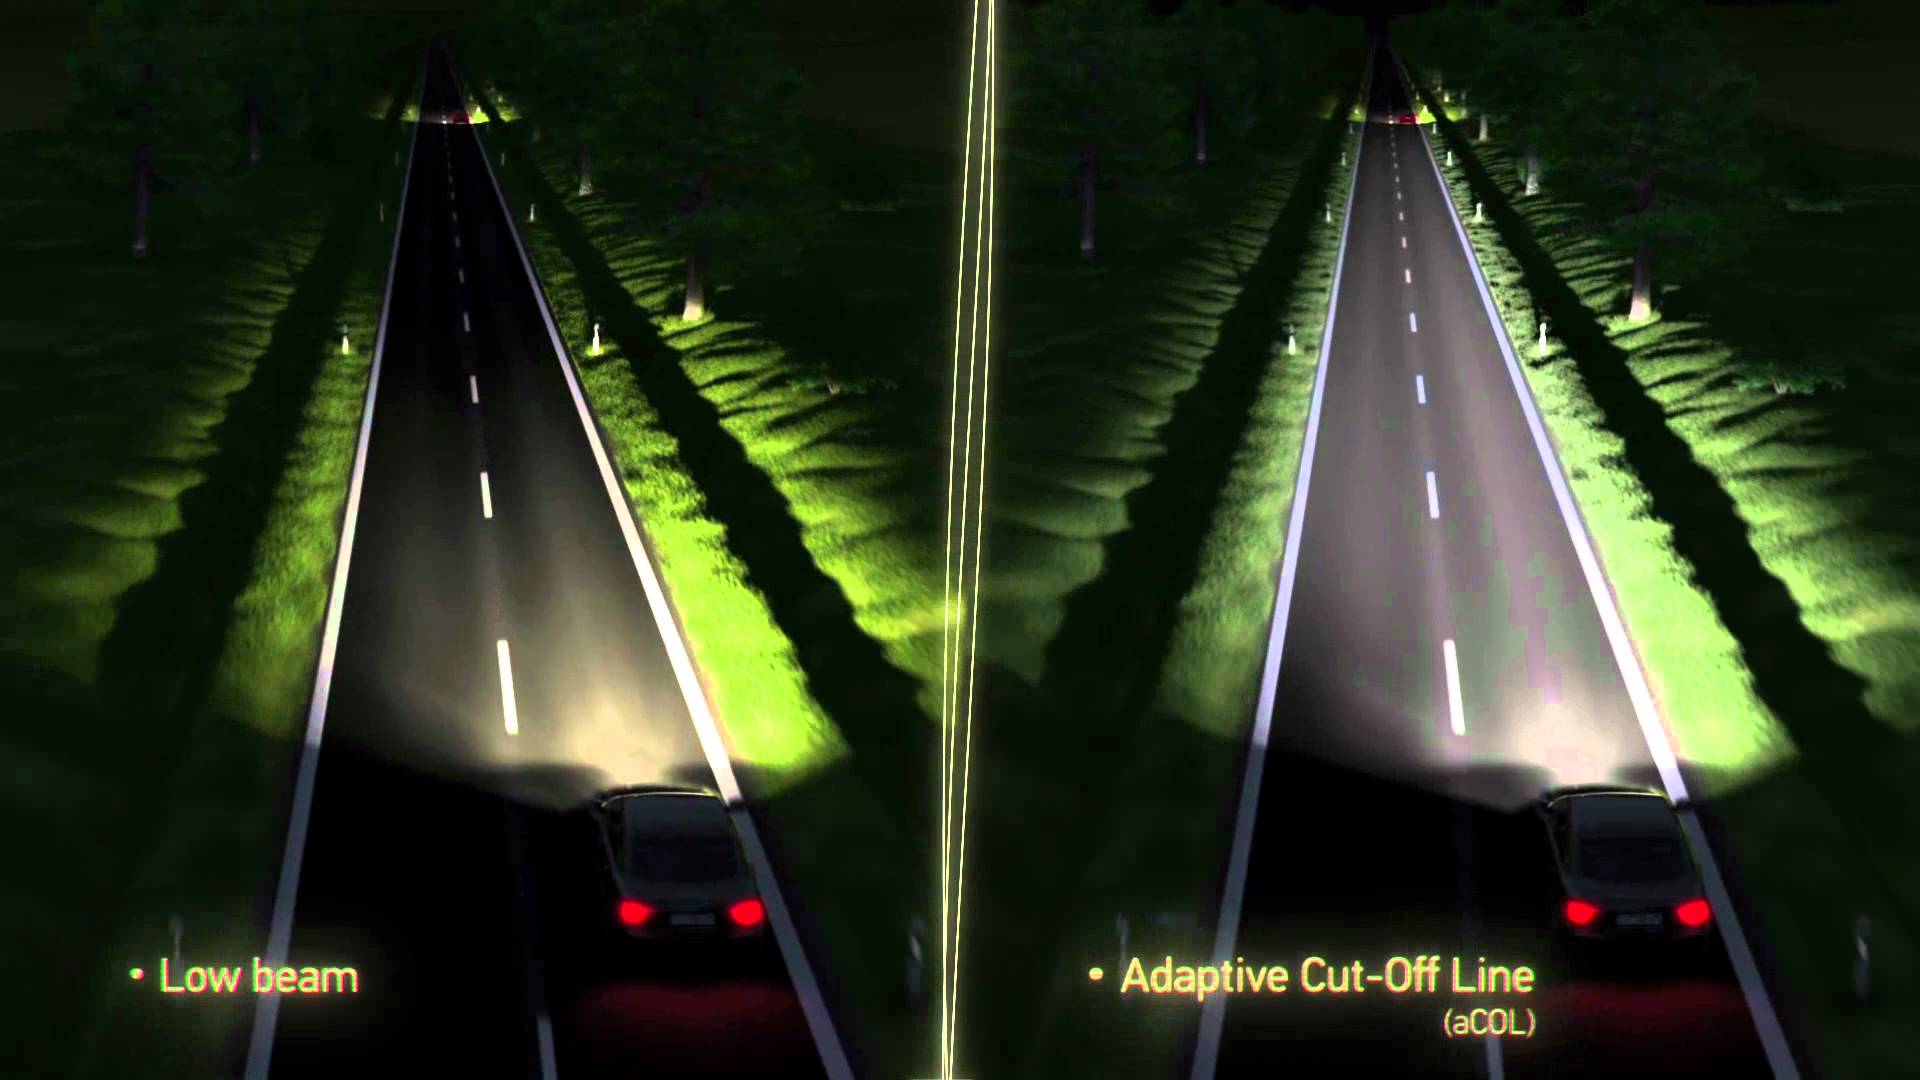
Modern automotive technology has significantly simplified high beam usage. Many newer vehicles come equipped with “automatic high beams.” These intelligent systems use forward-facing cameras and sensors to detect oncoming headlights, taillights of vehicles you’re following, and even ambient light levels. They’ll then switch between high and low beams automatically, providing optimal visibility without driver intervention. Even more advanced are “adaptive driving beams,” sometimes called matrix LED lights, which can selectively dim or even “shadow” parts of the light beam, allowing you to use high beams constantly without blinding other road users. This innovation offers continuous maximum illumination precisely where it’s needed.
- Automatic Systems: Sensors detect other vehicles and ambient light, switching beams for you.
- Adaptive Driving Beams: Advanced tech that shapes the light to avoid dazzling others while maintaining high beam visibility.
- Enhanced Safety: These systems reduce driver fatigue and ensure optimal lighting for longer periods.
Conclusion


Mastering your high beams is a key skill for safer night driving. By understanding when and where to deploy them – primarily on dark, unlit roads – and crucially, when to dim them for the safety and comfort of others, you enhance visibility for everyone. Whether your car features a traditional stalk or advanced automatic systems, the goal remains the same: illuminate your path responsibly.
Take a moment to locate your specific high beam control and perhaps practice its use in a safe, unpopulated area. Your owner’s manual is an excellent resource for vehicle-specific details. Drive confidently, drive safely, and make the most of your vehicle’s lighting capabilities.
❓ Frequently Asked Questions
What are the primary ways to activate high beams in different vehicles?
Most vehicles use the turn signal stalk on the left side of the steering column; you typically push it forward (away from you) or pull it backward (towards you) to engage high beams. Some modern cars may feature a dedicated button on the dash or steering wheel for activation.
How can I tell if my high beams are currently on?
A distinct blue indicator light, often resembling a headlight icon with several horizontal lines, will illuminate on your dashboard when your high beams are active. This serves as a crucial visual reminder to drivers.
What are the general rules for when it is appropriate to use high beams?
High beams are best used on unlit roads, in rural areas, or whenever there is no oncoming traffic or vehicles directly ahead of you. They should be dipped (switched to low beams) as soon as other cars are within approximately 500 feet or when following another vehicle closely.
Are there any advanced features for high beams, like automatic activation?
Yes, many newer vehicles include automatic high beam systems that intelligently detect oncoming headlights and taillights, automatically adjusting between high and low beams without driver intervention. These systems enhance both convenience and safety for nighttime driving.
What should I do if my high beams seem dim or aren’t working correctly?
First, ensure your regular headlights are on and functioning, as high beams require them. If high beams still don’t work or appear dim, it could indicate a blown fuse, faulty bulb, or an electrical issue. Consult your vehicle’s owner’s manual or a certified mechanic for proper diagnosis and repair.
Can using high beams inappropriately lead to legal penalties or safety risks?
Yes, using high beams incorrectly can momentarily blind other drivers, creating dangerous situations and increasing the risk of accidents. Many jurisdictions have specific laws against using high beams within a certain distance of other vehicles to prevent glare-related hazards and potential legal consequences.