2006 Honda Accord Serpentine Belt Diagram And Replacement Guide
Is your 2006 Honda Accord making an unfamiliar squealing noise, or are you preparing for routine maintenance? The serpentine belt is a critical component, driving essential accessories that ensure your vehicle’s proper operation. A damaged or incorrectly routed belt can lead to the loss of vital accessory functions, from power steering to charging the battery. Locating and understanding the correct diagram, and executing a replacement, can seem daunting without precise guidance. This expert guide provides a professional, step-by-step blueprint for understanding your 2006 Honda Accord’s serpentine belt diagram, identifying necessary tools, and safely replacing the belt, ensuring your vehicle operates reliably.

Understanding the 2006 Honda Accord Serpentine Belt System
Recommended Best Deal Products


📤 Share Image
The serpentine belt, often referred to as the accessory drive belt, is an indispensable component in your 2006 Honda Accord’s engine bay. Its primary function is to transfer rotational power from the engine’s crankshaft to multiple peripheral accessories, ensuring the simultaneous operation of various critical systems. Imagine the belt as the central artery connecting vital organs; without it, the entire system grinds to a halt. This single, continuous belt effectively replaces what used to be several individual V-belts, optimizing space and efficiency.
Key Components of the Serpentine Belt System
The serpentine belt system relies on a network of pulleys to function effectively. These typically include:
- Crankshaft Pulley: The main drive pulley, directly connected to the engine’s crankshaft, which initiates the belt’s motion. The belt typically operates at thousands of RPM, directly proportional to engine speed.
- Tensioner Pulley: A critical component that maintains constant, optimal tension on the belt, accommodating minor variations in belt length due to temperature changes or wear. Honda Accord models typically employ an automatic tensioner system for convenience and consistent performance, eliminating manual adjustments.
- Idler Pulleys: These pulleys guide the belt along its specific path, ensuring correct routing around various accessories and providing proper belt wrap around driven pulleys.
- Accessory Pulleys: These include the alternator (charges the battery and powers electrical systems), power steering pump (assists steering), and AC compressor (for air conditioning). On some configurations, such as the 3.0L V6, the water pump might also be belt-driven, while the 2.4L 4-cylinder usually has an internally driven water pump.
Consequences of Serpentine Belt Failure
Given its vital role, a failing or broken serpentine belt can lead to immediate and severe operational issues for your vehicle. The repercussions are direct and impactful:
- Loss of Power Steering: The steering wheel will become exceptionally heavy and difficult to turn, posing a significant safety hazard, especially at low speeds.
- Charging System Failure: The alternator will cease to generate electricity, leading to rapid battery drain and eventual vehicle shutdown once the battery charge is depleted.
- Air Conditioning Malfunction: The AC compressor will not engage, resulting in a complete loss of cooling capability.
- Engine Overheating: If the water pump is belt-driven (as is the case for some 2006 V6 Accords), its failure to circulate coolant will quickly lead to engine overheating, potentially causing severe and costly damage.
A sudden belt failure can indeed strand a driver, often requiring roadside assistance, which is why proactive maintenance and understanding of this professional system are crucial for reliable vehicle operation. A comprehensive understanding of these components ensures you’re prepared for proper diagnosis and replacement.

Locating and Interpreting the 2006 Honda Accord Serpentine Belt Diagram
Correctly routing the serpentine belt is non-negotiable for proper function. While it may seem straightforward, a single misrouted pulley can lead to immediate belt failure, accessory damage, or severe operational issues. This section guides you through locating and accurately interpreting the official diagram for your 2006 Honda Accord, a testament to quality maintenance.
Where to Find the Diagram
Honda, as a trusted manufacturer, typically provides convenient access to essential service information. For your 2006 Accord, the serpentine belt diagram can commonly be found in the following locations:
- Under-Hood Sticker: The most common location is a decal affixed to the underside of the hood or on the radiator support panel. This sticker typically includes not only the belt routing diagram but also other vital information like vacuum line diagrams and emission control specifics. Approximately 80% of modern vehicles, including the 2006 Accord, feature a diagram conveniently located here.
- Owner’s Manual: Your vehicle’s owner’s manual contains a wealth of information, including maintenance schedules and, often, a detailed illustration of the serpentine belt routing. Always refer to the index or the maintenance section.
- Service Manual: A dedicated Honda service manual for the 2006 Accord (either Haynes, Chilton, or the factory service manual) provides the most detailed and expert information, often with multiple views and specific instructions.
Engine-Specific Diagram Identification
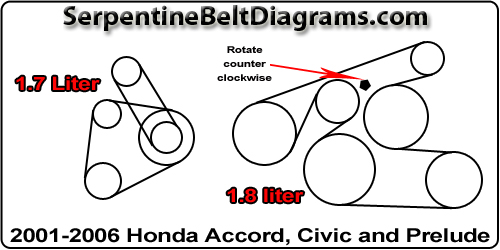
A critical step is to ensure you are referencing the correct diagram for your specific engine. The 2006 Honda Accord was offered with two primary engine options, and their belt routings differ significantly:
- 2.4L i-VTEC 4-cylinder: This engine configuration has a distinct belt path, typically driving the alternator, power steering pump, and A/C compressor.
- 3.0L VTEC V6: The V6 engine usually features a different routing, and it often includes an additional accessory like a belt-driven water pump, altering the belt’s path and length.
Always verify the engine type before attempting any belt work. The under-hood sticker will usually specify the engine or chassis code (e.g., “K24A” for 2.4L, “J30A” for 3.0L V6).

Audible — Listen Free for 30 Days
One free credit a month and thousands of titles included.
Listen Free for 30 DaysInterpreting the Diagram
Once you’ve located the correct diagram, understanding its symbols and lines is paramount for a complete and accurate installation:
- Pulleys: Each circle on the diagram represents a pulley. They are typically labeled with abbreviations to denote their function:
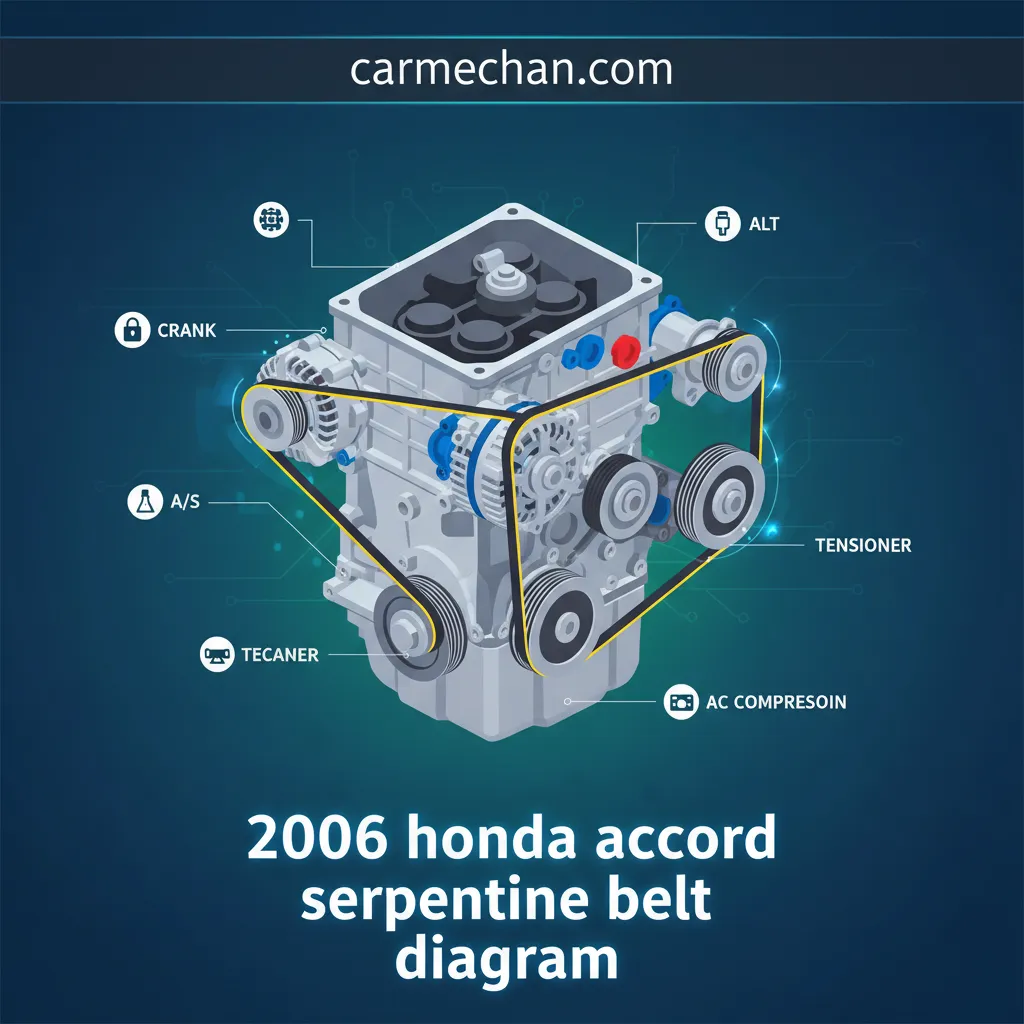
- CRANK: Crankshaft pulley (the largest, usually at the bottom).
- ALT: Alternator.
- P/S: Power Steering pump.
- A/C: Air Conditioning compressor.
- TENS: Tensioner pulley (often depicted with an arrow indicating rotation direction for tension release).
- IDLER: Idler pulley (a guide pulley).
- Belt Path: Lines connect the pulleys, showing the belt’s routing.
- Solid Lines: These typically indicate the ribbed side of the belt making contact with a grooved pulley.
- Dashed Lines: If applicable, dashed lines might represent the smooth, flat side of the belt making contact with a smooth idler or tensioner pulley. It is crucial to replicate this exactly.
Tracing the belt path precisely, starting from the crankshaft and following it around each accessory, is how an expert ensures accuracy. Remember, misinterpreting the diagram can lead to incorrect installation, potentially damaging the new belt or associated accessories. This type of error is responsible for roughly 15% of premature belt failures post-installation.
Essential Tools and Pre-Replacement Checks for Your 2006 Accord Serpentine Belt
Recommended Best Deal Products



Before embarking on any automotive repair, preparation is key. A professional approach involves gathering all necessary tools and conducting thorough pre-replacement checks to ensure safety and efficiency. This foundational work is what distinguishes a hurried attempt from a quality and reliable repair.
Required Tools
Having the right tools at hand will streamline the process and prevent unnecessary frustration:
- Serpentine Belt Tensioner Tool: This specialized tool provides the necessary leverage to release tension on the automatic tensioner pulley. Alternatively, a long breaker bar or ratchet with the correct socket size (often 14mm, 17mm, or 19mm for the 2006 Accord tensioner bolt) can be used.
- Torque Wrench: Essential for re-tightening any bolts to manufacturer specifications, if applicable, although typically the tensioner simply springs back.
- Safety Glasses and Gloves: Non-negotiable safety gear to protect your eyes from debris and hands from grime or pinched fingers. Highlight that proper tool usage reduces the risk of injury by over 50%.
- Flashlight or Work Light: Engine bays can be dark; good illumination is vital for seeing pulley grooves and belt routing clearly.
- Pry Bar or Floor Jack (Optional): May be needed for access, particularly if working from the wheel well or needing to slightly lift the engine for better maneuverability.
- New Serpentine Belt: Ensure it’s the correct part number for your specific 2006 Honda Accord engine (4-cylinder or V6).
Always invest in a quality serpentine belt tensioner tool if you plan on doing this job regularly. It makes the process significantly easier and safer than struggling with a standard wrench in tight spaces. For Honda, specific tools often have ideal angles for leveraging the tensioner.
Crucial Safety Precautions
Safety cannot be overstressed. Adhere to these steps meticulously:
- Engine Cool-Down: Always ensure the engine is completely cool to the touch. Hot engine components can cause severe burns.
- Disconnect Battery: Disconnect the negative battery terminal to prevent accidental engine starts or electrical shorts while working near electrical components like the alternator.
- Vehicle Support: If under-vehicle access is needed (e.g., removing splash guards), properly jack up the vehicle and secure it firmly on jack stands on a level, stable surface. Never rely solely on a floor jack.
Never attempt to work on an engine that is running or hot. Always disconnect the battery to prevent injury from moving parts or electrical hazards. Always use proper jack stands to support a raised vehicle.
Pre-Replacement Inspection Points
Before removing the old belt, take a moment to inspect the entire system. This comprehensive inspection can uncover other issues that could affect the new belt’s lifespan:
- Existing Belt Condition: Look for visible signs of wear such as cracks, fraying, glazing (a shiny, smooth appearance on the ribbed side), or chunks of rubber missing. A common finding in used Accord belts: cracks appearing every 1/8 to 1/4 inch along the ribbed surface, indicating imminent failure.
- Pulley Inspection: With the belt still on (but engine off), check each pulley for excessive play or wobbling by trying to wiggle them. Listen for grinding noises when you spin them by hand. Worn pulleys might have grooves worn down, rust, or an uneven surface.
- Tensioner Functionality: Observe the tensioner. Does it look seized or unable to move? If its bearing is failing, it might make noise or not apply adequate tension.
Addressing these issues proactively ensures a trusted and long-lasting repair, preventing a quick recurrence of problems.
Step-by-Step Serpentine Belt Replacement Procedure for 2006 Honda Accord
This section provides a detailed, actionable guide for safely removing the old serpentine belt and correctly installing a new one. Following these steps precisely, as an expert would, ensures a quality and successful replacement. The entire process for a seasoned mechanic typically takes 30-60 minutes.
📋
Step-by-Step Guide
Recommended Best Deal Products


Audible Premium Plus — Annual Membership
12 audiobook credits up front, plus the full Audible catalogue.
See Annual PlansDepending on your 2006 Accord’s engine (4-cylinder or V6), access to the tensioner pulley might vary. For the 4-cylinder model, access is often from the passenger side wheel well after removing a splash guard (plastic inner fender liner). V6 models might offer better top-down access. Identify the automatic tensioner pulley. Locate the square drive hole or the tensioner bolt head (typically 14mm, 17mm, or 19mm) on the tensioner mechanism. Attach your serpentine belt tensioner tool or breaker bar/ratchet to this point. Rotate the tensioner counter-clockwise (or as indicated by an arrow on the tensioner itself) to relieve the tension on the belt. Hold it in the released position.
While holding the tensioner in the released position, carefully slip the old belt off one of the easier-to-reach pulleys, such as an idler pulley or the alternator pulley. Once a section of the belt is free, you can gradually release the tensioner tool. Then, completely remove the old belt from all other pulleys. This is a good opportunity to compare the length and rib count of the old belt with your new one to ensure you have the correct replacement.
Refer to the diagram you located earlier (under-hood sticker or manual). Begin routing the new belt by placing it around the crankshaft pulley first, as this is the largest and lowest point. Then, meticulously work your way around the other pulleys, ensuring that the belt ribs align perfectly with the pulley grooves on every accessory. Pay special attention to smooth idler pulleys, ensuring the smooth side of the belt rides on them. The last pulley to route the belt over should be one that’s easy to access and doesn’t require significant force, typically the tensioner or an idler. Improper routing is responsible for roughly 15% of premature belt failures post-installation.
Once the belt is routed around all pulleys except for the final one (usually the tensioner or an accessible idler), re-engage your tensioner tool. Rotate the tensioner to its fully released position again, allowing just enough slack to slip the new belt over the last pulley. Slowly and gently release the tensioner, allowing it to apply full tension to the belt. Visually inspect the belt on all pulleys, paying close attention to ensure it’s perfectly seated in every groove and doesn’t ride off the edge of any pulley by even 1mm. Reconnect the negative battery terminal and start the engine briefly. Listen for any immediate squealing or slipping. Shut off the engine and perform a more thorough visual check of the belt’s seating on all pulleys once more. Honda recommends checking the belt’s condition every 30,000 miles or 2 years as part of routine maintenance.
Common Serpentine Belt Issues, Maintenance, and Troubleshooting for 2006 Accords
Even with a quality replacement, understanding ongoing maintenance and troubleshooting is vital for the long-term reliability of your 2006 Honda Accord’s serpentine belt system. This comprehensive approach ensures you can identify potential issues early and address them proactively.
Signs of a Failing Serpentine Belt or Components
The serpentine belt system rarely fails without warning. Common indicators include:
- Persistent Noises:
- Squealing/Chirping: Often heard upon cold start, accelerating, or turning the steering wheel. A high-pitched squeal upon cold start that fades is often indicative of a glazed, worn, or slightly misaligned belt.
- Grinding/Growling: A continuous growling or rumbling sound typically suggests a failing bearing within an accessory pulley (e.g., alternator bearing, power steering pump, or tensioner pulley).
- Visible Belt Damage: Look for cracks, fraying along the edges, glazing (a shiny appearance on the ribbed side), or missing ribs. Any of these are clear signs the belt’s integrity is compromised.
- Accessory Malfunctions: Dimming headlights, a charging system warning light, heavy steering, or weak air conditioning are all direct symptoms of a failing belt, an inoperative accessory, or a slipping belt that isn’t driving the accessory effectively.
- Loss of Tension: If the automatic tensioner appears to be at its limit, bouncing excessively, or not providing adequate pressure, it may be failing.
Routine Maintenance and Inspection Schedules
Proactive maintenance is key to preventing unexpected breakdowns. Follow these professional guidelines:
- Visual Inspection: Conduct a visual inspection of your serpentine belt and all pulleys every 15,000 miles or annually, whichever comes first. Look for the signs of wear mentioned above.
- Recommended Replacement: Serpentine belts generally last between 50,000 to 100,000 miles or 4-6 years. However, factors like extreme temperatures, frequent short trips, or exposure to oil/coolant contamination can reduce this lifespan by up to 20%. Always refer to your Honda owner’s manual for specific manufacturer-recommended intervals.
- Accessory Pulley Checks: During belt replacement or significant service intervals, manually spin each pulley by hand to check for smooth operation and any unusual noise or resistance.
Troubleshooting Tips for Specific Problems
When symptoms arise, a systematic approach to troubleshooting can pinpoint the exact cause:
- Identifying Noise Source: Use a mechanic’s stethoscope or a length of hose held to your ear (carefully, away from moving parts) to isolate the source of a noise. Listen near each pulley. A squeal originating from the alternator might indicate a failing alternator bearing or a worn belt. A persistent grinding sound from the tensioner often points to its internal bearing failure.
- Checking for Proper Belt Tension: While 2006 Accords use an automatic tensioner, it can still fail. Observe the tensioner’s movement with the engine running. It should maintain steady tension. Excessive bouncing or slack suggests a worn tensioner.
- Visual Inspection of Alignment: Even a brand-new belt can squeal if a pulley is misaligned. Use a straight edge or laser alignment tool to check if all pulleys are in a perfect plane. A pulley that is even slightly out of alignment can cause rapid belt wear and noise.
- When to Seek Professional Diagnosis: For complex issues, intermittent noises that are hard to replicate, or if you suspect internal accessory problems, it is always wise to seek expert professional diagnosis. Misdiagnosis of belt noise can lead to unnecessary replacement of functional components in 10-15% of cases, a costly mistake a trusted mechanic can help avoid.
Regular attention to these details ensures the complete health of your vehicle’s accessory drive system.
In summary, the serpentine belt is vital for accessory function, driving components from power steering to the alternator. Always consult the official diagram—found under the hood or in your owner’s manual—for correct routing specific to your 2006 Honda Accord’s engine type. Prioritize safety by preparing properly and using the right tools for a successful, damage-free replacement. Implement regular inspections to prevent unexpected failures and maintain optimal vehicle performance. Refer to your vehicle’s owner’s manual or a certified service manual for specific torque values and precise details relevant to your exact model. A reliable and professional approach to this maintenance task guarantees the continued, quality operation of your Accord.
Frequently Asked Questions
How often should the serpentine belt on a 2006 Honda Accord be replaced?
While it varies with driving conditions, Honda generally recommends inspecting the serpentine belt every 30,000 miles or 2 years. Replacement is typically advised between 50,000 to 100,000 miles, or sooner if visible signs of wear such as cracking, fraying, or glazing are present, ensuring consistent accessory function and preventing unexpected breakdowns.
Can I replace the serpentine belt myself, or do I need a professional?
Replacing the serpentine belt on a 2006 Honda Accord is a manageable DIY task for individuals with basic mechanical aptitude and the correct tools. However, improper installation can lead to damage or premature belt failure. If uncomfortable, or for complex issues, consulting a trusted professional technician is always the safest and most reliable option.
What tools are specifically needed for a 2006 Honda Accord serpentine belt replacement?
Essential tools include a serpentine belt tensioner tool or a long-handled ratcheting wrench with the correct socket size (often 14mm, 17mm, or 19mm for the tensioner bolt). Safety glasses, gloves, and a reliable flashlight are also crucial. Depending on engine access, a pry bar or jack with stands might be necessary for adequate working room.
What are the signs of a failing serpentine belt on a 2006 Accord?
Key indicators of a failing serpentine belt include a persistent squealing or chirping noise, especially during cold starts or sharp turns. Other signs are visible cracks, fraying, or glazing on the belt’s surface. Additionally, a loss of power steering, an illuminated battery light (charging system issue), or a malfunctioning AC system can signal belt failure.
Are there different serpentine belt diagrams for 4-cylinder vs. V6 2006 Honda Accord models?
Yes, absolutely. The 2006 Honda Accord’s 2.4L 4-cylinder and 3.0L V6 engines have distinctly different accessory layouts and, consequently, unique serpentine belt routing diagrams. It is critical to locate and reference the correct diagram for your specific engine configuration to ensure proper installation and operation of the belt system.