2012 Honda Accord Fuse Box Diagram: Locating And Understanding Electrical Fuses
2012 Honda Accord Fuse Box Diagram: Locating And Understanding Electrical Fuses
Recommended Best Deal Products


📤 Share Image
The intricate electrical network of your 2012 Honda Accord is a sophisticated system, critical for every function from ignition to entertainment. When an electrical component fails, a common culprit is often a blown fuse, but accurately identifying which fuse and its location can be a challenge without precise information. This expert guide provides a detailed breakdown of the 2012 Honda Accord fuse box diagrams, ensuring you can reliably locate, interpret, and address electrical issues with professional confidence.

The Essential Role of the 2012 Honda Accord’s Electrical System and Fuses
The 2012 Honda Accord boasts a sophisticated electrical system, an intricate architecture where every component, from the engine control unit to the smallest cabin light, is interconnected and reliant on a precise flow of electrical current. This network operates primarily on a 12-volt DC system, managing hundreds of individual circuits that power everything the vehicle does. Understanding this complexity is the first step toward effective maintenance.
At the heart of this system’s safety are the fuses. These aren’t merely small pieces of plastic and metal; they are crucial, sacrificial safety devices engineered to protect expensive electrical components from overcurrents. Imagine a scenario where a malfunctioning power window motor draws excessive current due to a short circuit or mechanical binding. Without a fuse, this surge could easily melt wiring, damage the motor control module, or even ignite a fire. The fuse, rated for a specific amperage (e.g., 15A), is designed to blow—or open the circuit—before any significant damage occurs, thereby protecting components like the audio system, headlights, or ABS module.
Ignoring electrical issues or, worse, using incorrect fuses (such as one with a higher amperage rating than specified) carries severe consequences. This can range from repeated component failure and wiring damage to potential fire hazards, jeopardizing both your vehicle and your safety. The 2012 Accord primarily utilizes blade-type fuses, including standard, mini blade, and low-profile mini blade variants, alongside larger cartridge fuses for high-current applications. Each type has a specific application and is rated for specific amperage to handle standard electrical loads.
For any diagnostic or maintenance task involving your Accord’s electrical system, consulting a quality, professional diagram is paramount. This ensures reliable troubleshooting and prevents misdiagnosis that could lead to further complications or unnecessary expenses.

Locating the Fuse Boxes in Your 2012 Honda Accord
Recommended Best Deal Products


Knowing the precise locations of your Accord’s fuse boxes is a fundamental aspect of effective electrical system maintenance. Most 2012 Honda Accord models feature at least two primary fuse boxes, meticulously placed to manage different segments of the vehicle’s extensive electrical network.
1. The Under-Hood Fuse Box (Engine Compartment Fuse/Relay Box)
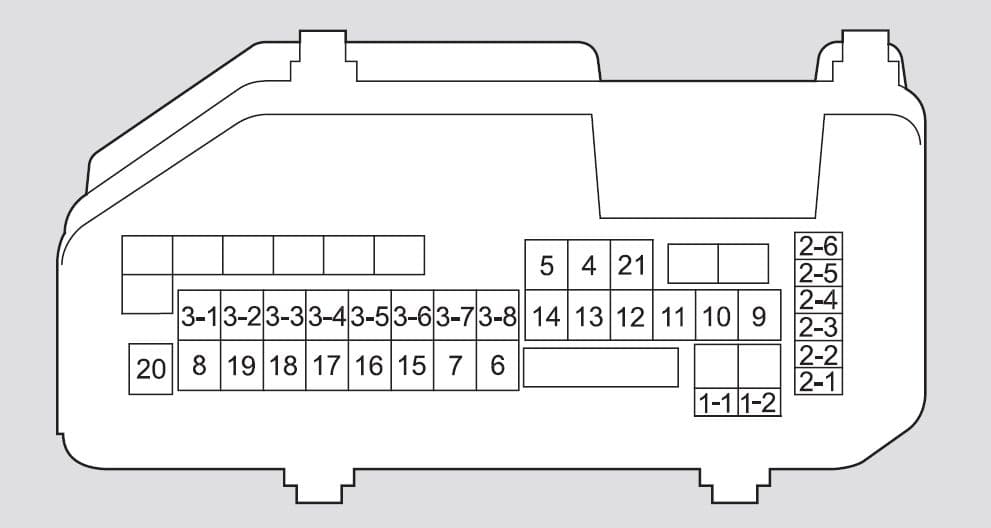
This critical fuse box is typically situated in the engine compartment, usually on the driver’s side. It’s often found near the vehicle’s battery or engine, clearly marked with a plastic cover. This box houses fuses and relays for high-current circuits, including the engine control systems, headlights, cooling fans, and crucial powertrain components.
To access it, simply unclip the retaining tabs or clips on the fuse box cover and lift it off. The underside of this cover frequently contains a diagram of the fuses within, providing immediate, trusted reference.
2. The Interior Fuse Box
The interior fuse box, sometimes referred to as the dashboard fuse box, manages circuits for cabin electronics and accessories. In your 2012 Honda Accord, this box is most commonly located under the dashboard on the driver’s side, often positioned in the footwell area or behind an access panel near the OBD-II port. Its placement allows for convenient access while minimizing its visual impact on the cabin aesthetics.

Audible — Listen Free for 30 Days
One free credit a month and thousands of titles included.
Listen Free for 30 Days
📋
Step-by-Step Guide: Accessing Your Interior Fuse Box
Sit in the driver’s seat and look towards the lower left side of the dashboard, often around knee level or below the steering column. You might need to adjust your seat backward and use a flashlight for better visibility.
The interior fuse box is typically concealed behind a small plastic access panel, often rectangular and approximately 4-6 inches wide. This panel might have a small indentation or slot for prying.
Use a trim removal tool or a flat-head screwdriver wrapped in tape (to prevent scratches) to gently pry off the panel. It’s usually held in place by friction clips. Pull it off carefully to avoid damaging the clips or the surrounding trim, ensuring a professional approach. The back of this panel often also features a fuse diagram.
While some vehicles might have auxiliary fuse locations for specific components in areas like the trunk or under seats, the 2012 Honda Accord typically relies on these two primary fuse boxes for most circuits. Always cross-reference with your vehicle’s owner’s manual for model-specific variations and the most trusted and complete information, as precise locations can sometimes vary slightly by trim level or market.
Interpreting the 2012 Honda Accord Fuse Box Diagrams
Recommended Best Deal Products


Once you’ve located the fuse box, the next critical step is to accurately interpret its diagram. These diagrams are your roadmap to the Accord’s electrical health, and understanding them is fundamental for any reliable troubleshooting. You can obtain the official fuse box diagrams from several key sources: they are often printed directly on the inside of the fuse box covers, detailed within your vehicle’s owner’s manual, or available in comprehensive service manuals.
Understanding Symbols and Amperage
Honda diagrams, like most modern automotive schematics, employ internationally recognized ISO symbols to represent various electrical components and circuits. Familiarize yourself with common icons: a light bulb for headlights, a fan for HVAC, a cigarette lighter symbol for power outlets, or specific abbreviations like “DRL” for Daytime Running Lights, “ABS” for the Anti-lock Braking System, or an icon resembling a fuel pump. The diagram will clearly label each fuse position, linking it to a specific component or system.
Audible Premium Plus — Annual Membership
12 audiobook credits up front, plus the full Audible catalogue.
See Annual PlansEqually important are the fuse amperage ratings, typically indicated as 10A, 20A, 30A, and so forth. This number represents the maximum current the fuse can safely carry before blowing. Using the correct amperage rating is paramount for electrical system integrity and safety. An incorrect rating can lead to serious issues, from repeated fuse blowing to catastrophic wiring damage. Standard Honda diagrams often use a consistent color code for quick visual reference: for instance, a yellow fuse signifies 20A, and a red fuse indicates 10A.
Diagram Layout and Navigation
The layout of 2012 Accord fuse diagrams typically mirrors the physical arrangement of the fuses within the box. They usually feature a grid or numbered system, making it straightforward to pinpoint the exact fuse you need. For example, if your windshield wipers aren’t working, you would consult the diagram, locate the symbol for “WIPER” or “WPR,” and identify its corresponding fuse number and amperage. This methodical approach is critical for an expert diagnosis.
If you encounter a less common symbol, cross-reference it with the legend often provided on the diagram itself or in your owner’s manual. For a deeper understanding, trace the circuit’s pathway. Knowing which components share a circuit can help you understand the flow of power and identify other potential points of failure beyond just the fuse.
Diagnosing Electrical Faults and Testing Fuses in Your 2012 Accord
When an electrical component in your 2012 Honda Accord ceases to function, a blown fuse is often the simplest and most common culprit. A systematic and reliable diagnostic process is crucial to confirm this and avoid unnecessary component replacements.
📋
Step-by-Step Guide: Diagnosing a Blown Fuse
Note the precise electrical malfunction. For example, if your headlights are not working, but the parking lights are, it narrows down the issue. Common symptoms pointing to a blown fuse include specific lights not working, power outlets being dead, the radio remaining silent, or power windows becoming inoperative.
Consult your 2012 Honda Accord’s fuse box diagram (from the cover or owner’s manual) to find the fuse associated with the faulty component. For the headlight example, you would look for the ‘HEADLIGHT’ or ‘HI BEAM’ fuse in the under-hood fuse box.
There are several ways to test a fuse. A visual inspection involves carefully removing the fuse and looking for a broken or melted filament. However, visual inspection is only about 70-80% reliable, especially for smaller, opaque fuses. For a more accurate test, use a multimeter set to continuity mode (ohms). A properly functioning fuse will show continuity (zero or near-zero ohms) across its terminals. If it shows an open circuit (OL or infinite resistance), the fuse is blown. Alternatively, a dedicated fuse tester provides a quick, clear indication.
If the fuse tests good, the problem lies elsewhere. This requires ruling out other potential electrical issues such as faulty relays (often found alongside fuses in the under-hood box), loose connections, or the failure of the component itself (e.g., a burnt-out headlight bulb). A scenario where headlights aren’t working would involve checking the fuse, then the relay, and finally the bulb, to ensure a complete and expert diagnosis.
Before working on any electrical components, always ensure the vehicle is off. For more extensive diagnostics or if you are uncomfortable, it’s prudent to disconnect the negative terminal of the battery to prevent accidental shorts or electrical shocks, ensuring a professional and safe operation.
Safe and Professional Fuse Replacement Procedures for the 2012 Accord
Once a blown fuse has been identified, proper replacement is critical to restore functionality and prevent further electrical problems. This isn’t merely a matter of swapping components; it demands adherence to best practices to ensure the long-term reliability and safety of your 2012 Honda Accord’s electrical system.
Necessary Tools and Preparation
Before you begin, gather the essential tools: a fuse puller (often conveniently located clipped inside one of the fuse box covers), a flashlight for clear visibility, and most importantly, appropriate replacement fuses. Ensure the vehicle’s ignition is off, and consider disconnecting the battery’s negative terminal for added safety.
📋
Step-by-Step Guide: Fuse Replacement
Use the fuse puller to grip the blown fuse firmly and pull it straight out from its slot. Exercise careful handling to avoid bending or damaging the fuse box terminals. These terminals are delicate and damage can lead to intermittent electrical issues.
This step is paramount: always replace a blown fuse with a new fuse of the exact same amperage rating and type as specified in the diagram or as the original fuse you removed. If the original was a 10A mini-blade fuse, use a 10A mini-blade replacement. Modern vehicle fuses, such as those in your Accord, are specifically designed to fail as a sacrificial component, often rated with a 125% safety margin above typical operating current to handle momentary surges.
Align the new fuse with the empty slot and push it firmly into place until it seats completely. You should feel a slight click as it locks in.
Reconnect the battery if you disconnected it, then turn on the ignition and test the affected electrical component. If it works, securely replace the fuse box cover and any access panels. If the fuse blows again immediately, a deeper electrical issue exists that requires professional investigation.
Never, under any circumstances, replace a fuse with one of a higher amperage rating or attempt to bypass it with metal foil or wire. For instance, replacing a 10A fuse with a 20A fuse could allow excessive current to flow, leading to severe wiring damage, overheating, and potentially a vehicle fire. Conversely, using a lower amperage fuse will likely result in repeated blowing, indicating that the circuit cannot sustain its normal operating load. Always source quality, authentic replacement fuses that meet Honda’s specifications for optimal performance and safety.
Maintaining Your 2012 Honda Accord’s Electrical Integrity
Proactive maintenance of your 2012 Honda Accord’s electrical system is key to fostering long-term reliability and significantly reducing the likelihood of fuse-related issues. An expert approach extends beyond simply replacing blown fuses; it involves understanding and preventing the root causes of electrical problems.
Preventative Inspections and Practices
- Periodic Fuse Box Checks: Make it a habit to periodically inspect both under-hood and interior fuse boxes. Look for any signs of corrosion on fuse terminals, which can increase resistance and lead to localized heat build-up. Also, check for loose connections or any discoloration (e.g., melted plastic around a fuse), which indicates overheating and a potential underlying issue.
- Address Repeatedly Blown Fuses: If a fuse for a specific accessory or component blows repeatedly, this is a clear indicator of a deeper electrical issue. Simply replacing it will not resolve the problem. Such persistence signals a short circuit, an overloaded circuit, or a faulty component that requires professional diagnosis. For example, a continuously blowing fuse for a specific accessory suggests checking the accessory’s wiring or the component itself.
- Proper Aftermarket Accessory Installation: One of the most common causes of electrical issues stems from improper aftermarket installations. When adding accessories like new head units, auxiliary lights, or charging ports, ensure they are installed with dedicated wiring harnesses, correctly sized wires, and appropriate fuses. Avoid “piggybacking” off existing circuits, as this can easily overload them and lead to fuse problems or even more severe damage.
- Carry a Spare Fuse Kit: Always keep a small assortment of common amperage fuses (e.g., 10A, 15A, 20A) in your vehicle. This trusted preparedness can be invaluable for roadside emergencies, allowing you to quickly replace a blown fuse and restore functionality without being stranded.
When to Seek Professional Help
While understanding your fuse box diagram empowers you to handle many common electrical issues, there are instances where consulting a certified professional is highly recommended. For any complex, persistent electrical issues, intermittent problems, or if you’re uncomfortable with the diagnostic process, a qualified technician possesses the specialized tools and expertise to perform advanced diagnostics. This ensures your vehicle’s optimal performance and safety standards are maintained, reflecting a truly comprehensive and complete approach to vehicle care.
By The Numbers: Electrical System Facts
Standard Operating Voltage
Typical Fuse Safety Margin
Visual Fuse Inspection Reliability
Electrical Issues from Aftermarket Installs
Successfully locating and understanding your 2012 Honda Accord fuse box diagrams is crucial for effective electrical maintenance. Always consult your vehicle’s owner’s manual for model-specific details and safety protocols. Professional diagnostics are recommended for complex or persistent electrical issues. Empower yourself with this trusted knowledge to maintain your Accord’s electrical system, or consult a certified technician for advanced diagnostics.
Frequently Asked Questions
Why do fuses blow in a 2012 Honda Accord?
Fuses primarily blow to protect circuits from overcurrent. This typically occurs due to a short circuit, an overloaded circuit (e.g., too many accessories on one power source), or a faulty component drawing excessive current. It’s a critical safety mechanism preventing wiring damage or potential fire hazards, highlighting the robust, reliable design of your vehicle’s electrical safeguards.
Can I use a higher amperage fuse in my 2012 Accord?
No, absolutely not. Replacing a blown fuse with one of a higher amperage rating is extremely dangerous. It bypasses the circuit’s intended protection, allowing excessive current to flow. This can severely damage wiring, costly electrical components, or even cause an electrical fire. Always use a fuse with the exact specified amperage for quality, reliable protection.
How do I know if a fuse is blown without removing it?
For some blade fuses, a visual inspection reveals a broken or burnt filament inside. However, this isn’t always clear, especially for smaller fuses. The most accurate professional method is using a fuse tester or a multimeter set to continuity mode. Insert the probes onto the test points on top of the fuse; a lack of continuity or a ‘no light’ indication confirms it’s blown, ensuring trusted results.
Where is the fuse puller located in my 2012 Honda Accord?
A small, plastic fuse puller tool is typically located within one of your Accord’s fuse boxes. It’s most commonly found clipped to the inside of the under-hood fuse box cover, or sometimes within the interior fuse box. This expert tool is essential for safely and easily removing fuses without damaging the fuse terminals, promoting professional maintenance.
What are the common electrical problems indicated by blown fuses in a 2012 Accord?
Common issues include non-functional power outlets (e.g., cigarette lighter), specific lights not working (headlights, tail lights, interior lights), a dead radio or infotainment system, inoperative power windows, or even issues with the horn or sunroof. Identifying the affected component quickly allows for targeted fuse diagnosis, ensuring a reliable, expert solution to your electrical problem.