Bleed Brakes DIY: Fix Spongy Pedal & Improve Stopping Power
Last Updated on September 1, 2026 by Ryan
Bleeding brakes is crucial for maintaining a firm pedal and safe stopping. It involves removing air bubbles from the hydraulic system that can cause a spongy feel. This guide provides all the essential steps and tools for a successful DIY brake bleed.

Prime for Young Adults — 6 Months Free
Students and 18–24s get six months of Prime free, then half price.
Start 6 Months Free🎯 Key Takeaways
Recommended Best Deal Products

- Bleed the wheel farthest from the master cylinder first.
- Always use fresh, clean brake fluid of the correct DOT type.
- Never let the master cylinder reservoir run dry during bleeding.
- Maintain proper pedal technique for effective air removal.
- Ensure all bleeder valves are fully tightened afterwards.
If you’re experiencing a spongy brake pedal or reduced stopping power, bleeding your brakes is often the direct solution. This essential maintenance task removes air from your hydraulic brake system, restoring a firm pedal feel and reliable braking performance. Tackling this DIY project yourself can save you money and significantly improve your vehicle’s safety and responsiveness.

A well-bled brake system ensures that every pound of pressure you apply to the pedal is efficiently translated into stopping force at the wheels. Ignoring a spongy pedal can compromise your driving safety and potentially lead to more expensive repairs down the line. By following a clear, step-by-step process, you can confidently bleed your brakes and enjoy the peace of mind that comes with a properly functioning braking system.
Understanding Brake Fluid & Air Contamination
Your vehicle’s braking system operates on a simple yet powerful hydraulic principle: brake fluid, a non-compressible liquid, transmits force from your pedal to the calipers or wheel cylinders. This fluid must be entirely free of air to function correctly. Air, unlike brake fluid, is highly compressible, and its presence in the lines is the primary cause of a soft or spongy brake pedal.
The Problem with Air in Your Brake Lines
When air enters the brake lines, pressing the pedal first compresses this air before any significant force reaches the brake components. This compression of air translates directly into lost pressure and a noticeable delay or reduction in braking effectiveness. Imagine trying to push a balloon full of air versus pushing a solid object; the balloon gives way easily. That’s essentially what happens when air contaminates your brake fluid. The pedal feels soft, travels further than it should, and the vehicle takes longer to stop, creating a significant safety hazard.
When Bleeding Becomes Necessary
Brake bleeding becomes necessary whenever air is introduced into the hydraulic system. This commonly occurs after replacing brake components like calipers, master cylinders, or brake lines, as these procedures expose the system to the atmosphere. Additionally, if your brake fluid level runs too low in the master cylinder, air can be drawn in. Even routine brake fluid flushes, while beneficial, require bleeding afterward to ensure all new fluid is air-free. A spontaneously spongy pedal, without recent component work, almost always indicates trapped air, signaling an immediate need for bleeding.
How to Bleed Brakes Like a Pro: A Practical Walkthrough
A firm, responsive brake pedal is paramount for your safety on the road. Over time, or after performing brake system repairs, air can become trapped in your brake lines. This air compresses, leading to a “spongy” brake pedal and reduced braking effectiveness. This comprehensive guide will walk you through the essential process of bleeding your vehicle’s brakes, ensuring a solid pedal feel and restoring peak braking performance. Follow these detailed steps carefully to achieve professional results at home.
Step 1: Gather Your Arsenal and Prep the Vehicle Safely
What you need: Jack, jack stands, wheel chocks, appropriately sized wrench for bleeder valves (preferably a flare nut wrench to prevent rounding), clear vinyl tubing (approx. 3/16″ or 1/4″ inner diameter), clear catch bottle or container, fresh DOT-rated brake fluid specific to your vehicle, rags or shop towels, eye protection, work gloves, and a flashlight.
Instructions: Begin by gathering all necessary tools and materials. Park your vehicle on a flat, level surface. Engage the parking brake and place wheel chocks behind the rear wheels (if bleeding front) or in front of the front wheels (if bleeding rear). Loosen the lug nuts on all wheels you intend to bleed, then safely lift the vehicle using a jack and secure it firmly on jack stands. Remove the wheels to gain easy access to the brake calipers/wheel cylinders and bleeder valves. Safety is paramount; never work under a vehicle supported only by a jack.

Audible — Listen Free for 30 Days
One free credit a month and thousands of titles included.
Listen Free for 30 DaysPro Tip: Always consult your vehicle’s owner’s manual or service guide to confirm the correct type of brake fluid (e.g., DOT 3, DOT 4, DOT 5.1) and ensure you use a fresh, unopened container. Brake fluid absorbs moisture from the air, degrading its performance, so an old, opened bottle is unsuitable.
Step 2: Understand the Bleeding Sequence and Locate Valves
What you need: Vehicle service manual (recommended), flashlight.
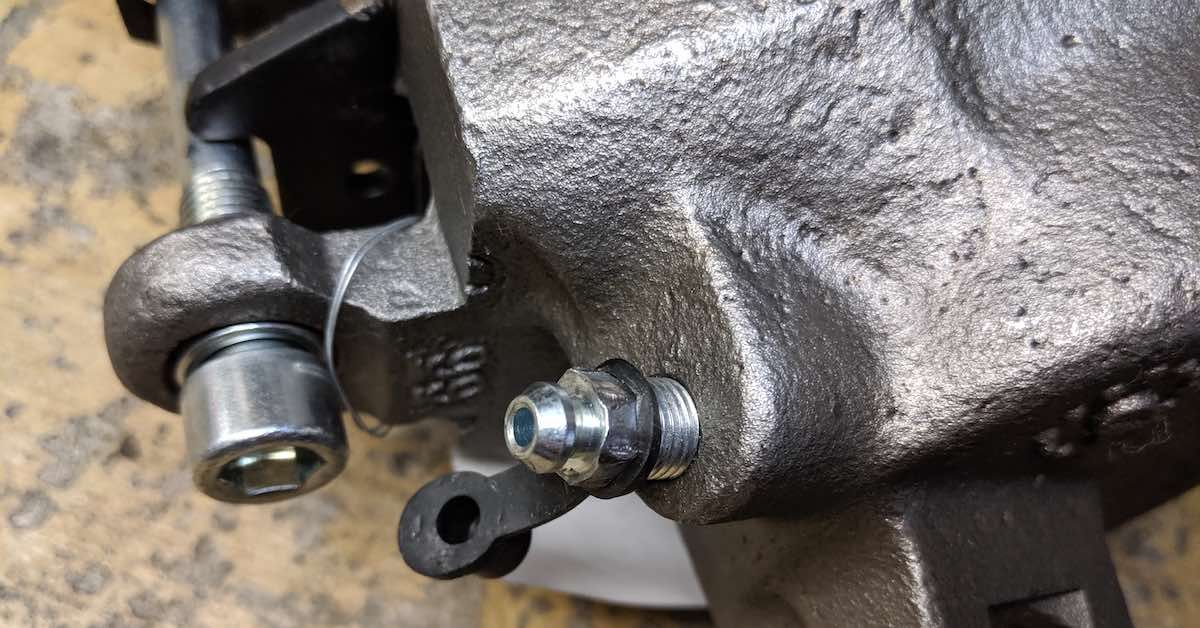
Instructions: The order in which you bleed the brakes is crucial. Generally, you start with the wheel farthest from the master cylinder and work your way closer. For most left-hand drive vehicles, this sequence is typically: Passenger Rear, Driver Rear, Passenger Front, Driver Front. However, some vehicles (especially those with ABS or specific brake system layouts) may have a different sequence. Refer to your vehicle’s service manual to confirm the precise order. Once you know the sequence, locate the bleeder valve on each caliper or wheel cylinder. These are small, nipple-like fittings usually covered with a rubber cap.
Pro Tip: If your vehicle has an Anti-lock Braking System (ABS), ensure you follow the manufacturer’s specific bleeding procedures, as some ABS systems may require a scan tool to cycle the ABS pump for a complete bleed. A general bleed can often be done without it, but consult your manual.
Step 3: Prepare the Master Cylinder and Fluid Reservoir
What you need: Fresh brake fluid, funnel, rags.
Instructions: Open your vehicle’s hood and locate the brake master cylinder reservoir, typically a plastic container on top of the master cylinder. Carefully clean any dirt or debris from around the cap to prevent contamination of the brake fluid. Remove the cap and fill the reservoir to the “MAX” line with fresh, new brake fluid. Throughout the bleeding process, it is absolutely critical to monitor this fluid level and never let it drop below the “MIN” mark, or you risk introducing more air into the system and having to start over.
Pro Tip: Place several clean rags around the master cylinder reservoir. Brake fluid is corrosive and can quickly damage paint and other vehicle components. Wiping up any spills immediately is essential.
Step 4: Connect Bleeding Equipment to the First Wheel
What you need: Correct size wrench for bleeder valve, clear vinyl tubing, clear catch bottle, fresh brake fluid.
Instructions: Starting with the first wheel in your determined sequence, remove the rubber cap from the bleeder valve. Fit the appropriately sized wrench over the bleeder valve first, then firmly push one end of the clear vinyl tubing onto the bleeder nipple. Ensure the tubing fits snugly to prevent air from leaking back in. Place the other end of the tubing into your clear catch bottle, ensuring the tip of the hose is submerged in a small amount of fresh brake fluid. This creates a seal, preventing air from being drawn back into the system when the pedal is released.
Audible Premium Plus — Annual Membership
12 audiobook credits up front, plus the full Audible catalogue.
See Annual PlansPro Tip: Submerging the hose tip in fluid is crucial. Without this, when the pedal is released, the vacuum created in the line can suck air back into the system through the bleeder valve, undoing your hard work.
Step 5: Execute the Two-Person Bleed Technique
What you need: An assistant, clear communication.
Instructions: This is a two-person job for safety and effectiveness. One person will be in the driver’s seat, the other at the wheel.
- The assistant in the driver’s seat slowly pumps the brake pedal 3 to 5 times, building pressure.
- They then hold the pedal down firmly. They must maintain constant pressure on the pedal.
- While the pedal is held down, you (at the wheel) use the wrench to open the bleeder valve about 1/4 to 1/2 turn. You will see old fluid and air bubbles (if present) flow into the catch bottle.
- Before the assistant releases the pedal, you must close the bleeder valve tightly.
- Once the valve is closed, the assistant can release the brake pedal.
- Repeat this “pump, hold, open, close, release” cycle until no more air bubbles are visible in the fluid coming out of the bleeder valve. The fluid should appear clear and free of bubbles.
Pro Tip: Communication is key! Use clear commands like “Pumping,” “Holding,” “Open,” “Closed,” and “Release.” Emphasize that the bleeder valve MUST be closed BEFORE the pedal is released to prevent air from being drawn back into the system.
Step 6: Monitor Fluid Level and Repeat for Remaining Wheels
What you need: Fresh brake fluid.
Instructions: After successfully bleeding the first wheel and before moving to the next, return to the master cylinder reservoir. Check the fluid level and top it up to the “MAX” line using fresh brake fluid. Never allow the fluid level to drop significantly, especially below the “MIN” mark, as this will introduce air into the entire system, requiring you to start from scratch. Once topped off, move to the next wheel in your predetermined sequence (e.g., Passenger Rear to Driver Rear) and repeat Steps 4 and 5 until all wheels have been bled thoroughly and no air bubbles are observed at any bleeder valve.
Pro Tip: Keep a close eye on the fluid’s color. Old, contaminated fluid is often dark brown or black. You want to see clear, new brake fluid flowing out, indicating a complete fluid exchange and successful bleed.
Step 7: Final Checks and Test Drive
What you need: Torque wrench (for wheel lug nuts).
Instructions: Once all four wheels have been bled, ensure every bleeder valve is securely tightened to prevent leaks, but do not overtighten, as this can strip the threads or damage the valve. Replace all rubber bleeder caps. Reinstall the wheels, snug the lug nuts, and then carefully lower the vehicle. Once on the ground, torque the lug nuts to your vehicle manufacturer’s specified setting using a torque wrench. Before driving, pump the brake pedal several times to build up full pressure. The pedal should feel firm and consistent, not spongy or soft. Check the master cylinder fluid level one last time and top it off if necessary. Look for any signs of leaks around the bleeder valves or brake lines.
Pro Tip: Take a very slow, cautious test drive in a safe area, applying the brakes gently at first. Gradually increase pressure to confirm proper braking function. If the pedal still feels spongy, repeat the bleeding process.
✅ Final Checklist
- Brake fluid reservoir filled to the “MAX” line.
- All bleeder valves securely tightened and rubber caps replaced.
- No visible leaks around bleeder valves, calipers, or brake lines.
- Brake pedal feels firm and consistent, with no sponginess or excessive travel.
- All wheel lug nuts torqued to manufacturer’s specifications.
Important Notes:
- Safety is paramount: Always use jack stands, wear eye protection and gloves. Never work under a vehicle supported only by a jack.
- When to seek professional help: If the brake pedal remains spongy after repeated bleeding attempts, if you continuously find air in the system, or if you suspect a master cylinder issue, ABS problem, or a leak you cannot locate, consult a qualified mechanic immediately. Braking systems are critical safety components.
- Estimated time and cost range: For an experienced DIYer, bleeding brakes can take 1-3 hours. For a beginner, it might take 3-5 hours. The cost is primarily for fresh brake fluid (typically $15-$40 per liter/quart), plus potentially a bleeder wrench and clear hose if you don’t already have them, totaling $20-$50.
Essential Tools and Supplies for Brake Bleeding
Before you begin the brake bleeding process, gathering the right tools and supplies is crucial for a smooth and effective job. Using the correct items not only makes the task easier but also helps prevent damage to your brake system components. Having everything laid out and ready will save you time and frustration during the procedure.
Specific Tools for the Job
- Jack and Jack Stands: Essential for safely lifting your vehicle and keeping it secure while you work on the wheels. Never rely solely on a jack.
- Wheel Chocks: To prevent the vehicle from rolling, even when lifted.
- Lug Wrench: For removing and reinstalling your vehicle’s wheels.
- Flare Nut Wrenches (or open-end wrenches): Specifically sized for your bleeder valves. Flare nut wrenches are highly recommended as they grip more of the nut, reducing the risk of rounding off the bleeder valve, which can be a common and frustrating problem.
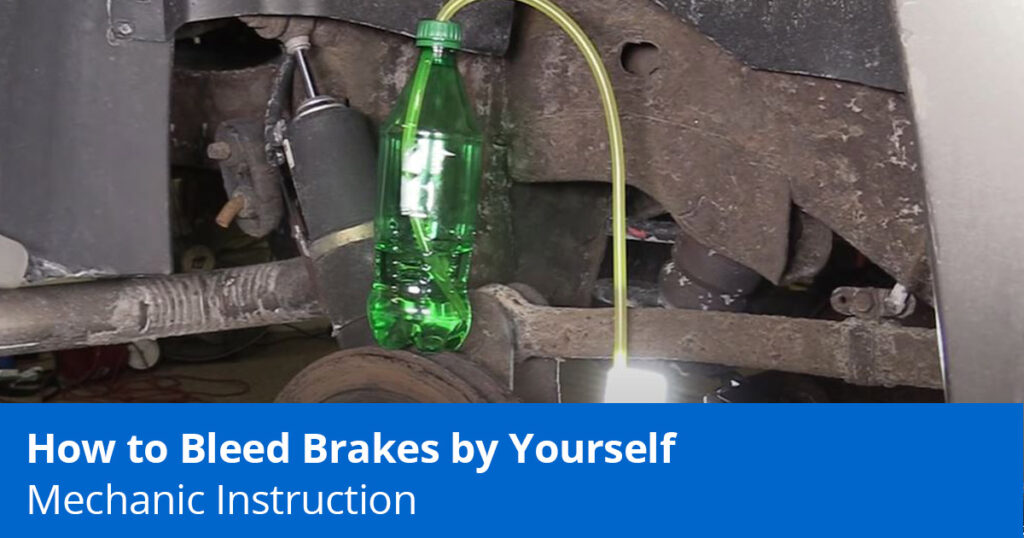
- Clear Tubing/Hose: Approximately 3-4 feet of clear, flexible vinyl or rubber hose that fits snugly over your bleeder valves (typically 1/4″ or 3/16″ inner diameter). This allows you to visually inspect the fluid for air bubbles.
- Collection Bottle/Container: A clean, empty plastic bottle (like a water bottle) to collect the old brake fluid. It’s helpful if it has some fluid in the bottom to submerge the hose end, preventing air from being sucked back in.
Brake Fluid and Collection Gear
- New Brake Fluid: Refer to your vehicle’s owner’s manual or the master cylinder cap for the specific DOT rating required (e.g., DOT 3, DOT 4, DOT 5.1). Using the incorrect fluid type can damage your brake system. Always use fresh, sealed brake fluid; never use fluid from an opened container, as it absorbs moisture over time. You’ll likely need 1-2 quarts for a full bleed.
- Turkey Baster or Syringe: Useful for removing old fluid from the master cylinder reservoir before adding new fluid.
- Rags and Shop Towels: Brake fluid can damage paint, so have plenty on hand for spills.
Critical Safety Precautions
Working on your vehicle’s brake system directly impacts its safety and your own. Therefore, prioritizing safety is paramount. Taking a few moments to set up correctly and protect yourself can prevent accidents and injuries. Never rush through these essential steps.
Protecting Yourself and Your Vehicle
- Eye Protection: Brake fluid is corrosive and can cause serious eye injury. Always wear safety glasses or goggles.
- Gloves: Protect your hands from brake fluid, which can irritate skin.
- Ventilation: Work in a well-ventilated area, especially if you spill fluid.
- Vehicle Stability: Always use proper jack stands on a level, stable surface after lifting your vehicle. Engage the parking brake and use wheel chocks on the wheels that remain on the ground. Give the vehicle a gentle shake to confirm it’s secure before getting underneath or reaching into wheel wells.
- No Smoking/Open Flames: Brake fluid is flammable. Keep all sources of ignition away from your workspace.
Maintaining a Clean Workspace
Brake fluid is notorious for stripping paint and attracting dirt. A clean workspace minimizes contamination of your new brake fluid and protects your vehicle’s finish. Lay down old towels or cardboard under the work areas to catch any drips. Immediately wipe up any spills with clean rags and dispose of them properly. Contaminated brake fluid can compromise braking performance, so ensure your collection bottle and funnel (if used) are spotless. Maintaining cleanliness also helps you spot potential leaks once the job is done.
Recognizing When Your Brakes Need Bleeding
Ever notice your brake pedal feeling less firm, almost like you’re pressing a sponge? This “spongy pedal” is the most common and telling sign that your brake system might have air trapped within its lines, begging for a bleed. Air, unlike incompressible brake fluid, compresses under pressure. This compression directly translates to that disconcerting soft feel underfoot and a noticeable reduction in your vehicle’s stopping power. It’s not merely an inconvenience; it’s a significant safety concern that demands attention.
The Spongy Pedal Syndrome: Your Primary Clue
When you press a brake pedal and it travels further down than usual before engaging the brakes, or consistently feels soft and lacks firm resistance, air is almost certainly the culprit. This often happens after specific repairs, such as replacing a brake caliper, a master cylinder, or even just opening a brake line. If your brake fluid reservoir ever runs critically low, air can easily be introduced. The air pockets in the system act like tiny compressible cushions, absorbing some of your pedal force instead of transmitting it directly to the brake pads. The result? You have to push harder, the pedal feels squishy, and your car takes a longer distance to come to a complete stop.
Other Warning Signs & When to Consider Bleeding
While the spongy pedal is paramount, other subtle indicators might hint at trapped air. You might experience a general reduction in overall braking efficiency, feeling as though your brakes just aren’t as strong as they used to be. Another, less common, sign can be inconsistent brake response across different wheels, or even a slight pull to one side under braking (though this can also stem from other issues). Beyond symptoms, proactive bleeding is a wise preventative measure after:
- Any time a brake line has been opened, disconnected, or replaced.
- Replacing any major brake component like a caliper, master cylinder, or ABS module.
- If your brake fluid reservoir has run completely dry at any point.
- Discovering contaminated or old brake fluid, often as part of a full fluid flush.
Ignoring these signals can significantly compromise your safety and potentially lead to premature wear on other brake components. A healthy brake pedal should always feel firm, consistent, and inspire confidence.
Troubleshooting Common Brake Bleeding Issues
Even seasoned DIYers can hit a snag when bleeding brakes. If you’ve just dedicated time and effort to bleed your system, and the pedal still feels less than firm, don’t despair. This common frustration usually points to a few identifiable culprits that are entirely fixable with a bit of systematic troubleshooting.
Still Spongy After Bleeding? Pinpointing the Problem
A persistent spongy pedal after a bleed session is the most common issue. Here’s what to meticulously check for:
- Incomplete Air Purge: The leading cause. You might not have purged all the air out of one or more calipers, or the bleeding process wasn’t thorough enough. Significant air, especially after major component replacement, often requires patience and perhaps a second, more extensive round of bleeding.
- Air Re-entry: Air can easily sneak back in. This happens if bleeder screws aren’t sealed properly between pedal pumps or vacuum cycles, or if the master cylinder reservoir ran dry. Even a tiny crack or loose fitting can continuously draw air into the system.
- Undetected Fluid Leaks: A hidden leak at a rusty brake line, a worn caliper piston seal, or a compromised banjo bolt will not only reduce fluid but also allow air to enter. Inspect all connections, lines, and calipers meticulously for any signs of weeping fluid.
- Faulty Components: While less common, a failing master cylinder, a caliper with a leaking piston seal, or an ABS module requiring a specific scan tool procedure can be the underlying issue. If manual bleeding fails, consider professional diagnosis.
Preventing Air Re-entry & Ensuring Success
Patience and meticulous attention to detail are your best allies. Always ensure the master cylinder reservoir never drops below the “MIN” line during the entire process; this is paramount. Use only clean, fresh brake fluid of the correct DOT rating, and confirm that your bleeder screws are sealing properly and snugly after each cycle. A proper seal is crucial to prevent air from being sucked back in as the pedal returns. If you suspect an issue with the bleeder screw itself, replacement is simple and inexpensive. Remember, a systematic approach, often starting with the wheel furthest from the master cylinder (consult your vehicle’s service manual), is key to achieving that firm, confidence-inspiring pedal.
Conclusion
Bleeding your brakes is more than just a maintenance task; it’s a critical safety measure that ensures your vehicle responds reliably when you need it most. Understanding the causes of air in your brake lines, recognizing the tell-tale signs like a spongy pedal, and knowing how to troubleshoot common issues are empowering skills for any car owner. It’s about restoring that firm, confident brake pedal feel and, ultimately, your peace of mind on the road.
Don’t let a soft brake pedal linger. Arm yourself with the right knowledge, gather your tools, and always consult your vehicle’s specific service manual for precise procedures. Taking charge of your brake system’s health is a smart move for your safety and your car’s longevity. You’ve got this!
❓ Frequently Asked Questions
What are the signs that my brakes need bleeding?
A common sign is a spongy or soft brake pedal that travels further down than usual before engaging. You might also notice reduced braking performance, requiring more effort to stop, or a need to ‘pump’ the pedal for adequate stopping power.
What is the correct sequence for bleeding brakes on most vehicles?
Generally, you should start with the wheel farthest from the master cylinder and work your way closer. This typically means beginning with the rear passenger, then rear driver, followed by the front passenger, and finally the front driver side wheel.
Can I mix different types of brake fluid?
No, you should never mix different DOT ratings of brake fluid (e.g., DOT3 with DOT4) unless explicitly stated as compatible by the manufacturer. Using the incorrect fluid or mixing types can lead to brake system damage or failure.
Is it necessary to use a special bleeding kit?
While not strictly necessary, a specialized bleeding kit, such as a one-person bleeder, vacuum pump, or pressure bleeder, can significantly simplify the process and ensure a more effective bleed. At minimum, a clear hose and a jar are required.
What safety precautions should I take when bleeding brakes?
Always wear eye protection and gloves, as brake fluid is corrosive to paint and skin. Ensure the vehicle is securely supported on jack stands on a level surface, and work in a well-ventilated area to avoid inhaling fumes.
My brake pedal is still spongy after bleeding; what could be wrong?
A persistent spongy pedal often indicates there’s still air trapped in the system or a leak. Recheck all connections, ensure the master cylinder reservoir never ran dry during the process, and consider repeating the bleed or using a different method like pressure bleeding to ensure all air is expelled.